
Saving Your Work
PowerPoint is typical of most Windows programs in the way it saves and opens files. The entire PowerPoint presentation is saved in a single file, and any graphics, charts, or other elements are incorporated into that single file.
The first time you save a presentation, PowerPoint opens the Save As dialog box, prompting you for a name and location. Thereafter, when you save that presentation, PowerPoint uses the same settings and does not prompt you for them again.
Saving for the first time
If you haven’t previously saved the presentation you are working on, Save and Save As do the same thing: They open the Save As dialog box. From there, you can specify a name, file type, and file location. Follow these steps:
1. | Choose Office Button |
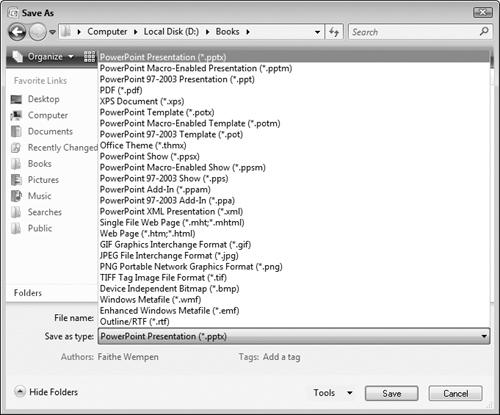
2. | Enter a filename in the File name box. See Figure 21-5. Note In Windows Vista, the Save As dialog box does not show the existing content of the current location by default. To view it, click the Browse Folders arrow in the bottom-left corner of the dialog box. Cross-Ref To save in a different location, see the section “Changing drives and folders.” To save in a different format, see the section “Saving in a different format.” |
3. | Click Save. Your work is saved. |

Filenames can be up to 255 characters. For practical purposes, however, keep the names short. You can include spaces in the filenames and most symbols except <, >, ?, *, /, and . However, if you plan to post the file on a network or the Internet at some point, you should avoid using spaces; use the underscore character instead to simulate a space if needed. There have also been problems reported with files that use exclamation points in their names, so beware of that. Generally it is best to avoid punctuation marks in names.
Tip
If you want to transfer your presentation file to a different computer and show it from there, and that other computer does not have the same fonts as your PC, you should embed the fonts in your presentation so the desired fonts are available on the other PC. To embed fonts from the Save As dialog box, click the Tools button, choose Save Options, and mark the Embed Fonts in the File checkbox. This option makes the saved file larger than normal, so choose it only when necessary. For more information on advanced saving features, see the section “Specifying Save Options.”
Saving Subsequent Times
After you have once saved a presentation, you can resave it with the same settings (same file type, name, and location) in any of the following ways:
Choose Office Button
 Save.
Save.Press Ctrl+S.
Click the Save button on the Quick Access toolbar.
If you need to save your presentation under a different name, as a different file type, or in a different location, use the Save As command instead. This reopens the Save As dialog box, as in the preceding steps, so that you can save differently. The originally saved copy will remain under the original name, type, and location.
Tip
If you frequently use Save As, you may want to place a button for it on the Quick Access Toolbar. To do this, right-click the Save As command and choose Add to Quick Access Toolbar.
Changing drives and folders
By default, all files in PowerPoint (and all of the Office applications) are saved to the Documents folder (or My Documents under Windows XP) for the current user. Each user has his or her own version of this folder, so that each person’s documents are kept separate depending on who is logged in to the PC.
The Documents folder is a convenient save location for beginners, because they never have to worry about changing the drive or folder. However, more advanced users will sometimes want to save files to other locations. These other locations can include floppy disks, other hard disks in the same PC, hard disks on other PCs in a network, hard disks on Web servers on the Internet, or writeable CDs.
Tip
Each user has a Documents or My Documents folder in his or her own profile. The actual location of that folder depends on the Windows version. For example, if Mary is logged in, the path would be C:UsersMaryDocuments. In Windows XP, the path would be C:Documents and SettingsMaryMy Documents. If your usual PowerPoint files seem to be missing at some point, make sure you are logged in under your usual user name.
Throughout all of the Office programs, the dialog boxes that save and open files are different depending on the operating system you are using.
Changing the save location (Windows Vista)
Windows Vista’s Save As dialog box offers several alternatives for navigating between locations. Here’s a summary:
Browse Folders: By default a compact version of the Save As dialog box appears, as in Figure 21-5. To see the full version, as in Figure 21-6, click the Browse Folders arrow.
Figure 21-6. Jump to a desired location using the Favorite Links and/or Folders lists.

Favorite Links list: This area displays shortcuts for popular locations such as Documents and Desktop. Double-click a shortcut here to jump to the desired location. This area does not appear unless Browse Folders is turned on.
Tip
Add your own favorite locations to the Favorite Links list by dragging their icons into the Favorite Links pane.
Folders list: This area displays a folder tree of locations, similar to the folder list in a Windows Explorer window. See Figure 21-6. To display the Folders list if it does not already appear, click the up arrow to the right of Folders (below the Favorite Links list). To hide the Folders list, click the down arrow (which replaces the up arrow).
Tip
Drag the divider line between the Favorite Links and Folders lists to adjust their relative sizes. Drag the vertical divider line between them and the file listing to make the Favorite Links and Folders panes wider or narrower. You can also enlarge the whole Save As dialog box if needed by dragging its border.
Address bar: This area shows the path to the currently displayed location. You can jump directly to any of those levels by clicking the name there. This is similar to the “Up One Level” feature from Windows XP style dialog boxes except you are not limited to going up a single level at a time—you can go directly up to any level. You can also click the right-pointing arrow to the right of any level to see a menu of other folders within that location, and jump to any of them from the menu. See Figure 21-7.
Figure 21-7. Click an arrow on the Address bar to see a menu of locations at the chosen level within the current path.

Changing the save location (Windows XP)
Under Windows XP, the Save In list shows the top-level locations on the system, including each drive, My Documents, and My Network Places. Open the list, as shown in Figure 21-8, and select the location in which you want to start. Then double-click folder icons in the file listing to drill down to the location in which you want to save. To go back up one level, click the Up One Level button. See Figure 21-8.
Figure 21-8. Select a top-level location from the Save In list and then double-click folders to work your way through to the desired location.

Along the left side of the Save As dialog box is the Places Bar. It’s roughly equivalent to the Favorite Links list in Windows Vista. You can click a folder to jump to the desired location to save a file.
Tip
If you consistently want your PowerPoint files saved into a different folder, change the default file location. Choose Office Button ![]() PowerPoint Options and click Save. Then type a new file location in the Default File Location text box. You cannot browse for it; you must know the full path name. Separate the parts of the path with symbols, like this: C:BooksPowerPointPPBible.
PowerPoint Options and click Save. Then type a new file location in the Default File Location text box. You cannot browse for it; you must know the full path name. Separate the parts of the path with symbols, like this: C:BooksPowerPointPPBible.
Saving in a different format
PowerPoint 2007 has a new XML-based file format, like the other Office 2007 applications. XML stands for eXtensible Markup Language; it is a text-based coding system similar to HTML that describes formatting by using inline bracketed codes and style sheets. XML-based data files are smaller than the data files from earlier PowerPoint versions, and they support all of the latest PowerPoint 2007 features. For best results, use this format whenever possible.
There are also several variants of this format for specialty uses. For example, there’s a macro-enable version with a .pptm extension. There are also “show” variants (.ppsx and .ppsm) that open in Slide Show view by default, and template variants (.potx and .potm) that function as templates.
Tip
PowerPoint 2007 does not include macro recording functionality, so why is there a macro-enabled file format? It’s because of Visual Basic for Applications (VBA). From the Developer tab, you can access a VBA editor, which lets you embed VBA code inside a PowerPoint presentation file (provided it is in a macro-enabled format).
However, not everyone has PowerPoint 2007, and only PowerPoint 2007 can open files with these new formats. (You can download a compatibility pack for earlier PowerPoint versions that will allow them to accept the new files, but you can’t assume that everyone who has an earlier version of PowerPoint will download it.) Therefore you might need to save presentations in other file formats in order to share files with other people.
The available formats are shown in Table 21-1. In the Save As dialog box, open the Save as Type drop-down list and select the desired format. See Figure 21-9.
| Presentations | ||
|---|---|---|
| Format | Extension | Usage Notes |
| PowerPoint Presentation | .pptx | The default; use in most cases. Can open only in PowerPoint 2007 (or on an earlier version with a conversion add-on installed). |
| PowerPoint Macro-Enabled Presentation | .pptm | Same as above except it supports the storage of VBA or macro code. |
| PowerPoint 97-2003 Presentation | .ppt | A backward-compatible format for sharing files with users of PowerPoint 97, 2000, 2002 (XP), or 2003. |
| PowerPoint Template | .potx | A 2007-format template file. |
| PowerPoint Macro-Enabled Template | .potm | A 2007-format template file that supports the storage of VBA or macro code. |
| PowerPoint 97-2003 Template | .pot | A backward-compatible template file, also usable with PowerPoint 97, 2000, 2002 (XP), or 2003. |
| PowerPoint Show | .ppsx | Just like a regular PowerPoint file except it opens in Slide Show view by default; useful for distributing presentations to the audience on disk. |
| PowerPoint Macro-Enabled Show | .ppsm | Same as above except it supports the storage of VBA or macro code. |
| PowerPoint 97-2003 Show | .pps | Same as a regular backward-compatible presentation file except it opens in Slide Show view by default. |
| PowerPoint XML Presentation | .xml | A presentation in XML format, suitable for integrating into an XML information storage system. |
| Single File Web Page | .mht, .mhtml | A complete presentation stored in a single file that can be displayed in most modern Web browsers. Suitable for posting on a Web site or sending via e-mail. |
| Web Page | .htm, .html | A typical text HTML file with each graphic element in a separate file. Suitable for posting on a Web site. |
| Graphics/Other | ||
| Format | Extension | Usage Notes |
| Produces files in Adobe PDF format, which is a hybrid of a document and a graphic. It shows each page exactly as it will be printed, and yet allows the user to mark up the pages with comments and to search the document text. Available only after downloading PDF and XPS support from Office Online. You must have a PDF reader such as Adobe Acrobat to view PDF files. | ||
| XPS | .xps | Much the same as PDF except it’s a Microsoft format. Windows Vista comes with an XPS viewer application. |
| Office Theme | .thmx | Somewhat like a template, but it contains only theme settings (fonts, colors, and effects). Use this if you want to apply the colors, fonts, and effects from the current presentation to other presentations but you don’t want to save any of the content or layout. |
| PowerPoint Add-In | .ppam | A file containing executable code (usually VBA) that extends PowerPoint’s capabilities. |
| PowerPoint 97-2003 Add-In | .ppa | Same as above except the add-in is backward-compatible. |
| GIF Graphics Interchange Format | .gif | Static graphic. GIFs are limited to 256 colors. |
| PNG Portable Network Graphics Format | .png | Static graphic. Similar to GIF except without the color depth limitation. Uses lossless compression; takes advantage of the best features of both GIF and JPG. |
| JPEG File Interchange Format | .jpg | Static graphic. JPG files can be very small, making them good for Web use. A lossy format, so picture quality may not be as good as with a lossless format. |
| TIFF Tagged Image File Format | .tif | Static graphic. TIF is a high-quality file format suitable for slides with high-resolution photos. A lossless compression format. |
| Device Independent Bitmap | .bmp | Static graphic. BMP is the native format for Windows graphics, including Windows background wallpaper. |
| Windows Metafile | .wmf | Static graphic. A vector-based format, so it can later be resized without distortion. Not Mac-compatible. |
| Enhanced Windows Metafile | .emf | Enhanced version of WMF; not compatible with 16-bit applications. Also vector-based and non-Mac-compatible. |
| Outline/RTF | .rtf | Text and text formatting only; excludes all non-text elements. Only text in slide placeholders will be converted to the outline. Text in the Notes area is not included. |
Figure 21-9. Choose a different format, if needed, from the Save As Type drop-down list.
Tip
If you consistently want to save in a different format from PowerPoint 2007, choose Office Button ![]() PowerPoint Options and click Save. Then, choose a different format from the Save Files in this Format drop-down list. This makes your choice the default in the Save As Type drop-down list in the Save As dialog box. Not all of the formats are available here; your choices are PowerPoint Presentation (the default), PowerPoint Macro-Enabled Presentation, and PowerPoint 97-2003.
PowerPoint Options and click Save. Then, choose a different format from the Save Files in this Format drop-down list. This makes your choice the default in the Save As Type drop-down list in the Save As dialog box. Not all of the formats are available here; your choices are PowerPoint Presentation (the default), PowerPoint Macro-Enabled Presentation, and PowerPoint 97-2003.
Table 21-1 lists a lot of choices, but don’t let that overwhelm you. You have three main decisions to make:
PowerPoint 2007 format or backward-compatible with PowerPoint 97-2003. Unless compatibility is essential, go with the 2007 format because you get access to all of the new features. (See Table 21-2 to learn what you’ll lose with backward-compatibility.) If you use a backward-compatible format, some of the features described in this book work differently or aren’t available at all.
Table 21-2. PowerPoint 2007 Features Not Supported in Previous PowerPoint Versions Feature Issues SmartArt Graphics Converted to uneditable pictures Charts (except Microsoft Graph charts) Converted to editable OLE objects, but the chart might appear different Custom Slide Layouts Converted to multiple masters Drop Shadows Soft shadows converted to hard shadows Equations Converted to uneditable pictures Heading and body fonts Converted to static formatting New effects: 2-D or 21-D text
Gradient outlines for shapes or text
Strikethrough and double-strikethrough
Gradient, picture, and texture fills on text
Shadows, soft edges, reflections
Most 21-D effects
Converted to uneditable pictures Themes Converted to styles Theme colors Converted to styles Theme effects Converted to styles Theme fonts Converted to regular font usage Macro-enabled or not. Most people will never need to create a macro-enabled presentation. PowerPoint 2007 does not support macro recording, so the only macros you would have would be written in VBA, and most PowerPoint users aren’t fluent in VBA programming.
Regular presentation or PowerPoint Show. The “show” variant starts the presentation in Slide Show view when it is loaded in PowerPoint; that’s the only difference between it and a regular presentation. You can build your presentation in a regular format, and then save in show format right before distribution.
Most of the other choices from Table 21-2 are special-purpose, and not suitable for everyday use. The following sections explain some of those special types.
Saving for use on the Web
To share your presentation on the Web with people who don’t have PowerPoint, you can save in one of the Web Page formats.
You have two choices for Web format: Web Page or Single File Web Page. Web Page creates an HTML document that has links to the slides, and then the slides and their graphics are stored in a separate folder. This would be suitable for posting on a Web site. Single File Web Page creates a single .mht document that contains all of the HTML codes and all of the slides. This would be suitable for e-mailing, for example. (In fact, the “M” in the name format is short for “mail,” because this format was originally designed for e-mail use.) However, with both of these Web formats, you lose some of the special effects, so you might prefer to distribute the presentation in a different way on the Web. If keeping the full effect of all the effects is important, consider saving in one of the PowerPoint Show formats and then make the PowerPoint Viewer utility available for free download from the same Web page.
Saving slides as graphics
If you save your presentation in one of the graphic formats shown in the Graphics/Other section of Table 21-1, the file ceases to be a presentation and becomes a series of unrelated graphic files, one per slide. If you choose one of these formats, you’re asked whether you want to export the current slide only or all slides. If you choose all slides, PowerPoint creates a new folder in the selected folder with the same name as the original presentation file and places the graphics files in it.
Saving slide text only
If you want to export the text of the slides to some other application, consider the Outline/RTF format, which creates an outline similar to what you see in the Outline pane in PowerPoint. This file can then be opened in Word or any other application that supports RTF text files. Only text in placeholders is exported, though, not text in manually inserted text boxes.
Specifying Save Options
The Save Options enable you to fine-tune the saving process for special needs. For example, you can employ Save Options to embed fonts, to change the interval at which PowerPoint saves AutoRecover information, and more.
There are two ways to access the Save options:
Choose Office Button
 PowerPoint Options and click Save.
From the Save As dialog box, click Tools
 Save Options.
The PowerPoint Options dialog box appears, as in Figure 21-10.
Figure 21-10. Set Save Options to match the way you want PowerPoint to save your work.

Then set any of the options desired. They are summarized in Table 21-3. Click OK when you are finished.
| Feature | Purpose |
|---|---|
| Save Files in This Format | Sets the default file format to appear in the Save As dialog box. Your choices are a regular presentation, a macro-enabled presentation, or a 97-2003 backward-compatible presentation. |
| Save AutoRecover info every ___ minutes | PowerPoint saves your work every few minutes so that if the computer has problems and causes PowerPoint to terminate abnormally, you do not lose much work. Lower this number to save more often (for less potential data loss) or raise it to save less often (for less slowdown/delay related to repeated saving). |
| Default file location | Specify the location that you want to start from when saving with the Save As dialog box. By default it is your Documents (or My Documents) folder. |
| Save Checked-Out Files To | Sets the location in which any drafts will be saved that you have checked out of a Web server library such as SharePoint. If you choose The Server Drafts Location on This Computer, then you must specify what that location will be in the Server Drafts Location box. If you choose to save to The Web Server, it’s not an issue because every save goes immediately back to the server. |
| Preserve Fidelity When Sharing This Presentation | This drop-down list enables you to select from among all the open presentation files for the following setting to affect. |
| Embed Fonts in the File | Turn this on if you are saving a presentation for use on a different PC that might not have the fonts installed that the presentation requires. You can choose to embed the characters in use only (which minimizes the file size, but if someone tries to edit the presentation they might not have all of the characters out of the font that they need), or to embed all characters in the font set. Unlike the others, this setting applies only to the current presentation file. |
One of the most important features described in Table 21-3 is AutoRecover, which is turned on by default. This means if a system error or power outage causes PowerPoint to terminate unexpectedly, you do not lose all of the work you have done. The next time you start PowerPoint, it opens the recovered file and asks if you want to save it.
Caution
AutoRecover is not a substitute for saving your work the regular way. It does not save in the same sense that the Save command does; it only saves a backup version as PowerPoint is running. If you quit PowerPoint normally, that backup version is erased. The backup version is available for recovery only if PowerPoint terminates abnormally (because a system lockup or a power outage, for example).