
Setting Global E-Mail Options
A number of Outlook’s options apply globally to all messages and to e-mail in general. You select these options using several dialog boxes that display the options in related groups. This section follows the same organization.
Mail preferences
To view and change e-mail preferences:
1. | Choose Tools |
2. | If necessary, click the Preferences tab. |
3. | At the top of this dialog box, click the E-Mail Options button. Outlook displays the E-Mail Options dialog box (Figure 27-49). Figure 27-49. Setting global e-mail preferences.
|
4. | Set options in this dialog box as explained in the following list. |
5. | Click OK. |
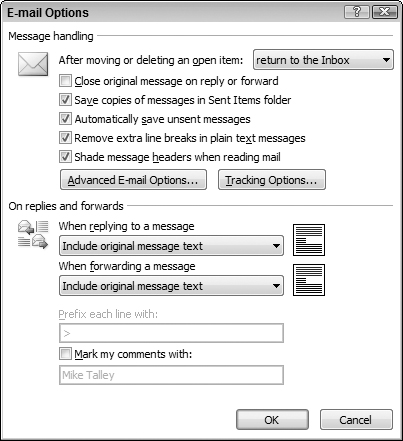
The options in the Message Handling section of the E-Mail Options dialog box are as follows:
Close Original Message on Reply or Forward: When you select Forward or Reply in a message that you received, the original message is closed.
Save Copies of Messages in Sent Items Folder: When you send a message, a copy is saved in the Sent Items folder (recommended!).
Automatically Save Unsent Messages: Messages you have started composing but not sent are saved in the Drafts folder.
Remove Extra Line Breaks in Plain Text Messages: Unneeded line breaks are stripped from plain-text messages.
Shade Message Headers when Reading Mail: When you are reading a message that contains quoted components, Outlook uses subtle shading to mark the quoted section. (This feature does not always work properly, I have found.)
Advanced E-Mail Options: Click this button to view and set advanced e-mail options (explained in the next section).
Tracking Options: Click this button to view and set tracking options (explained in a following section).
The On Replies and Forwards section of this dialog box determines what Outlook does when you reply to a message or forward a message. You set each independently but the options are essentially the same, as follows:
Do Not Include Original Message: Replies are sent without the original message. Not applicable to forwarded messages.
Attach Original Message: Replies and forwards are sent with the original message included as an attachment.
Include Original Message Text: Replies and forwards are sent with the original message included as part of the new message.
Include and Indent Original Message Text: Replies and forwards are sent with the original message included as part of the new message, indented with respect to the other parts of the message.
Prefix Each Line of the Original Message: Replies and forwards are sent with the original message included as part of the new message, with each line of the original message prefixed by what is entered in the Prefix Each Line With field (by default, this is the > sign).
The final option in this dialog box is Mark My Comments With. You use this option when you prefer to reply to or forward messages with your comments included along with the original message text. When this option is selected, your comments are each preceded by your name (or whatever you specify) in brackets.
Advanced e-mail options
When you click the Advanced E-Mail Options button in the E-Mail options dialog box, Outlook displays the dialog box shown in Figure 27-50.
Figure 27-50. Setting advanced e-mail options.
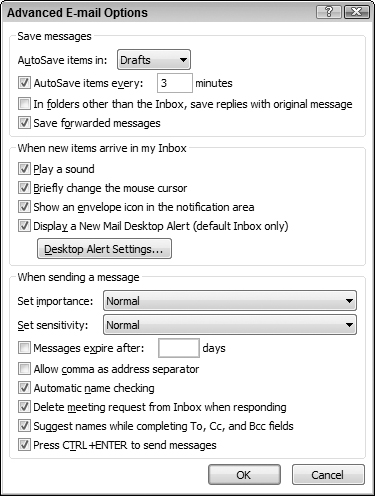
Most of these options are self-explanatory, so I do not go into details with those. The few that may require explanation are the following:
AutoSave Items In: Specifies the folder when Outlook automatically saves items (for example, messages you have started composing but not yet sent).
In Folders Other Than the Inbox: When you reply to a message that is located in any folder other than the Inbox, your reply is saved in that folder rather than in the Sent Items folder. This feature can help to keep related messages together.
Display a New Mail Desktop Alert: When a new message arrives, Outlook displays a small, semitransparent preview of the message in the lower-right corner of your screen. Click the Desktop Alert Settings button to specify the details of how this alert appears.
Set Importance/Sensitivity: Specifies the default importance and sensitivity levels for new messages that you create.
Tracking Options
If you click the Tracking Options button in the E-Mail options dialog box, Outlook displays the dialog box shown in Figure 27-51.
Figure 27-51. Setting e-mail tracking options.

The options in the top portion of this dialog box determine how Outlook handles requests for read and delivery receipts and receipts that have been returned to you, as follows.
Process Requests and Responses on Arrival: When a read or delivery receipt is received, Outlook records the receipt as part of the original item (the sent message).
Process Receipts on Arrival: Receipts are deleted on arrival (after processing).
After Processing, Move Receipts To: Specify a folder for saving processed receipts.
In the middle of this dialog box are options that you can set if you want every message you send to include a request for a delivery, read receipt, or both.
At the bottom of the dialog box, you can specify how Outlook handles requests for receipts that you receive.
Mail Setup
To access the Mail Setup dialog box, choose Tools ![]() Options from the main Outlook window and then click the Mail Setup tab in the Options dialog box. This tab is shown in Figure 27-52.
Options from the main Outlook window and then click the Mail Setup tab in the Options dialog box. This tab is shown in Figure 27-52.
Figure 27-52. The Mail Setup tab in the Options dialog box.

The E-Mail Accounts button lets you access Outlook’s e-mail accounts to add, delete, or modify accounts. Working with e-mail accounts is covered earlier in the chapter.
The Send Immediately When Connected option specifies that a message you create and send is sent immediately rather than put in the Outbox and sent the next time a send/receive operation takes place. If you click the adjacent Send/Receive button, Outlook opens a dialog box in which you can specify how often Outlook performs an automatic send/receive. The default is 30 minutes.
If you click the Data Files button on the Mail Setup tab, Outlook opens a dialog box in which you can change settings related to the data files that Outlook uses to store information (messages, calendar, and so on).
The final group of options on the Mail Setup tab are relevant only if you are using a dial-up (modem) connection to the network. For most users, the default settings are fine and need not be changed.
Mail Format
To access the Mail Format dialog box, choose Tools ![]() Options from the main Outlook menu and then click the Mail Format tab in the Options dialog box. This tab is shown in Figure 27-53.
Options from the main Outlook menu and then click the Mail Format tab in the Options dialog box. This tab is shown in Figure 27-53.
Figure 27-53. The Mail Format tab in the Options dialog box.

The Message Format section of this dialog box has the following elements:
Compose in this Format: Select the default format (HTML, Rich Text, or plain text) for new messages.
Internet Format: Click this button to specify that messages you create in rich-text format (RTF) are converted to HTML or plain text when being sent to Internet mail accounts (which generally cannot read RTF messages).
International Options: Click this button to set language options for new messages.
The HTML Format section has these options:
Reduce the File Size: Make HTML messages as small as possible by removing unneeded formatting information.
Rely on CSS for Font Formatting: Select this option if you want to use Cascading Style Sheets for font formatting.
Save Smart Tags in E-Mail: Smart Tags are sent as part of a message rather than being present only while you are composing the message.
The Stationery and Fonts button and the Signatures button give you access to the tools for creating and modifying these items, specifying the defaults to use with new messages, and so on.
Click the Editor Options button and then click Advanced to display the window that is shown in Figure 27-54. You use this window to set a variety of options that control how the e-mail editor works. Note the list of three categories on the left: Popular, Proofing, and Advanced. Click each one to display a different set of related options.
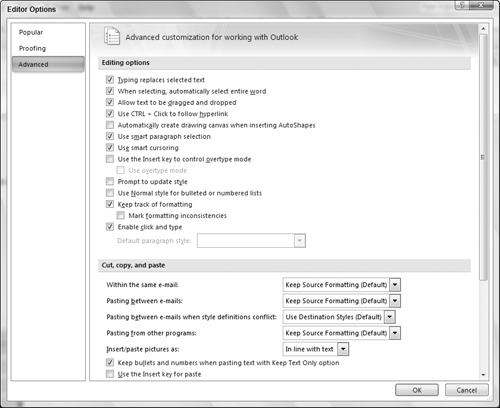
Many people use Outlook without ever making changes to any of these options, but they are available if you want to make the editor better suit your working style. If you have used the Microsoft Word word processing program, you may recognize a good deal of overlap between Outlook’s editor options and the options available in Word. There is a good reason for this overlap—Outlook’s editor is in fact based on Word.