
Organizing, Finding, and Sharing
Just as you can rearrange, change, and view pages in a three-ring binder, your OneNote notes remain flexible so that you can update, change, rearrange, and use them exactly as you need to. You can search for notes or even publish them for use by others. This last section in the chapter explains how you can get the most out of all the content that you pile in to your OneNote notebooks.
Reorganizing
You can tackle any of a number of tasks to reorganize and rearrange information on a page, between sections, and between notebooks. These are the most common actions you will use to keep your notebook information up-to-date:
Rename a section. Right-click the section tab, click Rename, type the new name, and press Enter.
Rename a page. Click in the title box at the top of the page and make the desired changes. The new name appears in the page tab, as well.
Move a note on a page. Click the note, move the mouse pointer over the bar at the top of the note container until the four-headed arrow appears, and then drag. To move an icon, drag it. To move a picture or inserted file printout, place the mouse pointer over the picture or printout and then click the select button that appears; then, drag the picture.
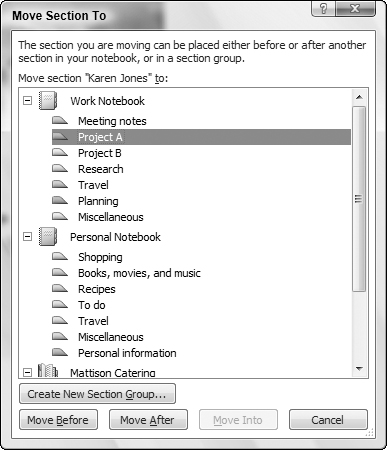
Move a section to another notebook. Right-click the section tab and click Move. In the Move Section To dialog box that appears (Figure 38-14), click the section near where you want to move the selected section and then click the Move Before or Move After button.
Figure 38-14. You can move a section into another notebook.
Move a section within the notebook. Drag the section tag left or right until the black triangle appears in the desired destination and then release the mouse button.
Move or copy a page to another section. Right-click the page tab, point to Move Page To, and then click Another Section. Select the desired section in the Move or Copy Pages dialog box that appears (it resembles the Move Section To dialog box in Figure 38-14), click the section into which you want to move or copy the page, and then click the Move or Copy button.
Move a page within its own section. Drag the page tab until the black triangle appears at the desired destination location and then release the mouse button.
Delete a note or other item from the page. Move the mouse pointer over the item or note container and then click the select button that appears. Press Delete.
Delete a page or section. Right-click the page or section tab and then click Delete.
Viewing tagged notes
Taking the time to tag notes pays off when you need to view key note information later. OneNote can display a Tags Summary task pane (Figure 38-15), which displays the tagged notes from all your open notebooks. To open the Tags Summary task pane, choose View ![]() All Tagged Notes. To change how the task pane lists the notes, open the Group Tags By drop-down list at the top of the task pane and then click the desired grouping: Tag Name, Section, Title, Date, or Note Text. You can even add a new page listing the tagged notes to the current notebook by clicking the Create Summary Page button at the bottom of the task pane. Click the task pane’s Close (X) button when you finish viewing the tagged notes.
All Tagged Notes. To change how the task pane lists the notes, open the Group Tags By drop-down list at the top of the task pane and then click the desired grouping: Tag Name, Section, Title, Date, or Note Text. You can even add a new page listing the tagged notes to the current notebook by clicking the Create Summary Page button at the bottom of the task pane. Click the task pane’s Close (X) button when you finish viewing the tagged notes.
Figure 38-15. Viewing tagged notes can help you find key information stored in your notebooks.

Searching notes
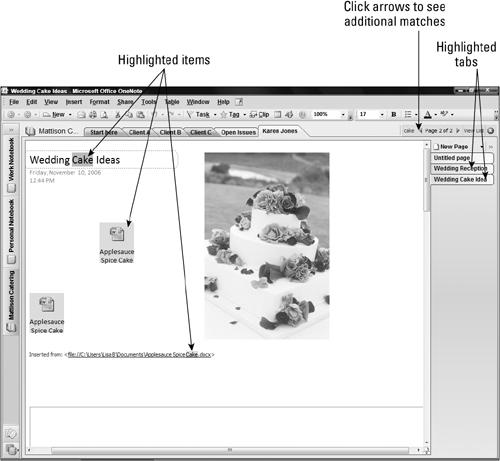
When you want to find a particular note, type a search word or phrase into the Search All Notebooks text box above the page tabs (Figure 38-16), and then press Enter. As shown in Figure 38-17, the search feature highlights every item on the page that holds matching text. The search results also highlight the tab for every page that holds the matching text; click page tabs or the arrows in the search text box area to view additional matches. To close the search, click the red X (Exit Search and Clear Match Highlighting) button at the right end of the search text box area.
Figure 38-16. Search for notes by making an entry in the Search All Notebooks text box.

Figure 38-17. Search highlights all instances of the search text, and highlights the tab for each page holding the search text.
Publishing pages for others
You can publish one or more pages from a notebook to share the information on those pages with others who need the information but don’t necessarily need to have access to your OneNote notebook. Publishing converts the page information to another format and saves it in a file of that format: Single File Web Page (viewable with a Web browser), OneNote Sections or OneNote Single File Package (for OneNote users), Microsoft Office XML Document (for Word 2007 users), and Microsoft Office Word Document (for users of an older Word version).
Use this process to publish pages to a file:
1. | Select the pages to publish using the page tabs. To select a single page, click its tab. To select multiple pages, click the first tab and then Ctrl+click to add other pages or Shift+click to select a range of pages. |
2. | Choose File Figure 38-18. Publishing pages in another format enables other users to view your notes.
|
3. | Type a filename in the File Name text box. Note that if you’re using Windows XP rather than Vista, your Publish dialog box will look a little different. |
4. | Select a file type from the Save As Type drop-down list. |
5. | Click Save. OneNote creates the file, which you can then e-mail or otherwise provide to the desired recipients. The recipient can then double-click the file in Windows to open the file in its associated application. |
Tip
If you also have Microsoft Office Word 2007 installed, you can publish any note as a blog entry. Right-click a note and click Blog This to start the process. If you aren’t already signed up with a blogging provider, you will be prompted to do so.