
Enabling Optional Display Elements
PowerPoint has a lot of optional screen elements that you may (or may not) find useful, depending on what you’re up to at the moment. The following sections describe them.
Ruler
Vertical and horizontal rulers around the slide pane can help you place objects more precisely. To toggle them on or off, mark or clear the Ruler check box on the View tab. Rulers are available only in Normal and Notes Page views.
The rulers help with positioning no matter what content type you are working with, but when you are editing text in a text frame they have an additional purpose as well. The horizontal ruler shows the frame’s paragraph indents and any custom tab stops, and you can drag the indent markers on the ruler just like you can in Word.
Note
The ruler’s unit of measure is controlled from the Regional Settings in the Control Panel in Windows.
Tip
The vertical ruler is optional. To disable it while retaining the horizontal ruler, choose Office Button ![]() PowerPoint Options, click Advanced, and in the Display section, clear the Show Vertical Ruler check box.
PowerPoint Options, click Advanced, and in the Display section, clear the Show Vertical Ruler check box.
Gridlines
Gridlines are non-printing dotted lines at regularly spaced intervals that can help you line up objects on a slide. Figure 20-14 shows gridlines (and the ruler) enabled.

To turn gridlines on or off, use any of these methods:
Press Shift+F9.
On the View tab, in the Show/Hide group, mark or clear the Gridlines check box.
On the Design tab, in the Arrange group, choose Align
 Show Gridlines.
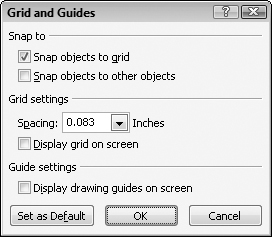
There are many options you can set for the gridlines, including whether objects snap to it, whether the grid is visible, and what the spacing should be between the gridlines. To set grid options, follow these steps:
1. | On the Home tab, in the Drawing group, choose Arrange Figure 20-15. Set grid options and spacing.
|
2. | In the Snap To section, mark or clear these check boxes.
|
3. | In the Grid Settings section, enter the amount of space between gridlines desired. |
4. | Mark or clear the Display Grid On Screen check box to display or hide the grid. (Note that you can make objects snap to the grid without the grid being displayed.) |
5. | Click OK. |
Guides
Guides are like gridlines except they are individual lines, rather than a grid of lines, and you can drag them to different positions on the slide. As you drag a guide, a numeric indicator appears to let you know the ruler position. See Figure 20-16. Use the Grid and Guides dialog box to turn guides on/off, or press Alt+F9.
Figure 20-16. Guides are movable, non-printing lines that help with alignment.

You can create additional sets of guide lines by holding down the Ctrl key while dragging a guide (to copy it). You can have up to eight horizontal and vertical guides, all at positions you specify.
Color/grayscale/pure black and white views
Most of the time you will work with your presentation in color. However, if you plan to print the presentation in black and white or grayscale (for example, on overhead transparencies or black-and-white handouts), you should check to see what it will look like without color.
Tip
This Color/Grayscale/Pure Black and White option is especially useful when you are preparing slides that will eventually be faxed, because a fax is pure black and white in most cases. Something that looks great on a color screen could look like a shapeless blob on a black-and-white fax. It doesn’t hurt to check.
Click the Grayscale or the Pure Black and White button on the View tab to switch to one of those views. When you do so, a Grayscale or Black and White tab becomes available, as shown in Figure 20-17. From its Setting group, you can fine-tune the grayscale or black-and-white preview. Choose one that shows the object to best advantage; PowerPoint will remember that setting when printing or outputting the presentation to a grayscale or black-and-white source.

When you are finished, click the Back to Color View button on the Grayscale tab. Changing the Black and White or Grayscale settings doesn’t affect the colors on the slides; it only affects how the slides will look and print in black and white or grayscale.