
Table Layout and Design
Word 2007’s Table Tools contextual tab of the Ribbon provides you with most of what you need to create tables that are both aesthetically appealing and functional. Naturally, Word can’t do all of the work. It’s up to you to decide on presentation. When you get stuck for ideas, however, sometimes the Ribbon provides just the touch of inspiration, or just the right suggestion or hint to speed you along your way.
Word’s Table Tools tab has Design and Layout tabs. In many ways, although Design comes first in the Ribbon, Layout logically comes first. Layout determines whether or not your presentation is logical, meaningful to the reader, and ultimately whether it helps whatever point you’re trying to make. After all that, design is icing on the cake.
So far, we’ve looked at a number of basic tools that help you achieve the right structure for your tables. In this section, we’re going to look at how to mold tables into shape and then polish them for presentation.
Note
Many of the Ribbon techniques described in this section are also available in the right-click context menu. If you prefer the context menu to the Ribbon, press Ctrl+F1 to dismiss the Ribbon and go for it!
Modifying table layout
Once you have your basic table, what do you do with it? We all know that situations, ideas, and data change. Let’s look at how to cope with change.
Note that all references to the Layout tab in this section actually refer to the Table Tools ![]() Layout tab. We can save ink and trees by saying that up front rather than each and every time the need arises. Note that none of the layout tools provide Live Preview. Live Preview must wait for the Design tab discussion.
Layout tab. We can save ink and trees by saying that up front rather than each and every time the need arises. Note that none of the layout tools provide Live Preview. Live Preview must wait for the Design tab discussion.
Deleting tables and table parts
Sometimes you need to trim your tables by deleting rows or columns. Sometimes you have to delete the entire table. Sometimes this simple act can prove more daunting and challenging than you expect. If you select a table and tap the Delete key, the data inside the table is deleted, but the table shell itself is still there! “Good trick! Now, make it go away!” you exclaim. The same thing sometimes happens when you try to delete a cell, a row, or a column.
Tip
When the Delete key doesn’t do what you want, try the Backspace key instead.
Rather than say this a half dozen times, let’s just say it once. If you want to remove the contents of a cell, row, column, or table, select what you want to remove and tap the Delete key. In what follows, we’ll be looking at table structure, not contents.
Deleting tables
As you’ve seen, you can’t just select a table and tap the Delete key. That would be too logical and easy. Instead, select the table and tap the Backspace key. Goodbye table. Why? Who knows. It works.
Alternately, click anywhere in the table (no need to select anything) and in the Layout tab, choose Delete ![]() Delete Table, as shown in Figure 9-13. Again, the table is gone. If you absolutely positively need to know how to do it using the Delete key, insert a paragraph above or below the table (but outside the table) and include it in the selection. Now when you press Delete, the table departs.
Delete Table, as shown in Figure 9-13. Again, the table is gone. If you absolutely positively need to know how to do it using the Delete key, insert a paragraph above or below the table (but outside the table) and include it in the selection. Now when you press Delete, the table departs.
Figure 9-13. Delete the current cell, column, row, or table using the Layout tab’s Delete tool.

You can also kiss the table goodbye by cutting it to the Clipboard. Select the table and click the Cut tool, or press Ctrl+X (or Shift+Delete). Of course, this clutters the Clipboard, which you might not want cluttered.
Deleting rows, columns, and cells
To delete the current row or column, you have the same options: select the offending rows or columns and press Backspace, or choose Delete ![]() Delete Columns, Delete
Delete Columns, Delete ![]() Rows, or Delete
Rows, or Delete ![]() Cells from the Layout tab’s Delete tool (refer to Figure 9-13).
Cells from the Layout tab’s Delete tool (refer to Figure 9-13).
When deleting cells, Word needs a little more information. You are prompted as shown in Figure 9-14. Make your selection and click OK. Now you know how those rag-eared tables you sometimes see lost their corner cells!
Figure 9-14. Word prompts to find out how to handle the rest of the column or row when you delete a single cell.

Inserting rows, columns, and cells
To insert a row or column into a table, click in the row or column adjacent to where you want to insert, and then click Insert Above, Insert Below, Insert Left, or Insert Right, depending on where you want the new row or column to appear. If you miss, you can always drag the new row or column where you want it.
Tip
To add a new row to the end of an existing table, put the insertion point in the bottom right cell and press the Tab key. To add additional rows, press F4 (Repeat). Or, hold the Tab key until it repeats, and then continue holding until the table has the desired number of new rows. To add a new interior row, click outside the right side of the table above where you want the new row to appear, and press Enter.
To insert multiple rows or columns, you have a couple of options. Select the number of rows or columns you want to insert, and then click the appropriate Insert tool. Word will insert as many rows or columns as you have selected. Alternatively, insert a single row or column, and then press the F4 (Repeat) key for each additional row or column you need.
To insert cells, select the cell(s) adjacent to where you want the new one(s) to appear, and click the Insert Cells launcher in the bottom right corner of the Rows and Columns group in the Layout tab. You’ll see a dialog box with the identical options shown in Figure 9-14. Choose the desired action and click OK.
Controlling how tables break
Sometimes you don’t particularly care how tables break across pages, but sometimes you do. When you have an opinion, select the row or rows in question and click Properties in the Layout tab (or right-click the selection and choose Table Properties from the shortcut menu). In the Row tab under Options, Allow Row to Break Across Pages is enabled by default. Clear this option if you absolutely positively don’t want the selected row(s) to break.
To force a table to break at a particular point, move the insertion point to anywhere in the row where you want the break to occur, and then press Ctrl+Enter. Note that this doesn’t simply force the table to break at that point, it actually breaks the table into two tables. If the Repeat As Header Row At The Top of Each Page setting is enabled, it won’t be inherited by the “new” table. You’ll need to copy the heading row to the new table and reinstate the setting, if needed.
Merge
Sometimes you need to merge columns, rows, or cells. Merging cells is easy. Select the cells you want to merge and click Merge Cells in the Layout tab (refer to Figure 9-13).
Tip
You want it even easier? Use the Table Eraser, in the Table Tools ![]() Design tab. Click the Eraser button, and then click on the table line segment that stands between Romeo and Juliet. Instant marital bliss. Click the Eraser button again, or press the Esc key to turn it off. Jump ahead to the section “The Table Eraser” near the end of this chapter for more exciting details.
Design tab. Click the Eraser button, and then click on the table line segment that stands between Romeo and Juliet. Instant marital bliss. Click the Eraser button again, or press the Esc key to turn it off. Jump ahead to the section “The Table Eraser” near the end of this chapter for more exciting details.
Word can’t really merge rows or columns. Suppose, for example, that your table has three columns, and you need to merge each of the cells in two adjoining rows. What you want to end up with is one new row with three new combined cells. If you select both rows and click Merge Cells, however, Word treats that as a request to merge all of the cells in the selection, and you end up with one big cell. This is illustrated in Figure 9-15. There is no way around this. If you want the middle result, you must merge each set of cells separately (in other words, merge A and F, and then merge B and G). To effect a merge of the columns, while retaining the rows, you would need to merge A and B, and then F and G.
Figure 9-15. Word cannot merge into multiple cells.

Splitting cells, row, and columns
At first, it seemed that one cell, row, or column was fine, but later you decide that the logic of the presentation calls for two (or more) where there once was one. In any divorce, amicable or not, one has to divvy up the jointly held property. Like a few of the shadier attorneys, Word seems to think that everything should go to one party, the other getting nothing.
If we reverse the situation illustrated in Figure 9-15, to make a long story short, we end up with all of the data in the upper row, as shown in Figure 9-16.
Figure 9-16. When you split cells, Word’s distribution logic probably won’t agree with yours.

When you split cells using Word’s default divorce attorney, you’re going to have to manually redistribute the goodies after the split. You get to be the judge!
A better solution to managing and controlling split-ups is to use the Draw Table tool, described later in this chapter. In Table Tools ![]() Design, click on the Draw Table tool to set it in motion. Use the tool to draw a line in a cell between the items you want to separate. The items above the new line go north, and the ones below the line head south.
Design, click on the Draw Table tool to set it in motion. Use the tool to draw a line in a cell between the items you want to separate. The items above the new line go north, and the ones below the line head south.
Horizontal splits are often harder to control. The trick is to make sure that items are horizontally displayed and separated either by at least two spaces or by a tab (press Ctrl+Tab to insert a tab inside a table). It can still be tedious, but it’s a bit more direct than using the dialog box, and you have a bit more control and precision, your honor.
Cell size
When using a table to lay out a form, cell measurements sometimes have to be precise, especially when trying to align a Word document with preprinted forms. When cell height and width need to be controlled precisely, click in the corresponding boxes in the Cell Size group on the Layout tab, shown in Figure 9-17. Note that cell height cannot vary for any cell within any given row.
Figure 9-17. Use the Cell Size group to specify the precise height and width of rows and columns.

When you need rows to all have the identical height, click the Distribute Rows button. If rows are of different heights—as sometimes happens when converting part of an Excel spreadsheet into a Word table—this command determines the optimal height and equalizes the height of all selected rows, or of all rows in the table if no rows are selected.
Similarly, click Distribute Columns to set selected or all columns to the same width. If columns in different rows have different widths, this command will not equalize the whole table. It works only when all the rows have the identical width. If any differ (e.g., if row 2 is 4″ and all of the other rows are 3.5″, giving the table a ragged left and/or right edge), it won’t equalize them all. To remedy this, drag the right border(s) of shorter or longer rows so that they all align on the left and right.
Cell alignment
Cell alignment offers nine options, as shown in Figure 9-18. To set or change cell alignment, click in or select the cells you want to change, and then click the desired tool. As noted elsewhere, many users confuse cell alignment with table alignment. With the whole table selected, this tool will at most set the individual alignment of each cell, and won’t have any effect on table alignment. Instead, select the whole table and use the Paragraph Alignment tool in the Home tab of the Ribbon, or use the Alignment setting in the Table Properties dialog box.
Figure 9-18. Word offers nine options for cell alignment.

Text direction
To control Text direction in table cells, click the Text Direction tool in the Layout tab. This option often makes possible the portrait presentation of tables that otherwise might need to reside in separate landscape document sections.
Cell margins and cell spacing
Word provides several different kinds of controls for cell margins. Cell margin is the distance between cell contents and the imaginary lines that divide cells. Proper margins can keep cells from becoming too crowded. Additional spacing sometimes helps achieve a precise look. It can also prevent data from printing over the borders when using a table to format data for printing on preprinted forms. To set cell margins and cell spacing, click Cell Margins in the Layout tab, shown in Figure 9-18. This displays the Table Options dialog box shown in Figure 9-19.
Figure 9-19. If your table is too crowded, increase the default cell margins.

Despite the text in the dialog box, this does not set the default cell margins or spacing for tables. It sets those only for the currently selected table.
Cell spacing can be used to create the rather cool effect shown in Figure 9-20. This gives the table the appearance of having a distinct box inside each table cell.
Figure 9-20. Cell spacing can give tables a more dramatic appearance.

Tables that span multiple pages
When a table spans multiple pages, Word can automatically repeat one or more heading rows to make the table more manageable. When the need arises, select the target table’s heading rows (you can have multiple heading rows), and click Repeat Heading Rows in the Layout tab. The selected heading rows are then repeated where necessary. The setting can be toggled on or off for each individual table. Because the number of heading rows can vary, this setting cannot be made the default for all tables, nor incorporated into a style definition.
This setting has no observable effect on tables that display or print on a single page. It also has no effect on pages displayed in Web view, because Web pages are seamless and pageless in concept.
Sorting tables
Word provides a flexible and fast way to sort data in tables. As noted in Chapter 6, “Paragraph Formatting,” it can also sort lists that aren’t in tables. To sort a table, click anywhere in the table and click the Sort tool in the Layout tab. Word displays the Sort dialog box, shown in Figure 9-21. If the table has headings at the top of each column, enabling the Header Row setting does two things. First, it provides labels in the Sort By and Then By drop-down lists. Second, it excludes the header row from being included in the sort. Unlike the previous feature, this one allows only a single header row.

To sort, set Sort By to the first field. Setting Type to Text, Number, or Date affects the way data is sorted. For Weight, shown here, sorting by number ensures that the correct sorting order will be used. Choose the desired order, Ascending or Descending. If you have additional sort fields, use Then By to include up to two of them. Click Options for additional settings, including how fields are separated (for non-table sorts) and additionally whether to make the sort case sensitive, and to set the sorting language. Click OK to close Sort Options, and then click OK to do the sort.
Table math
Word can perform some calculations using the Formula tool shown in the Layout tab in Figure 9-18. It is limited, however, and is subject to hard-to-spot errors. If you use Word for math, double-check all calculations using a calculator or Excel. But if you have Excel and you need math in tables, then use Excel, period. You can then link the results to Word. See Chapter 42, “Integration with Other Office Applications,” for additional information on using Excel with Word.
Modifying table design
Word 2007 provides a number of powerful new tools to help you quickly enhance the look and feel of your tables. One of these tools, Table Styles, features Live Preview. In this section, we’ll look only at the features contained in the Table Tools ![]() Design tab, shown in Figure 9-22.
Design tab, shown in Figure 9-22.
Figure 9-22. The Table Tools  Design tab provides access to six preset Table Style Options and a gallery of Table Styles.

Table styles
Word 2007 has a number of preset table styles that you can apply to any table. They provide a wide variety of different kinds of formatting that can be previewed live in your table. You can use these styles to ensure a consistent, professional look to your tables. You can also modify them and save the modified version for later use.
To use a table style, click anywhere in the target table to activate the Table Tools tab. Under Table Tools, click Design. In Table Styles, hover the mouse over different styles and observe the changes to your table. As you move the mouse, ScreenTips display the name of the selected table style (such as Table Colorful 2), as shown in Figure 9-23.
Figure 9-23. As you move the mouse over different table styles, the currently selected table displays a Live Preview of the formatting.

If you see a style you like, click on it to apply it to your table. If it’s not perfect, you can modify it. If you don’t see a style you like, click the More button to the right of the table styles that are showing. Word displays the full Table Style Gallery, showing Custom, Plain, and Built-In table styles, as shown in Figure 9-24.
Figure 9-24. The Table Style Gallery enables you to test-drive dozens of built-in table styles.

To modify the currently displayed table style, click Modify Table Style just below the Table Style Gallery, to display the Modify Style dialog box, shown in Figure 9-25. You can use the Modify Style dialog box to apply style formatting, as described in Chapter 7, “Styles.”
Figure 9-25. If you type a new name, the style will be saved as a custom style in the Table Styles Gallery.

For additional options, right-click a table style in the gallery for the menu shown in Figure 9-26. Note the Set as Default option. This option enables you to set the selected table style as the default for all tables in the current document, or as the default for all future tables in documents based on the current template. This enables you to easily achieve a consistent look for tables you add to your documents.
Figure 9-26. For additional options, right-click any table style in the gallery.

Note
Making this your default table style does not apply the style to existing tables. You would need to do that using the method described above (albeit one table at a time). Note also that the Modify Style dialog box for table styles lacks the Automatically Update option. That denies you the potential utility or the disastrous consequences (take your pick) to which that might lead given the preponderance of documents based on the normal.dot or normal.dotm templates.
Table style options
Word provides access to six options, shown in Figure 9-22, that it can automatically apply to your table. For these to work, the table must have been formatted using one of the Built-In table styles instead of Plain Table, shown in Figure 9-24. Click to check or uncheck to apply those features to your tables. Table style options provided are as follows:
Header Row— Applies special formatting to the entire top row in your table.
First Column— Applies special formatting to the entire first column.
Total Row— Applies special formatting the last row, except for the first cell.
Last Column— Applies special formatting to the last column, except for the top cell.
Banded Rows— Alternates shading in rows to create a horizontal striping effect. This helps the reader focus on specific rows.
Banded Columns— Alternates shading in columns to create vertical strips, focusing the reader on columnar comparisons.
Each of the style options works together with Table Styles. Each Table Style might have any of these attributes enabled. Use the checkboxes to add or remove attributes.
Shading
Shading refers to the background color for tables, which can be applied individually to cells, rows, or columns, or to a complete table. Shading sometimes is used to draw attention to one or more elements of a table.
Shading is a Live Preview attribute. As shown in Chapters 5 and 6, shading is applied by selecting the part of the document you want shaded, and then using the Shading tool, as shown in Figure 9-27. You can use either of the Shading tools in the Ribbon to shade a table, not just the one in the Design tab. The Home tab’s Shading tool also works.
Figure 9-27. If you apply one of the Theme Colors to shade a table, the table shading will change when different themes are applied.

Borders and table drawing
Borders refers to lines that separate a table into cells, rows, and columns. You’ve seen in other chapters that borders are not unique to tables, and can be applied to characters and paragraphs as well. They also can be applied to other Word document elements, such as text boxes, frames, and graphics. Any of the border tools can be used to control borders in tables. None of the border tools offer Live Preview, although the Borders and Shading dialog box does provide a generic preview.
You have two strategies for working with borders. You can use the holistic approach by launching the Borders and Shading dialog box. For a detailed description of how to apply borders using the Borders and Shading dialog box, see the “Borders and boxes” section in Chapter 6.
The second strategy uses an ad hoc approach, by using the Borders, Line Style, Line Weight, Pen Color, Draw Table, and Eraser tools in the Design tab, shown in Figure 9-28. Much, if not all, of what you can do using the Borders and Shading dialog box, you can also do using the Borders tool, in combination with the Draw Borders group in the Design tab. Use whichever method works better for you, and it doesn’t have to be the same method or set of tools each time.
Figure 9-28. Use the Borders tool and its friends to perform ad hoc editing on table borders.

You should experiment with the Borders tools to get a feel for how they work. Even if you generally prefer the dialog box approach, the individual tools are great when you want to touch up or polish the look of a table. Keep in mind that you can use Ctrl+Z to remove the last effect applied, and F4 to reapply the most recent effect to a new selection.
When you use the Borders tool, it applies the current style, weight, and color shown in the Draw Borders group. For example, if you use the Borders tool in the configuration shown in Figure 9-29, the line style will be the triple line shown, 2¼ points, and black (which might be hard to see in a book with grayscale pictures). Therefore, to apply a black, 2¼ point triple line to the outside perimeter of the currently selected table cells, rows, columns, or complete table, choose Borders ![]() Outside Borders, as shown in Figure 9-29.
Outside Borders, as shown in Figure 9-29.
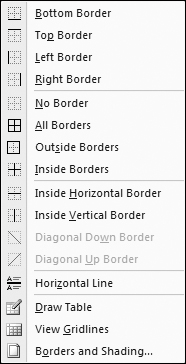
Figure 9-29. Use the Borders tool to apply borders by name, remove borders (No Border), draw a horizontal line, display gridlines, as well as launch the Borders and Shading dialog box.
You can also change existing borders using the Draw Table tool. Like the Borders tool, the Draw Table tool also takes its cue from the currently selected style, weight, and color.
To change a particular border to blue without changing the other border attributes, for example, use the style and weight controls to reset those controls so that they match the current border settings. Use the Pen Color control to choose the shade of blue that you want. Finally, click Draw Table to turn the tool on (it will look pushed-in), and then click each of the borders you want dyed blue. Note that the Draw Table tool affects only one border at a time.
To turn the Draw Table tool off, either click it again (it’s a toggle) or press the Esc key.
Note
Using either the Draw Table tool or the Borders tool, it’s possible to place ugly diagonal lines in table cells. Unfortunately, the effect is purely visible, not functional. You cannot place data above and below those lines. Some folks use these ugly lines to indicate that the cells contain no data. Some might well imagine that emptiness or subtle shading conveys the same information, and somewhat more elegantly and eloquently. It’s all a matter of style and aesthetics. If you want ugly diagonal lines and X’s in your tables (yes, the diagonals can go both ways at the same time), it’s entirely up to you. It’s your table.
Drawing tables from scratch
You can also use the Draw Table tool to draw tables from scratch. In the Insert tab, choose Table ![]() Draw Table. Use the table pen to drag to form an overall outline of the table. Then use the pen to add rows or columns, as shown in Figure 9-30. If necessary, you can use the Layout tools later to touch up any cell, row, or column dimensions that need to be adjusted.
Draw Table. Use the table pen to drag to form an overall outline of the table. Then use the pen to add rows or columns, as shown in Figure 9-30. If necessary, you can use the Layout tools later to touch up any cell, row, or column dimensions that need to be adjusted.
Figure 9-30. Use the Draw Table tool to create tables from scratch, as well as to expand, extend, and modify existing tables.

The Table Eraser
The Table Eraser is a powerful tool, and perhaps misunderstood. The Eraser actually erases parts of tables. It doesn’t merely remove border lines. It actually deletes the table structure it touches. To turn the Table Eraser on, click the Eraser button at the far right end of the Table Tools ![]() Design tab.
Design tab.
No, it won’t leave a hole in the middle of the table where non-table text can leak through (although that would be really cool). What it can do, however, is turn interior cells into a larger interior cell. Or, if you’ve ever wanted to knock a table’s block off, now’s your chance. You can use the Table Eraser to remove corner cells from tables. In some presentations, the top left corner cell serves no purpose, so why tolerate its presence? Erase it!
To dismiss the Eraser, either click the Eraser tool again to toggle it off, or press the Esc key. The Table Eraser also goes away if you click outside a table (i.e., in regular text).