
Adding Records to a Database Table
So far you have only created one table in the MyAccessAutoAuctions database: tblContacts.
Adding records is as simple as selecting the table name in the database container and clicking on its name to bring up the table in Datasheet view. Once opened, you can type in values for each field. Figure 34-21 shows adding records in datasheet mode to the table.

You can enter information into all fields except the Contact ID field (ContactID). AutoNumber fields automatically provide a number for you.
Although you can add records directly into the table through the Datasheet view, it is not the most efficient way. Adding records using forms is better.
Opening a datasheet
To open a datasheet from the Database window, click Tables in the Navigation Pane. Then, double-click the name of the table you want to open, for example, tblProducts.
An alternative method for opening the datasheet is to right-click on the table name and select Open from the pop-up menu.
Tip
If you are in any of the design windows, click on the Datasheet View command in the ribbon’s View group to view your data in a datasheet.
Moving within a datasheet
You easily move within the Datasheet window using the mouse to indicate where you want to change or add to your data—just click a field and record location. In addition, the ribbons, scroll bars, and Navigation buttons make it easy to move among fields and records. Think of a datasheet as a spreadsheet without the row numbers and column letters. Instead, columns have field names, and rows are unique records that have identifiable values in each cell.
Table 34-4 lists the navigational keys that you can use for moving within a datasheet.
| Navigational Direction | Keystrokes |
|---|---|
| Next field | Tab |
| Previous field | Shift+Tab |
| First field of current record | Home |
| Last field of current record | End |
| Next record | Down arrow (↓) |
| Previous record | Up arrow (↑) |
| First field of first record | Ctrl+Home |
| Last field of last record | Ctrl+End |
| Scroll up one page | PgUp |
| Scroll down one page | PgDn |
The Navigation buttons
The Navigation buttons (shown in Figure 34-22) are the six controls located at the bottom of the Datasheet window, which you click to move between records. The two leftmost controls move you to the first record or the previous record in the datasheet. The three rightmost controls position you on the next record, last record, or new record in the datasheet. If you know the record number (the row number of a specific record), you can click the record number box, enter a record number, and press Enter.
Figure 34-22. The Navigation buttons of a datasheet.

Note
If you enter a record number greater than the number of records in the table, an error message appears stating that you can’t go to the specified record.
Entering new data
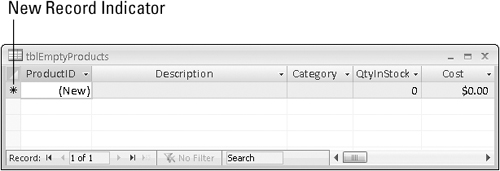
All the records in your table are visible when you first open it in Datasheet View. If you just created your table, the new datasheet doesn’t contain any data. Figure 34-23 shows an empty datasheet. When the datasheet is empty, the first row contains an asterisk (*) in the record selector—indicating it’s a new record.
Figure 34-23. An empty datasheet. Notice that the first record is blank and has an asterisk in the record selector.
The new record appears at the bottom of the datasheet when the datasheet already contains records. Click the New Record command in the ribbon’s Record group, or click the new record navigation button to move the cursor to the new row—or simply click on the last row, which contains the asterisk. The asterisk turns into a pencil when you begin entering data, indicating that the record is being edited. A new row—containing an asterisk—appears below the one you’re entering data into. The new-record pointer always appears in the last row of the datasheet. Figure 34-24 shows adding a new record into tblProducts.

To add a new record to the open Datasheet View of the tblProducts, follow these steps:
1. | Click the New Record button. |
2. | Type in values for all fields of the table, moving between fields by pressing the Enter key or the Tab key. |
When adding or editing records, you may see three different record pointers:
Record being edited
Record is locked (multiuser systems)
New record
Caution
If the record contains an AutoNumber field, Access shows the name (New) in the field. You cannot enter a value in this type of field; rather, simply press the Tab or Enter key to skip this field. Access automatically puts the number in when you begin entering data.
Saving the record
Moving to a different record saves the record you’re editing. Tabbing through all the fields, clicking on the Navigation buttons, clicking Save in the ribbon’s Record group, and closing the table all write the edited record to the database. You’ll know the record is saved when the pencil disappears from the record selector.
To save a record, you must enter valid values into each field. The fields are validated for data type, uniqueness (if indexed for unique values), and any validation rules that you have entered into the Validation Rule property. If your table has a primary key that’s not an AutoNumber field, you’ll have to make sure you enter a unique value in the primary key field to avoid an error message. Using an AutoNumber field as a table’s primary key ensures you won’t get this error message when entering data.
Tip
The Undo button in the Quick Access toolbar reverses changes to the current record and to the last saved record. After you change a second record, you cannot undo the saved record.
Tip
You can save the record to disk without leaving the record by pressing Shift+Enter.
Now you know how to enter, edit, and save data in a new or existing record. Next you learn how Access validates your data as you make entries into the fields.
Understanding automatic data type validation
Access validates certain types of data automatically. Therefore, you don’t have to enter any data-validation rules for these data types when you specify table properties. The data types that Access validates automatically include
Number/Currency
Date/Time
Yes/No
Access validates the data type when you move off the field. When you enter a letter into a Number or Currency field, you don’t initially see a warning not to enter these characters. However, when you tab out of or click on a different field, you get a warning like the one shown in Figure 34-25. This particular warning lets you choose to enter a new value or change the column’s data type to Text. You’ll see this message if you enter other inappropriate characters (symbols, letters, and so on), enter more than one decimal point, or enter a number too large for a certain Number data type.
Figure 34-25. The warning Access displays when entering data that doesn’t match the field’s data type. Access gives you a few choices to correct the problem.

Access validates Date/Time fields for valid date or time values. You’ll see a warning similar to the one shown in Figure 34-34 if you try to enter a date such as 14/45/05, a time such as 37:39:12, or an invalid character in a Date/Time field.
Yes/No fields require that you enter one of these defined values: Yes, True, -1, or a number other than 0 (it displays as a -1) for Yes; or No, False, Off, or 0 for No. Of course, you can define your own acceptable values in the Format property for the field, but generally these are the only acceptable values. If you enter an invalid value, the warning appears with the message to indicate an inappropriate value.
Tip
Display a checkbox in Yes/No fields to prevent users from entering invalid data.