Creating a New Rule
To create a new e-mail rule, select Rules and Alerts from the Tools menu. Outlook displays the Rules and Alerts dialog box, in which you should select the E-Mail Rules tab. If you have any rules already defined, they are listed here. You can work with existing rules as described later in this chapter. To create a new rule, click the New Rule button to display the Rules Wizard, as shown in Figure 28-5.
Figure 28-5. The first step in defining a new rule.
You can see that this dialog box has two parts, Select a Template at the top and Edit the Rule Description at the bottom. The following sections look at these in turn.
Selecting a rule template
The Select a Template portion of this dialog box is divided into three sections, each containing two or more templates:
Stay Organized: Templates that move, delete, or flag messages or other items
Stay Up to Date: Templates for alerting you when messages arrive
Start From a Blank Rule: Templates that are empty and let you define a rule from scratch
The remainder of this section deals with the first two of these categories. Starting from a blank rule is covered separately later in this chapter.
When you click an item in the Select a Template section, the Edit the Rule Description section displays the rule definition along with an example. Editing the definition is covered in the next section.
Editing a rule description
A rule definition contains underlined elements that represent the parts of the rule that you can edit. Figure 28-5, for example, shows a definition with two editable elements: People or Distribution List and Specified. When you click such an underlined element, Outlook opens a dialog box in which you can specify the details. In this example:
Click People or Distribution List to open a dialog box in which you can select the people, distribution lists, or both from your address book. The rule will be applied to messages from the selected people.
Click Specified to select a folder to which matching messages will be moved.
After you have made selections for the editable rule items, the rule displays the selected information. An example is shown in Figure 28-6, in which the rule is defined to move messages from “Andre Tallisk” to the “Clients” folder. Note that these elements of the rule are still underlined and can be clicked to make changes as needed.
Figure 28-6. A completed rule definition displays the details that you have specified.
Finishing the rule
At this point, the rule is ready to use. You can click Finish in the Rules Wizard dialog box to save the rule. In some cases, you may want to fine-tune the rule; if so, click the Next button. Fine-tuning a rule is essentially the same as creating a rule from a blank template, covered in the next section.
Creating a rule from a blank template
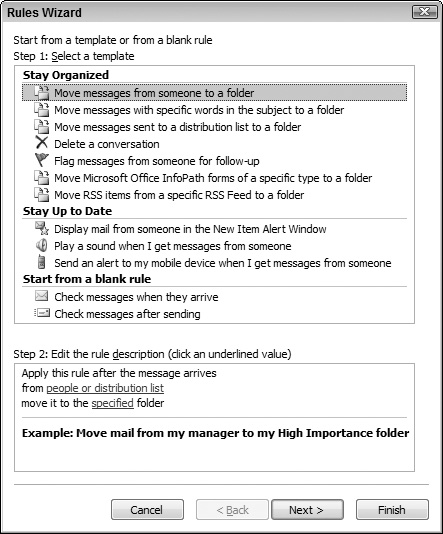
If the rule templates that Outlook provides do not suit your needs, you can create a rule from a blank template. In the first step of the Rules Wizard, shown earlier in Figure 28-5, you must select one of the following from the Start From a Blank Rule section:
Check Messages When They Arrive: Creates a rule that works with messages you receive
Check Messages After Sending: Creates a rule that works with messages you send
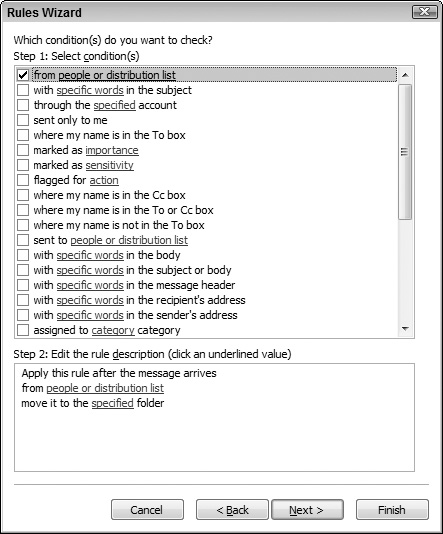
After making your selection, click the Next button. Outlook displays the next wizard step as shown in Figure 28-7. You use this dialog box to specify the conditions for the rule. You can have more than one condition for a rule. When you do, all conditions must be met for a message to be processed. The steps to follow are:
Figure 28-7. Selecting conditions for a rule.

1. | |
2. | |
3. | |
4. | Click the Next button to proceed to the next wizard step, where you will define the rule’s action. This dialog box is shown in Figure 28-8. Figure 28-8. Selecting an action for a rule.
|
5. | Select the action that you want to be part of the rule. |
6. | If necessary, click any underlined element in the action to specify the details. |
7. | Click Next to display the next wizard step, where you specify any exceptions to the rule (Figure 28-9). An exception lets you modify a rule, as in this example: If the message subject contains the word free, delete it unless the sender is in my Contacts list. Exceptions are optional, and they are added the same way as conditions and actions. Figure 28-9. Specifying exceptions for a rule.
|
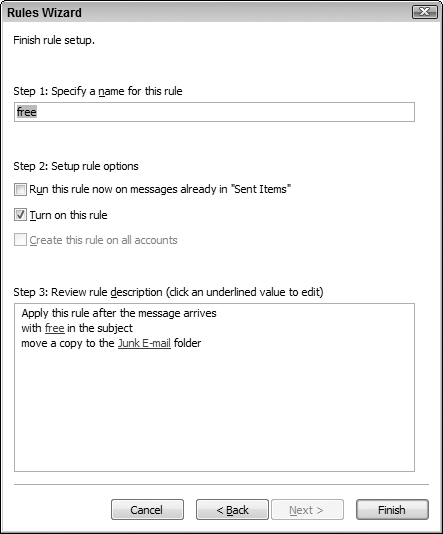
8. | Click Next to go to the final step of the wizard (Figure 28-10). In this dialog box, you specify a name for the rule and have the opportunity to edit the rule by clicking underlined elements in the rule description. You can also set the following options:
Figure 28-10. The final step of the Rules Wizard.
|
9. | Click Finish to complete the rule definition and return to the Rules and Alerts dialog box. |