
Styles Task Pane
Conceptually, the Styles task pane is the replacement for Word 2003’s Styles and Formatting task pane. Shown in Figure 7-11, the Styles task pane provides some of the same functionality, but not all. It also offers some new functionality that Word’s earlier task pane didn’t have.
Figure 7-11. Right-click a style in the Styles task pane for style-specific options.

Note
In Figure 7-11, notice that styles have three kinds of icons next to them: ¶, a, or ¶a.
The ¶ means that it’s a paragraph style only. You cannot apply it to only part of a paragraph, and you can apply it by placing the insertion point anywhere in the target paragraph.
The a icon means that it’s a character/text style. It is applied only to selected text. You can apply it to a single word (assuming that “When selecting, automatically select entire word” is enabled in the Editing Options section of Word Options). You can also apply it to a single character or an entire document.
The ¶a icon means that the style can be used as either a character style or a paragraph style. If nothing is selected or if parts of two or more paragraphs are selected, the style is applied to the entire paragraph(s) touched by the selection. If only part of a single paragraph is selected, the style is applied only to selected text.
Does this mean that Heading styles, which use ¶a, can be applied to something less than a full paragraph? You betcha! This can be exceedingly useful when you want to include headings at the beginning of paragraphs, particularly when you want to save vertical space in the document. This is not a new feature, by the way; you could do it as far back as Word 2000.
The options you get when you right-click or use the drop-down arrow vary according to Word’s Options settings as well as to whether the selected style is a built-in style or a user-created style. In Figure 7-11, the built-in Heading 1 style excludes the Delete option. You cannot delete a built-in style. You can hide it, but you can’t deep-six it.
The Update option at the top of the menu appears even if the option Prompt to Update Styles is not enabled (Office Button ![]() Word Options
Word Options ![]() Advanced
Advanced ![]() Editing Options). If you have that option turned off but need the capability, the Styles task pane provides ad hoc access to it.
Editing Options). If you have that option turned off but need the capability, the Styles task pane provides ad hoc access to it.
Two extremely useful options, one of them new in Word 2007, are Select All # Instance(s) and Remove All # Instance(s). The Remove All option is new and extremely useful when cleaning up a document’s extraneous formatting. Remove does not delete the text in question. Instead, it removes the style wherever it is used and resets the formatting of those occurrences to the default style for the current document. Ordinarily, that would be Normal.
The Select option is equally useful. Typically, to change a given style to a different style, you might consider using Find and Replace. Indeed, that is an option. However, it’s not necessary. Click Select All # Instances, and then click the desired style in the Styles task pane. Or, once the instances are selected, use manual/direct formatting to “sculpt” the text just the way you want it, and then choose New Style at the bottom of the Styles task pane.
Note
In Figure 7-11, why would Select All and Remove All say Not Currently Used when the style is in fact in use? This is an artifact of a Word Options setting. Choose Office Button ![]() Word Options
Word Options ![]() Advanced
Advanced ![]() Editing Options section and click to disable Keep Track of Formatting. Now Select All and Remove All will work. The problem stems from the way in which Word keeps track of formatting, which it does by making tiny incremental changes to the underlying style. The result is that when Keep Track of Formatting is used, Word disallows the Select All and Remove All features.
Editing Options section and click to disable Keep Track of Formatting. Now Select All and Remove All will work. The problem stems from the way in which Word keeps track of formatting, which it does by making tiny incremental changes to the underlying style. The result is that when Keep Track of Formatting is used, Word disallows the Select All and Remove All features.
Remove from Quick Gallery does not remove the style from the document. Instead, it removes the style from the Quick Gallery listing of styles. If the style is not currently in the Quick Style Gallery, the command in the pop-up will be Add to Quick Gallery instead.
Manage styles
Another option available from the Styles task pane is the Manage Styles button. Shown in Figure 7-12, Manage Styles is your master control and grand central station for styles. Use this dialog box to create, modify, and delete styles (the latter, only user-created styles).
Figure 7-12. Manage Styles gives you complete control over styles.

Use the manager also as a launch pad for the Organizer, via the Import/Export button, which enables you to copy styles between different templates and documents, as well as rename and delete styles (again, only user-created styles can be deleted).
Recommended styles
The Recommend tab, shown in Figure 7-13, controls which styles show up on the list of recommended styles. The “recommended” option shows up in each of the style-related task panes and applies to the styles that are displayed in the Quick Style Gallery. For any style, you can choose to Show, Hide Until Used, or Hide. It’s a great way to focus the options when you want to exercise strong control over document formatting. It’s better than a whip!
Figure 7-13. Use the Recommend tab to control what styles show up when you restrict style controls to displaying “recommended” styles.
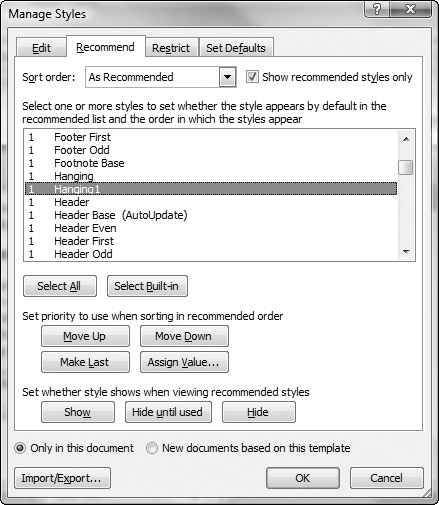
In the recommended list of styles, you can apply your changes one at a time or by using standard Windows selection techniques to select multiple styles. Note the Select All and Select Built-in buttons, too, which enable you to quickly distinguish between Word’s standard styles and user-created styles.
Use the Move Up/Move Down/Make Last/Assign Value tools to determine the recommended order. You can even alphabetize them, if that makes more sense to you!
Restricted styles
You’ve heard of the style police? Well, grab your badge! For even stronger style enforcement, the Restrict tab lets you restrict which styles can be used. This is a good tool when designing templates and forms in which you want extremely tight control over the formatting of content. It’s also useful in setting up training classes for Word, for which you might want to tame the options a bit to prevent the novice user from being overwhelmed.
Additionally, if you want to enforce the use of only styles—and not direct formatting—the restricted styles capability provides a way to do it. Use Limit Formatting to Permitted Styles, shown at the bottom of Figure 7-14, to accomplish this feat. This can be useful when setting up forms and templates for specific tasks in which the resulting document formatting must adhere to strict requirements.
Figure 7-14. The Restrict tab enables you to make direct formatting off-limits.

By restricting formatting only to certain styles, you effectively prevent the use of direct formatting tools. As shown in Figure 7-15, when formatting is restricted to Normal and Heading 1 through Heading 5, most of the Font and Paragraph controls on the Home tab of the Ribbon are dimmed as unavailable.
Figure 7-15. In this scenario, formatting is limited to Normal and Heading 1 through 5, which puts the Font and Paragraph direct formatting controls off-limits.

Note that not only can you limit formatting only to permitted styles, you can block Theme and Quick Style switching. If you want to tame “artistic” tendencies of users whose mission statement doesn’t include using up all of the colored ink or toner, this provides an avenue of attack. Did I mention that this stuff is better than a whip?
Style Inspector
The Style Inspector enables you to quickly determine whether the current formatting is applied wholly through a style, or whether direct formatting is in effect. In Figure 7-16, notice that under the paragraph and text (character) styles there is a box with the word “Plus.” In the lower panel, it says Plus: <none>, which indicates that no direct text/character formatting has been applied. In the upper panel, however, it shows that left alignment has been applied directly, along with a left indent of .38″, and line spacing of 1.5 lines. In the current mystery, it appears that someone mistakenly applied the Heading 3 style to regular body text and then tried to compensate using direct formatting.
