
Manipulating Controls
Creating a form is a multistep process. The next step is to make sure that your controls are properly sized and moved to their correct positions. The Arrange tab of the Ribbon—shown in Figure 35-12—contains commands used to assist you in manipulating controls.
Figure 35-12. The Arrange tab lets you work with moving and sizing controls, as well as manage the overall layout of the form.

Resizing a control
You can resize controls by using any of the smaller handles on the control. The handles in the control corners let you make the field larger or smaller in both width and height—and at the same time. Use the handles in the middle of the control sides to size the control larger or smaller in one direction only. The top and bottom handles change the height of the control; the left and right handles change the control’s width.
When the mouse pointer touches a corner handle of a selected control, the pointer becomes a diagonal double arrow. You can then drag the sizing handle until the control is the desired size. If the mouse pointer touches a side handle in a selected control, the pointer changes to a horizontal or vertical double-headed arrow. Figure 35-13 shows the Description control after being resized. Notice the double-headed arrow in the corner of the Description control.
Figure 35-13. Resizing a control.

Tip
You can resize a control in very small increments by holding the Shift key and pressing the arrow keys. This technique also works with multiple controls selected. Using this technique, a control changes by only 1 pixel at a time (or moves to the nearest grid line if Snap to Grid is selected in the Arrange tab’s Control Layout group).
When you double-click on any of the sizing handles, Access resizes a control to a best fit for the text in the control. This is especially handy if you increase the font size and then notice that the text is cut off either at the bottom or to the right. For label controls, note that this best-fit sizing adjusts the size vertically and horizontally, though text controls are resized only vertically. This is because when Access is in form-design mode, it can’t predict how much of a field to display—the field name and field contents can be radically different. Sometimes, Access doesn’t correctly resize the label.
Sizing controls automatically
The Size group on the Arrange tab on the Ribbon has several commands that help size controls based on the value of the data, the grid, or other controls, while in Design View. Here are the Size commands:
Size To Fit: Adjusts control height and width for the font of the text they contain
Size To Tallest: Makes selected controls the height of the tallest selected control
Size To Shortest: Makes selected controls the height of the shortest selected control
Size To Grid: Moves all sides of selected controls in or out to meet the nearest points on the grid
Size To Widest: Makes selected controls the width of the widest selected control
Size To Narrowest: Makes selected controls the height of the narrowest selected control
Tip
You can access many commands by right-clicking after selecting multiple controls. When you right-click on multiple controls, a shortcut menu displays choices to size and align controls.
Moving a control
After you select a control, you can easily move it, using either one of these methods:
Click on the control and hold the mouse button down; the cursor changes to a four-directional arrow. Drag the mouse to move the control to a new location.
Click once to select the control and move the mouse over any of the highlighted edges; the cursor changes to a four-directional arrow. Drag the mouse to move the control to a new location.
Select the control and use the arrow keys on the keyboard to move the control. Using this technique, a control changes by only 1 pixel at a time (or moves to the nearest grid line if Snap to Grid is selected in the Arrange tab’s Control Layout group).
When an attached label is created automatically with another control, it is called a compound control. If a control has an attached label, the label and control move together; it doesn’t matter whether you click the control or the label.
You can move a control separately from an attached label by pointing to the Move handle of the control and then dragging it. Move the label control separately from the other control by pointing to the Move handle of the label control and dragging it separately.
Figure 35-14 shows a Label control that has been separately moved to the top of the Text Box control. The four-directional arrow cursor indicates that the controls are ready to be moved together. To see this cursor, the control(s) must already be selected.
Figure 35-14. Moving a control.

Press Esc before you release the mouse button to cancel a moving or a resizing operation. After a move or resizing operation is complete, click the Undo button on the Quick Access toolbar to undo the changes, if necessary.
Aligning controls
You may want to move several controls so that they are all aligned (lined up). The Arrange tab’s Control Alignment group has several options described in the following list:
Left: Aligns the left edge of the selected controls with that of the leftmost selected control
Right: Aligns the right edge of the selected controls with that of the rightmost selected control
Top: Aligns the top edge of the selected controls with that of the topmost selected control
Bottom: Aligns the bottom edge of the selected controls with that of the bottommost selected control
To Grid: Aligns the top-left corners of the selected controls to the nearest grid point
You can align any number of selected controls by selecting a command from the Control Alignment group. When you choose one of the commands, Access uses the control that is the closest to the desired selection as the model for the alignment. For example, suppose that you have three controls and you want to left-align them. They are aligned on the basis of the control farthest to the left in the group of the three controls.
Figure 35-15 shows several sets of controls. The first set of controls is not aligned. The Label controls in the second set of controls have been left-aligned. The Text Box controls in the second set have been right-aligned. Each label, along with its attached text box, has been bottom-aligned.
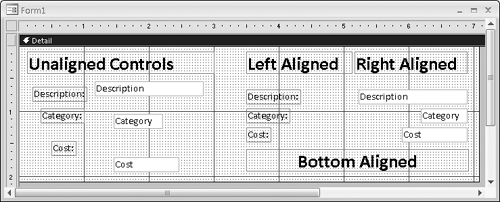
Each type of alignment must be done separately. In this example, you can left-align all the labels or right-align all the text boxes at once. However, you must bottom-align each label and its text control separately (three separate alignments).
The series of dots in the background of Figure 35-15 is the grid. The grid can assist you in aligning controls. Hide or display the grid by selecting the Show Grid command from the Arrange tab’s Show/Hide group. You can also hide or display the ruler using the Ruler command in the Show/Hide group.
Use the Snap to Grid command in the Arrange tab’s Control Layout group to align new controls to the grid as you draw or place them on a form. It also aligns existing controls to the grid when you move or resize them. Snap to Grid is on when it appears selected in the Ribbon.
When Snap to Grid is on and you draw a new control by clicking on the form and dragging to size the control, Access aligns the four corners of the control to points on the grid. When you place a new control by clicking the control in the Field List and then dragging it to the form, only the upper-left corner is aligned.
As you move or resize existing controls, Access 2007 lets you move only from grid point to grid point. When Snap to Grid is off, Access 2007 ignores the grid and lets you place a control anywhere on the form or report.
Tip
You can temporarily turn Snap to Grid off by pressing the Ctrl key before you create a control (or while sizing or moving it). You can change the grid’s fineness (number of dots) from form to form by using the Grid X and Grid Y Form properties. (Higher numbers indicate greater fineness.)
The Arrange tab’s Position group contains commands to adjust the space between multiple controls. These commands change the space between controls on the basis of the space between the first two selected controls. If the controls are across the screen, use horizontal spacing. If they are down the screen, use vertical spacing. These commands are as follows:
Make Horizontal Spacing Equal: Makes the horizontal space between selected controls equal. You must select three or more controls for this command to work.
Increase Horizontal Spacing: Increases the horizontal space between selected controls by one grid unit.
Decrease Horizontal Spacing: Decreases the horizontal space between selected controls by one grid unit.
Make Vertical Spacing Equal: Makes the vertical space between selected controls equal. You must select three or more controls for this command to work.
Increase Vertical Spacing: Increases the vertical space between selected controls by one grid unit.
Decrease Vertical Spacing: Decreases the vertical space between selected controls by one grid unit.
Tip
Aligning controls aligns the control boxes only. If you want to align the text within the controls (also known as justifying the text), you must use the Design tab’s Font group and select the Left, Right, or Center commands.
Modifying the appearance of a control
To modify the appearance of a control, select the control and click on commands that modify that control, such as commands in the Font group or Controls group. To change the text color and font of the Description label, follow these steps:
1. | Click
Description
label on the form. |
2. | In the Design tab’s Font group, change the Font Size to 14, click the Bold command, and change the Font Color to blue. |
3. | Resize the
Description
label so the larger text fits (remember, you can double-click any of the sizing handles to autosize the label). |
Modifying the appearance of multiple controls
To modify the appearance of multiple controls at once, select the controls and click on commands to modify the controls, such as commands in the Font group or Controls group. To change the text color and font of the Description, Category, and Cost labels and text boxes, follow these steps:
1. | Select the three labels and three text boxes by dragging a selection box through them (refer to Figure 35-11). |
2. | In the Design tab’s Font group, change the Font Size to 14, click the Bold command, and change the Font Color to blue. |
3. | Resize the labels and text boxes so the larger text fits (remember, you can double-click any of the sizing handles to autosize the controls). As you click the commands, the controls’ appearances change to reflect the new selections (shown in Figure 35-16). The fonts in each control increase in size, become bold, and turn blue. Any changes you make apply to all selected controls. |

When multiple controls are selected, you can also move the selected controls together. When the cursor changes to the four-directional arrow, click and drag to move the selected controls. You can also change the size of all the controls at once by resizing one of the controls in the selection. All the selected controls increase or decrease by the same number of units.
Grouping controls
If you routinely change properties of multiple controls, you may want to group them together. To group controls together, select the controls by holding down the Shift key and clicking them or dragging the selection box through them. After the desired controls are selected, select the Group command from the Arrange tab’s Control Layout group; the Group button appears to the left of the Snap to Grid button. A box appears around the selected controls, as shown in Figure 35-17, indicating they’re grouped together.

After you’ve grouped the controls together, whenever you click any of the controls inside the group, the entire group is selected. Double-click on a control to select just that one control. After a single control in the group is selected, you can click on any other control to select it.
To resize the entire group, put your mouse on the side you want to resize. After the double arrow appears, click and drag until you reach the desired size. Every control in the group changes in size. To move the entire group, click and drag the group to its new location. With grouped controls, you don’t have to select all the controls every time you change something about them.
To remove a group, select the group by clicking any field inside the group, then select the Ungroup command from the Arrange tab’s Control Layout group.
Deleting a control
You can delete a control by simply selecting it in the form’s Design View and pressing the Delete key on your keyboard. The control and any attached labels will disappear. You can bring them back by immediately selecting Undo from the Quick Access toolbar. You can also select Cut from the Home tab’s Clipboard group or Delete from the Home tab’s Records group.
You can delete more than one control at a time by selecting multiple controls and pressing Delete. You can delete an entire group of controls by selecting the group and pressing Delete. If you have a control with an attached label, you can delete only the label by clicking the label itself and then selecting one of the delete methods. If you select the control, both the control and the label are deleted. To delete only the label of the Description control, follow the next set of steps (this example assumes that you have the Description text box control in your Form Design window):
1. | Select the
Description
label control only. |
2. | Press Delete to remove the label from the form. |
Attaching a label to a control
If you accidentally delete a label from a control, you can reattach it. To create and then reattach a label to a control, follow these steps:
1. | Click the Label button on the Controls group. |
2. | Place the mouse pointer in the Form Design window. The mouse pointer becomes the Text Box button. |
3. | Click and hold down the mouse button where you want the control to begin; drag the mouse to size the control. |
4. | Type Description: and click outside the control. |
5. | Select the
Description
label control. |
6. | Select Cut from the Home tab’s Clipboard group. |
7. | Select the
Description
text box control. |
8. | Select Paste from the Home tab’s Clipboard group to attach the label control to the text box control. |
Another way to attach a label to a control is to click the informational icon next to the label, shown in Figure 35-18. This informational icon lets you know that this label is unassociated with a control. Click the Associate Label with a Control command from the menu, and then select the control you want to associate the label with.

Copying a control
You can create copies of any control by copying it to the Clipboard and then pasting the copies where you want them. If you have a control for which you have entered many properties or specified a certain format, you can copy it and revise only the properties (such as the control name and bound field name) to make it a different control. This capability is useful with a multiple-page form when you want to display the same values on different pages and in different locations, or when copying a control from one form to another.
Changing the control type
In Figure 35-19, the Complete control is a checkbox. Although there are times you may want to use a checkbox to display a Boolean (Yes/No) data type, there are other ways to display the value, such as a toggle button. A toggle button is raised if it’s true and depressed (or at least very unhappy) if it’s false.
Figure 35-19. Become a magician and turn a checkbox into a toggle button.

Use these steps to turn the checkbox into a toggle button:
1. | Select the Complete label control (just the label control, not the checkbox). |
2. | Press the Delete key to delete the label control because it is not needed. |
3. | Right-click the
Complete
checkbox, and choose Change To |
4. | Resize the toggle button and click inside it to get the blinking cursor; then type Complete on the button as its caption (shown on the right of Figure 35-19). |