
Creating a Blank File
When you start the Word application using the Start menu, it by default creates a new, blank document file for you. This document file has the placeholder name Document1 until you save it to assign a more specific name, as described later in the chapter. You can immediately start entering content into this blank document.
If you need another blank document, you can create it at any time by following these steps:
1. | |
2. | Click the Blank Document icon if it isn’t selected by default. |
3. | Click Create. The new, blank document appears. |
Typing text
When you create a new, blank document, you can begin typing text to fill the page. As you type, each character appears to the right of the blinking vertical insertion point. You can use the Backspace and Delete keys to delete text, the Spacebar to enter spaces, and all the other keys that you’re using for typing.
Word also enables you to start a line of text anywhere on the page using the Click and Type feature. (This feature only works in the Print Layout view, so to learn more about that view, see the later section describing Word 2007’s views.) To take advantage of Click and Type, move the mouse pointer over a blank area of the page. If you don’t see formatting symbols below the I-beam mouse pointer, click once. This enables Click and Type and displays its special mouse pointer. Then, you can double-click to position the pointer on the page and type your text. Figure 4-1 shows snippets of text added to a page using Click and Type.

Using word wrap
By default, the margins for a blank document in Word 2007 are 1″ on the left and right, which is a quarter inch less than previous versions of Word. When you type enough text to fill each line, hitting the right margin boundary, Word automatically moves the insertion point to the next line. This automated feature is called word wrap, and it’s a heck of a lot more convenient than having to make a manual carriage return at the end of this line.
If you adjust the margins for the document, word wrap always keeps your text within the new margin boundaries. Similarly, if you apply a right indent, divide the document into columns, or create a table and type in a table cell, word wrap automatically creates a new line of text at every right boundary. Just keep typing until you want or need to start a new paragraph (covered shortly). Later chapters cover changing margins and indents and working with tables.
Inserting versus overtyping
Like its prior versions, Word 2007 offers two modes for entering text: insert mode and overtype mode. In the default mode, insert mode, if you click within existing text and type, Word inserts the added text between the existing characters, moving text to the right of the insertion point farther right to accommodate your additions, and rewrapping the line as needed. In contrast, when you switch to overtype mode, any text you type replaces text to the right of the insertion point.
Overtyping is a fine method of data entry—when it’s the mode that you want. Unfortunately, in previous Word versions, the Insert key on the keyboard toggled between insert and overtype modes by default. Because the Insert key is found above or right next to the Delete key on the keyboard, many a surprised user would accidentally hit the Insert key and then unhappily type right over their text.
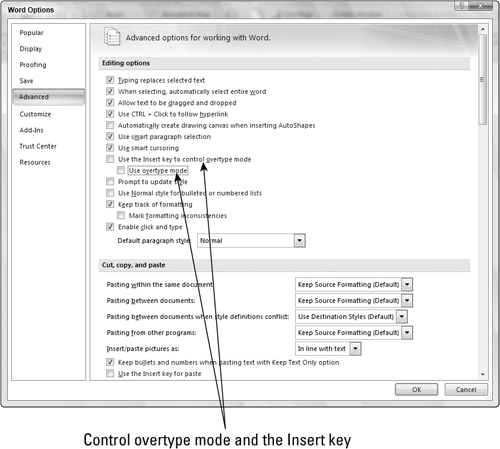
In Word 2007, the Insert key’s control of overtype mode is turned off by default. You can use the Word Options dialog box to turn overtype mode on and off, and also to enable the Insert key’s control of overtype mode. Select Office Button ![]() Word Options, and then click Advanced in the list at the left side of the Word Options dialog box. Use the Use Overtype Mode checkbox (Figure 4-2) to toggle overtype mode on and off, and the Use the Insert Key to Control Overtype Mode checkbox to toggle the Insert key’s control of overtype mode on and off. Click OK to apply your changes.
Word Options, and then click Advanced in the list at the left side of the Word Options dialog box. Use the Use Overtype Mode checkbox (Figure 4-2) to toggle overtype mode on and off, and the Use the Insert Key to Control Overtype Mode checkbox to toggle the Insert key’s control of overtype mode on and off. Click OK to apply your changes.
Figure 4-2. The Word Options dialog box enables you to turn overtype mode on and off.
Using default tabs
Every new, blank document has default tab stops already set up for you. These tabs are set at 1/2 inch (.5″) intervals along the whole width of the document between the margins. To align text to any of these default tab stops, press the Tab key. You can press Tab multiple times if you need to allow more width between the information that you’re using the tab stops to align.
Tip
To display the rulers so that you can better work with text alignment features like tabs in a document, click the View Ruler button that appears at the top of the vertical scroll bar at the right side of the Word window.
Making a new paragraph
In previous versions of Word, when you wanted to create a new paragraph in a blank document, you had to press the Enter key twice. That’s because the default body text style didn’t provide for any extra spacing after a paragraph mark, which is a hidden symbol inserted when you press Enter.
In Word 2007, pressing Enter by default not only inserts the paragraph mark to create a new paragraph, but also inserts extra spacing between paragraphs to separate them visually and eliminate the need to press Enter twice. As shown in Figure 4-3, when you press Enter after a paragraph the insertion point moves down to the beginning of a new paragraph, and Word includes spacing above the new paragraph.
