
Saving and File Formats
What good are any of these tools if the information never leaves the Word window? At the end of the day, the goal is to create letters, reports, brochures, pamphlets, books, web pages, blogs, and other publications that take on some kind of semi-permanent existence. As long as you see “Document1” in Word’s title bar, you run the risk of losing your investment of time and creativity.
Word is like most other Windows programs. When you’re ready to commit your work to disk, just choose Office Button ![]() Save.
Save.
Like most other Windows programs, you also can press Ctrl+S to save the current document. If it is new and hasn’t been named, you’ll see the Save As dialog box shown in Figure 4-6, or something similar. If the document isn’t new, Ctrl+S does an immediate Save using the existing filename. For a new file, navigate to the save location, enter a filename in the File Name text box, and then click Save.

Tip
If you’re working in Windows XP, the Places Bar at the left makes it easy to navigate to a folder for saving. To add a folder to the Places Bar, select the folder in the list of files and folders. Right-click in the Places Bar itself and choose Add [folder name]. Notice the Move Up and Move Down commands. You can reorganize your places by right-clicking a place and choosing the appropriate command. Most of the default places can be shuffled to the bottom if you don’t use them, but they can’t be removed. The Trusted Templates place, however, can’t be moved or removed. Windows Vista does not use the Places Bar in Save As or Open dialog boxes. Instead, you’ll see a Favorite Links list at the left. You can drag links into the Favorite Links list and use the resulting shortcuts much as you use the Places Bar in Windows XP, only more easily and more directly.
Note also the Save as Type drop-down list under File Name. The list of formats you will see varies depending on how much of Office was installed. To have the fullest array of save options, you should do two things.
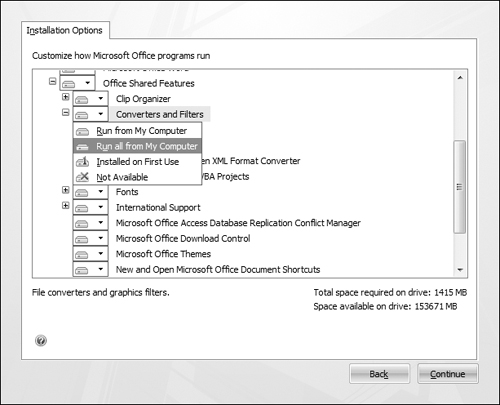
First, in Word or Office setup (start the process for changing program settings in the Add or Remove Programs section in Windows’ Control Panel), navigate to Office 2007’s (or Word 2007’s) Installation Options section, and set Converters and Filters to Run All from My Computer, as shown in Figure 4-7. Click Continue, as needed, to complete the installation. Note that you need do this only if the full set of converters isn’t already installed.
Figure 4-7. To maximize your Save and Open options, install the full set of converters.
The second thing to do is to go to the Microsoft Office Web site and download the converter pack. Installed, this pack adds the fullest range of converters to your Office 2007 setup. Note that the location and name of this free add-on varies. At this writing, however, it is located here:
www.microsoft.com/downloads/details.aspx?FamilyID=cf196df0-70e5-4595-8a98-
370278f40c57&DisplayLang=en
You can also search Microsoft’s Web site for OCONVPCK.EXE.
If, instead of pressing Ctrl+S, you click the Office button, you will see—among other options—Convert, Save (same as having pressed Ctrl+S), Save As, and Publish options. Note that only Save works exactly as it did in Office 2003.
Convert
You will see the Convert option on the Office Button (File) menu only if the current file is from an earlier Word format (e.g., Word 97–Word 2003, also known as compatibility mode), such as when you use an older template from Office Online as the basis for your document. Clicking the Convert menu choice converts the current file into Word 2007 format so that you can then save it.
Warning
Make a copy of the file or save the file under a new name before clicking Convert. The Convert option renames the original file. The first time you convert, Word does alert you to what it’s doing, but if you’re like most users, you won’t read the fine print and you’ll click “Do not ask me again about converting documents.” If you do happen to click that option, in the future there will be no warning; and if you’re like me, you will forget it was ever there the first time.
When you convert, Word converts the document currently displayed to Word 2007 format. At that point, the notation “(Compatibility Mode)” disappears from Word’s title bar, but the displayed name still shows .doc instead of a new Word 2007 document extension. Even so, at this point you can still recover the original file by closing the file without saving the changes. Until you save, the converted file exists only in the current window.
However, if you now save the file, Word immediately renames it using Word’s new extension (.docx for a plain vanilla Word 2007 document file, or .docm for a Word 2007 document file that contains macros). Once converted, the original .doc file is gone forever! After the fact, you can perform a Save As and resave the file in the original format. However, I’m not going to guarantee that it will be byte-for-byte identical to the original.
Word 2007’s confusing Save As
Word 2007’s Save As option is a bit confusing. You really have two choices embedded in that option, even though it might look like you have only one. If you click Save As itself—not the right-pointing triangle—you will get the Save As dialog box shown in Figure 4-6.
When you hover over the right-pointing triangle, however, the two options shown in Figure 4-8 are displayed. Most users at first overlook the first option (clicking on Save As itself) and conclude that the five options shown in Figure 4-8 are the only ones offered. Not only is that not the case, but the options shown actually are redundant. That’s because all of those formats (Word 97–2003, PDF, and XPS) are also available from the Save As dialog box. Why did Microsoft do it this way? It was to highlight the typical user’s most likely Save As choices. Unfortunately, it often confuses the user who thinks that the number of Save As options has been greatly reduced.
Figure 4-8. Save As... and the triangle to the right of it are two distinct options that can be clicked.

Note
The PDF or XPS option appears only if you install the free patch available from Microsoft.
Publish
Word 2007’s other new save-related option contains three options that have been termed publish. Many Internet users ordinarily think of publish in terms of Web sites. Well, that’s really what this is, albeit perhaps different from the way some users think about publishing. Shown in Figure 4-9, these options all result in Word content ending up online. I’m going to talk about the Blog feature here. To learn more about the latter two options, Document Management Server and Create Document Workspace, see Chapter 40, “SharePoint.”
Figure 4-9. Word 2007 has three new Publish options: Blog, Document Management Server, and Create Document Workspace.

Blogging
New in Word 2007 is the Blog feature, which enables you to publish directly from Word to supported blogs. Which blogs are supported? At this time, MSN Spaces, SharePoint 2007, Blogger, and Community Server are supported. You might also have success with some services that support the metaweblog and ATOM APIs.