
Excel
Although sharing work between Word and Excel often works well, differences in how the two programs operate can produce confusing results. You can address this issue by becoming aware of those differences and working to accommodate them. This section looks at Word and Excel and ways to share text, data, tables, and graphics.
Using Excel content in Word
Word offers a variety of different ways to share and exchange content with Excel:
Clipboard: Copy content to the Clipboard and then use Paste or Paste Special to insert the contents into Word or Excel. Commandment: When in doubt, use Paste Special.
Chart: Use Office 2007’s new Chart feature to create a chart inside Word using Excel’s facilities.
Object: Use Insert
 Text
Text  Object
  Object
  Create New or Create from File to embed all or part of an Excel worksheet into a Word document.
File: Use Insert
 Text
Text  Object
  Text from File to insert content from an Excel worksheet into a Word file.
A common method that does not work, however, is drag and drop. You cannot select data or other content in Excel and drag it into Word. The reverse does work, however, as you’ll see shortly.
Clipboard
Excel’s Clipboard works differently from the Clipboard in most other Office programs. Why? Nobody seems to know for certain, although theories abound. If you’re not an Excel veteran, however, it’s likely to bother you. When you select cells in an Excel worksheet, they are highlighted as shown in Figure 42-1. At this point, they are merely highlighted and cannot be moved or otherwise acted upon. You also need to copy (or cut) the selection to the Clipboard, by pressing Ctrl+C, right-clicking, and choosing Copy, etc.
Figure 42-1. To move cells in Excel, it’s not enough to select them; you have to copy them to the Clipboard.

Even after you’ve copied the selection to the Clipboard, the Excel selection needs to remain highlighted as shown (surrounded by a dashed outline). If you press Esc in Excel or double-click elsewhere (or perform dozens of other actions in Excel), the Paste button dies. Even if the data has actually been copied to the Clipboard, you still can’t use the Paste button unless the selection is still active in Excel. More to the point, the Paste Special feature is no longer available, and Paste Special often is the best way to deal with Excel data.
When the selection has been disturbed, and if the Clipboard was set up to automatically collect data, you can use the Clipboard pane itself to paste the selection into Word. However, the Paste Special options aren’t available. The Office Clipboard develops a terrible case of amnesia about Excel’s data unless the selection is still active. Therefore, don’t get distracted in the middle of trying to copy data from Excel to Word.
With the selection active in Excel, click where you want the data to appear in Word, click the Paste button’s drop-down arrow, and choose Paste Special (or press Ctrl+Alt+V). The Paste Special dialog box, shown in Figure 42-2, appears. Notice that the default is HTML format. Why is that the default, rather than Formatted Text (RTF), and does it make any difference?
Figure 42-2. When pasting a selection of cells from Excel into Word, you often have as many as eight options regarding how to paste.

At the end of the day, both HTML and RTF retain both formatting and table structure, but there are differences. They might seem subtle, or they might seem substantial, depending on your needs. Note that nothing special was done in Excel to format the cells. Differences also exist among other options that might seemingly appear similar. Different paste special options are as follows:
Microsoft Office Excel Worksheet Object: Inserts the selection as a complete mini-spreadsheet, complete with Excel facilities.
Formatted Text (RTF): Inserts formatted text as a table, retaining the cell, column, and row formatting in effect in the Excel file. This option often misinterprets cell shading and other colors.
Unformatted Text: Inserts plain text with no attributes.
Picture (Windows Metafile): Inserts an .emf picture file that does not retain the cell divisions in the resulting picture, that is, it’s just a picture of the text (larger than either Bitmap or Enhanced Metafile).
Bitmap: Inserts a .png picture file (smaller than either of the other two picture options; this option retains the cell divisions in the picture).
Picture (Enhanced Metafile): Inserts an .emf picture file that is essentially identical in appearance to the Windows Metafile, but is slightly smaller in size.
HTML Format: Retains text formatting but doesn’t retain all of the table formatting. This feature usually results in a table that is smaller in width than the RTF table. This option inserts cell shading and colors more accurately than RTF.
Unformatted Unicode Text: Usually, this option yields the same result as Unformatted Text. Unicode goes well beyond ASCII and ANSI and provides for many more characters and languages. If you find that linguistic information is being lost when you’re pasting as unformatted text, then switch to unformatted Unicode text.
When you copy graphics from Excel to Word, the rules change a bit and become more familiar. Right-click the graphic and choose Copy. This time, you don’t get the dashed selection because you’re not copying cells—so it’s a bit simpler, and after something has been copied to the Clipboard, the Paste Special options remain available. Switch to Word and you’ll see the options shown in Figure 42-3.
Figure 42-3. When copying pictures from Excel to Word, no special handling is required.

The simplicity stops there, however, because the choice you make can produce wildly varying file sizes. For example, a 40K .jpg file was inserted into an Excel worksheet. It was then copied to the Clipboard so that it could be pasted back into Word to see what difference the different Paste Special options make. The dramatic differences are shown in Table 42-1.
| Paste Special Method | File Extension | Size |
|---|---|---|
| Picture (Windows Metafile) | .emf | 460K |
| Bitmap | .bmp | 331K |
| Picture (Enhanced Metafile) | .emf | 214K |
| Picture (GIF) | .gif | 129K |
| Picture (PNG) | .png | 821K |
| Picture (JPEG) | .jpg | 47K |
| Microsoft Office Graphic Object (Default) | .jpg | 40K |
When using Paste Special, you might want to experiment to see which format gives you the best appearance in your document depending on how it is to be presented (online versus on paper). However, based on file size, Word’s default option, Microsoft Office Graphic Object, is the best choice.
Chart
When you insert a chart using Insert ![]() Illustrations
Illustrations ![]() Chart, assuming that Excel 2007 is installed and available, Word starts Excel, uses a placeholder data set in an Excel worksheet, and creates a chart based on that data. The chart is embedded as an Excel object in Word. Use Excel to replace the data set with the data you want to use. The chart and all information taken from the data set are updated automatically.
Chart, assuming that Excel 2007 is installed and available, Word starts Excel, uses a placeholder data set in an Excel worksheet, and creates a chart based on that data. The chart is embedded as an Excel object in Word. Use Excel to replace the data set with the data you want to use. The chart and all information taken from the data set are updated automatically.
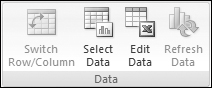
Formatting is performed using the Chart Tools tabs on the Ribbon—Design, Layout, and Format. If you need to change the data, however, you use Excel, but don’t start Excel directly. Instead, click inside the chart, choose the Chart Tools Design tab on the Ribbon, and then click Select Data or Edit Data in the Data section of the Ribbon, as shown in Figure 42-4.
Figure 42-4. You can swap rows and columns without resorting to Excel. To edit the data, however, you need Excel.
When you make changes to the data, the chart itself in Word is updated automatically. If you might need to undo changes, leave Excel open. As long as it remains open, Ctrl+Z will work. If you close Excel, changes to the chart and data set are saved automatically. However, Excel really does close, so Ctrl+Z will no longer undo changes you might have made.
Object
A third way to use Excel data in a Word document is as an object. In Word, choose Insert ![]() Text
Text ![]() Object
Object ![]() Object. To use an existing Excel worksheet, click Create from File. To create a new Excel object, click Create New.
Object. To use an existing Excel worksheet, click Create from File. To create a new Excel object, click Create New.
Create from File
Use the Browse button to navigate to the target file. Choose Link to File or Display as Icon, according to your needs, and click OK.
Note
Typically, you would use Display as Icon when the purpose is to provide access to the contents of the Excel file rather than to display it. For example, suppose you have a number of tax tables that you want to provide to the reader. Some readers need one table, others need another, and so on. A document will be much less cluttered if users can click a link to open the data set of interest in Excel rather than make all readers look through all the data files to find the one they want.
Create New
In the Create New tab of the Object dialog box, select the desired type of Excel object, as shown in Figure 42-5. Choose Display as Icon if desired (click Change Icon if appropriate) and then click OK. Use Excel’s tools to create the desired object and then close Excel. When you close Excel, you will be prompted to save the changes in the Word document. Click Yes to save the changes; click No to keep working on the Excel object; or click No if you don’t mind losing the work you’ve been doing.

Tip
Notice that when working in Excel this way, you can’t get inside the Excel object to save your work. Saving is controlled within the Word process. If you want to have an independent version of the Excel object that is accessible from Excel without using Word, copy the contents of the “objectized” Excel worksheet to the Clipboard, open the full Excel application, paste your work into it, and save it.
To insert the contents of the file, click Insert. To link to the contents, click the drop-down arrow next to Insert and select Insert as Link. Word now issues a confirmation dialog box. If you’re sure the Excel file you’re opening is safe, click Yes.
From spreadsheet to table
When you use one of the methods shown to insert formatted Excel data into Word, a Word table is created automatically. Sometimes, however, you need to insert data into a table that already exists. Typically, two problems can occur. First, sometimes the pasted cells don’t go exactly where you want them to go. Second, no matter what you do, the formatting in the table never ends up exactly as you want.
To handle the first problem, the dimensions (rows and columns) of the source must be identical to the destination, and the destination cells must be selected. For example, if you are pasting a selection of cells that contains five rows and four columns, the destination must also be 5 × 4, and you must select the destination cells. If you try to paste in the top-left cell (which seems logical, right?), Word pastes the entire selection into that cell, so you end up with a table within a table.
There is no perfect way to handle the second problem. Even if you choose the setting Office Button ![]() Word Options
Word Options ![]() Advanced
Advanced ![]() Pasting from other programs to Match Destination Formatting or Keep Text Only, something in the formatting will be messed up—usually the spacing.
Pasting from other programs to Match Destination Formatting or Keep Text Only, something in the formatting will be messed up—usually the spacing.
Your best bet, assuming that you’re using a style, is to choose Paste Special ![]() Unformatted Text and then reapply the style to the pasted cells. Alternatively, if some table cells contain the correct formatting, use the Format Painter to reformat the pasted cells as desired.
Unformatted Text and then reapply the style to the pasted cells. Alternatively, if some table cells contain the correct formatting, use the Format Painter to reformat the pasted cells as desired.
Tip
If you are inserting new cells into an existing table (as opposed to replacing existing material), insert blank rows so that you have empty cells that you can select and into which you can paste the incoming cells.
Using Word content in Excel
Going from Word into Excel isn’t quite as tricky as going from Excel into Word, although some quirks exist to be aware of.
Clipboard
When you paste content from Word into Excel—using the default Paste behavior—different kinds of content are handled differently. To see your options, make your selection in Word and copy or cut it to the Clipboard. In Excel, click the Paste drop-down arrow for the options shown in Figure 42-6.
Figure 42-6. When pasting text, table material, or both from Word into Excel, you can paste as a link, a picture (including text and tables), or a picture link.

Note
When you paste a picture link, if the source text or tables material is updated, then it is automatically updated in Word. If you replace the picture, the picture will not be updated. If the source picture is updated (that is, it is linked and the original picture changes but it keeps the same name and location), the picture will be updated.
When you paste text that includes one or no paragraph marks, it is inserted into the selected cell. If the selection contains multiple paragraphs, it is inserted into consecutive cells in the target column. For example, if the Clipboard contains three paragraphs and you paste into Row 1 Column 1, the three paragraphs are inserted into Row 1 Column 1, Row 2 Column 1, and Row 3 Column 1, respectively.
When you paste all or part of a table into Excel, the cells are inserted into separate cells matching the original selection in Word. Destination cells do not need to be selected. For example, to copy a 5 × 4 table from Word to Excel, select the table and copy or cut it to the Clipboard. Right-click in the upper-left cell of the 5 × 4 area where you want the table to appear and choose Paste. Formatting and cell shading is copied to the destination unless you choose Paste Special ![]() Text (or Unicode Text).
Text (or Unicode Text).
Note
In Excel, when you choose Paste Special, unformatted text is indicated only as Text, without the word unformatted.
When you paste a picture from Word into Excel, it is inserted into Excel’s drawing layer rather than into cells. Note that Excel does not have an In Line with Text option for graphics.
Drag and drop
In contrast to going from Excel to Word, when you go from Word to Excel, drag and drop does work, as long as drag and drop editing is enabled in Word (choose Office Button ![]() Word Options
Word Options ![]() Advanced
Advanced ![]() Editing Options
Editing Options ![]() Allow Text to Be Dragged and Dropped).
Allow Text to Be Dragged and Dropped).
Caution
When you drag from one program to another, the normal default is for text to be copied. When you drag from Word to Excel, the default action is to move the selection. If you really want to move the text, fine. If you instead merely want to copy, then you need to press the Ctrl key when you drop the text. You don’t need to press Ctrl when you begin the drag. However, you do need to press it when you drop. When you press the Ctrl key, notice that the drag icon suddenly gains a + sign, signifying that it will be copied.
Object
You can insert a new or existing Word document into an Excel file as an object. To insert part of an existing Word file as an object, select the portion you want and copy it to the Clipboard. Click where you want it to reside, choose the Paste button’s drop-down arrow, and then choose Paste Special. In the Paste Special dialog box, shown in Figure 42-7, choose Microsoft Office Word Document Object. Select Display as Icon and Paste or Paste Link, as needed, and then click OK. Note that when using the Clipboard approach, you often can’t get the entire document, even if you press Ctrl+A (Select All). That’s because Ctrl+A excludes contents such as headers, footers, and footnotes. To insert the entire file as an object, therefore, you need to use a different approach.
Figure 42-7. Use Paste Special to paste the Clipboard’s contents as a Word object.

To insert the entire file as an object, in Excel, choose Insert ![]() Object. If you’re using Create New or Create from File, proceed as shown earlier in this chapter.
Object. If you’re using Create New or Create from File, proceed as shown earlier in this chapter.