
Working with Fields
There are times when you want to work with the fields you’ve already selected—rearranging their order, inserting a new field, or deleting an existing field. You may even want to add a field to the QBE grid without showing it in the datasheet. Adding a field without showing it enables you to sort on the hidden field, or to use the hidden field as criteria.
Selecting a field in the QBE grid
Before you can move a field’s position, you must first select it. To select it, you will work with the field selector row.
The field selector row is the narrow gray area at the top of each column in the QBE grid at the bottom of the Query Designer. Recall that each column represents a field. To select the Category field, move the mouse pointer until a small selection arrow (in this case, a dark downward arrow) is visible in the selector row and then click the column. Figure 36-11 shows the selection arrow above the Category column just before it is selected.
Figure 36-11. Selecting a column in the QBE grid. The pointer changes to a downward-pointing arrow when you move over the selection row.

Tip
Select multiple contiguous fields by clicking the first field you wish to select and then dragging across the field selector bars of the other fields.
Changing field order
The left-to-right order in which fields appear in the QBE grid determines the order in which they appear in Datasheet view. You may want to move the fields in the QBE grid to achieve a new sequence of fields in the query’s results. With the fields selected, you can move the fields on the QBE design by simply dragging them to a new position.
Left-click on a field’s selector bar, and, while holding down the left mouse button, drag the field into a new position in the QBE grid.
Figure 36-12 shows the Category field highlighted. As you move the selector field to the left, the column separator between the fields ProductID and Description changes (gets wider) to show you where Category will go.
Figure 36-12. Moving the Category field to between ProductID and Description. Notice the QBE field icon below the arrow near the Description column.

Resizing columns in the QBE grid
The QBE grid generally shows five or six fields in the viewable area of your screen. The remaining fields are viewed by moving the horizontal scroll bar at the bottom of the window.
There are times that you may want to shrink some fields to be able to see more columns in the QBE grid. You adjust the column width to make them smaller (or larger) by moving the mouse pointer to the margin between two fields, and dragging the column resizer left or right (see Figure 36-13). An easier way to resize columns in the QBE grid is to double-click on the line dividing two columns in the grid. Access “auto-sizes” the column to fit the data displayed in the column.

Removing a field
Remove a field from the QBE grid by selecting the field (or fields) and pressing the Delete key. You can also right-click on a field’s selector and choose Cut from the shortcut menu.
Inserting a field
Insert new fields in the QBE grid by dragging a field from a Field List above the QBE grid and dropping it onto a column in the QBE grid. The new column is inserted to the left of the column you dropped the field on. Double-clicking a field in a Field List adds the new column at the far right position in the QBE grid.
Providing an alias for the field name
To make the query datasheet easier to read, you can provide aliases for the fields in your query. An alias becomes the field’s heading in the query’s datasheet, but does not affect the field’s name or how the data is stored and used by Access. Aliases are sometimes useful to help users better understand the data returned by a query. Data in queries are often transformed by performing simple operations such as combining a person’s first and last name as a single field. In these situations, aliases are very useful because they provide an easily recognizable reference to the transformed data.
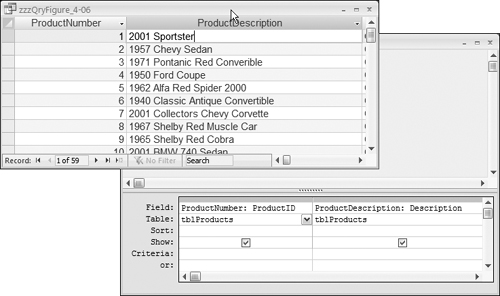
To follow along with this example, create a query using the fields from the tblProducts as shown in Figure 36-12. Follow these steps to establish an alias for the ProductID and Description fields:
1. | Click to the left of the P of the
ProductID
column in the top row of the QBE grid. |
2. | Type Product-Number followed by a colon (:) to the left of
ProductID. |
3. | Click to the left of the D in the Description column and enter Product Description: to the left of the field name. When you run the query, the aliases you created appear as the column headings. Figure 36-14 shows both the query in Design view and the query’s datasheet. Notice that the ProductID and Description column sport their new aliases instead of their respective field names. |
Aliases should be used with caution, however. Because an alias masks the name of the field underlying a datasheet, it’s easy to become confused which column headings are aliases and which are field names. It is a complete waste of time looking for a field named ProductDescription, based on a datasheet column heading. It would be nice if Access somehow distinguished between aliases and field names in Datasheet view, but the only way to know for sure is to examine the query’s design.
Showing a field
While performing queries, you may want to show only some of the fields in the QBE grid. Suppose, for example, you’ve chosen ContactType, FirstName, LastName, Address, City, and State. Then you decide that you want to temporarily look at the same data, without the ContactType and Addressfields. You could start a new query adding all of the fields except Address and ContactType, or you can simply “turn off” the Address and ContactType fields by unchecking the checkbox in the Show row of each of these columns (see Figure 36-15).
Figure 36-15. The Show checkbox is unchecked for the Address and ContactType fields.

By default, every field you add to the QBE grid has its Show checkbox selected.
Another common reason to hide a field in the query is because the field is used for searching or sorting, but its value is not needed in the query. For instance, consider a query involving the invoices from the Access Auto Auctions database. For a number of reasons, the users may want to see the invoices sorted by the order date, even though the actual order date is irrelevant for this particular purpose. Simply include the OrderDate field in the QBE grid, set the sort order for the OrderDate field, and uncheck its Show box. Access sorts the data by the OrderDate field even though the field is not shown in the query’s results.
Caution
If you save a query that has an unused field (its Show box is unchecked and no criteria or sort order is applied to the field), Access eliminates the field from the query. The next time you open the query, the field will not be included in the query’s design.