
Using the Task View
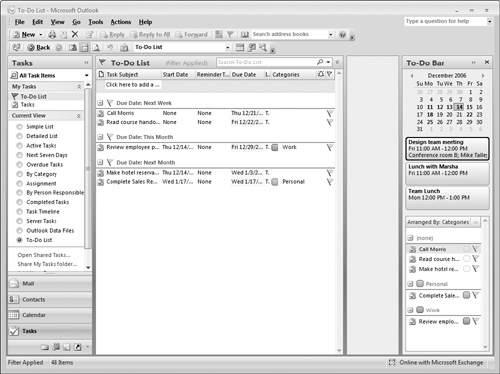
To switch to Task view in Outlook, click the Tasks button in the Navigation pane or choose Tasks from the Go menu. The default Tasks view, shown in Figure 30-22, displays active tasks—those not yet completed. They are arranged by due date initially, although you can change the sort order by clicking the column headings (To-Do Title, Status, and so on) at the top of the list.
Figure 30-22. The default Tasks view displays a list of all your active tasks.

Strictly speaking, the display shown in Figure 30-22 is the To-Do list—that is, uncompleted tasks. If you want to display all tasks, including completed ones, click the Tasks item under My Tasks in the Navigation pane (Figure 30-23). This view shows all tasks, with completed ones displayed and crossed out.

No Due Date?Although most tasks have a due date, it is not required. Tasks that do not have a due date are displayed in their own section, No Due Date, when tasks are organized by due date. |
While you are viewing tasks, you can open a single task by double-clicking it. You can also perform certain actions with the task by right-clicking it and selecting from the context menu. These actions are the following:
Mark a task as complete
Assign the task to someone
Add a follow-up to the task
Assign a category to the task
You learn more about these actions later in the chapter when I show you how to create a new task.
Outlook provides you with several other ways to view your tasks. You can switch to a different view by selecting the desired view in the Navigation pane. The views are as follows:
Simple List: A list of all tasks including completed ones (same as clicking Tasks, as described earlier).
Detailed List: Similar to Simple List but with more details about each task.
Active Tasks: Tasks not marked as completed.
Next Seven Days: Tasks due within the next seven days.
Overdue Tasks: Tasks whose due date has passed but are not marked as completed.
By Category: All tasks organized by assigned category.
Assignment: Tasks organized by the person they are assigned to.
By Person Responsible: Tasks organized by owner (the person who created the task).
Completed Tasks: Tasks that have been marked as completed.
Task Timeline: Displays tasks arranged on a timeline according to due date.
Server Tasks: Lists tasks and whom each task has been assigned to.
Outlook Data Files: Displays tasks organized by the Outlook data file they are in. This is relevant only if you have more than one Personal Folders File.
To-Do List: Displays active tasks in a simplified, easy-to-use format. See the upcoming “To-Do List view” section for more details.
Task Timeline view
Task Timeline view arranges tasks on a timeline according to their due date, as shown in Figure 30-24. This visual representation can be useful for finding time periods when many tasks are due, or for locating relatively free periods on your schedule.

What about Start Dates?Atask can have a start date assigned to it as well as a due date. A start date can be useful when you have a reason that you cannot start a task before that date. When displayed in Timeline view, a task with a start date is displayed at the start date with a line extending to the due date. |
In Figure 30-24, the Task Timeline view is displaying a week, with the days listed across the top of the display. You can switch between Day, Week, and Month views by clicking the corresponding button on the toolbar. You can also quickly scroll to today by clicking the Today button. To scroll forward and backward in time, use the horizontal scrollbar at the bottom of the window.
To-Do List view
The To-Do List view displays a simplified list of active tasks. It is not the same thing as the To-Do bar, which is explained later in the chapter. The To-Do list is shown in Figure 30-25. In the figure, the tasks are arranged by due date, as indicated by the heading at the top of the list. Click this heading to arrange the tasks by other fields, such as Category or Importance.
At the top of the To-Do list is a box labeled Type a New Task. You can click here and type a new task title. When you press Enter, the task is automatically created with a due date of today and default settings for other task data such as importance. Double-click the newly created task to change the due date or any other aspects of the task.