
Reading and Replying to Messages
When Outlook receives an e-mail message, it places it in your Inbox folder, as shown in Figure 27-19. By default, messages are sorted by the time and date they were received. You can see that the sender, the subject, the time and date received, and the message size are displayed. Please also note the following:
A message that you have not yet read is displayed in bold type with a closed envelope icon; see, for example, the top message in the figure. A message that has been read is displayed in normal type with an open envelope icon; see the bottom message in the figure.
If the message includes one or more attachments, a paper clip icon is displayed.

Reading a message
To read a message, double-click it in the Inbox. The message opens in its own window, as shown in Figure 27-20.

While you have an e-mail message open, you can carry out the following actions:
Print the message by clicking the Print button on the Quick Access toolbar.
Close the message and delete it by clicking the Delete button on the ribbon. Outlook moves the message to the Deleted Items folder.
Close the message without deleting it by clicking the X icon at the right end of the title bar.
Other actions that you can take with an e-mail message are covered later in this chapter.
You can also move the message from the Inbox to another folder. Doing so is useful when you want to organize received e-mail messages. You learn more about working with Outlook folders later in the chapter. The basic steps for moving an open message are the following:
1. | Click the Move to Folder button on the Message tab of the Ribbon. |
2. | Select Other Folder from the menu. Outlook displays the Move Item to dialog box, as shown in Figure 27-21. Figure 27-21. Moving an e-mail message to another folder.
|
3. | Click the destination folder. Or, to create a new folder, click the New button. Details on creating a new folder are presented later in the chapter. |
4. | Click OK. The message is closed and moved to the specified folder. |

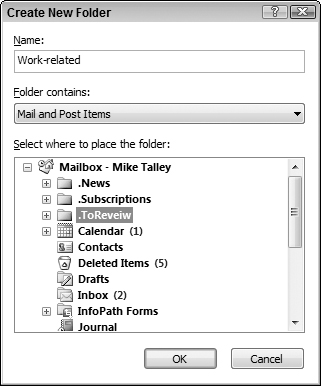
When you are moving an e-mail message to another folder, you are given the opportunity to create a new folder. When you click the New button in the Move Item to dialog box, Outlook opens the Create New Folder dialog box, shown in Figure 27-22. Then, follow these steps:
1. | Enter the name for the new folder in the Name box. |
2. | Make sure that Mail and Post Items is selected in the Folder Contains list. |
3. | Click the location for the new folder in the list. The new folder is created as a subfolder to the item you select here. |
4. | Click OK to close the dialog box and return to the Move Item to dialog box. The new folder is selected in the list. |
5. | Click OK to complete moving the mail message. |
Figure 27-22. Creating a new folder to move an e-mail message to.
Marking messages as read or unread
Messages that have not been read are displayed in bold font and with a closed envelope icon. When you open a message, it is marked as read and displayed in normal font with an open envelope icon. You can control how a message is flagged. Perhaps you open a message and then are called away; you might want to mark it as unread so that you will be sure to look at it again later.
If the message is open, simply click the Mark as Unread button on the Message tab of the Ribbon. If no message is open, you can select a message in the Inbox (or whatever mail folder you are in) and then:
Choose Edit
 Mark as Read to mark the message as read.
Choose Edit
 Mark as Unread to mark the message as unread.
Choose Edit
 Mark All as Read to mark all messages in the folder as read.
Using the Reading Pane
Outlook’s Reading Pane lets you view the contents of a message without opening it. When the Reading Pane is displayed, it shows the contents of whatever message is selected in the Inbox (or whatever other mail folder you are working in). This is shown in Figure 27-23.

The Reading Pane can be displayed at the bottom of the screen or along the right edge. To control the display of the Reading Pane, choose View ![]() Reading Pane and then select Right, Bottom, or Off.
Reading Pane and then select Right, Bottom, or Off.
Normally, viewing a message in the Reading Pane does not mark it as read; this requires opening the message. However, you can tell Outlook to mark messages as read when they are viewed in the reading pane as follows:
1. | Choose Tools |
2. | Click the Other tab. |
3. | Click the Reading Pane button to open the Reading Pane dialog box. |
4. | Select the box next to the Mark Items as Read When Viewed in Reading Pane option. |
5. | Click OK twice to close all dialog boxes. |
Other actions for received messages
When you are viewing a message that you have received, you can take several other actions besides those already described with the message. Each of these actions corresponds to a button on the Message ribbon:
Create Rule: Lets you create a rule for handling similar messages. Rules are covered in Chapter 28.
Block Sender: Adds the message sender to your Blocked Senders list and moves the message to the junk e-mail folder. You find more details on dealing with junk e-mail in Chapter 28.
Safe Lists: Adds the sender or the sender’s domain to your safe list. See Chapter 28 for more details.
Categorize: Assign the message to an Outlook category.
Follow Up: Flag the message for follow-up or create a reminder associated with the message.
Related: Find other messages from the same sender or that are related by subject or content.
Replying to and forwarding messages
Replying to and forwarding messages are two very useful things you can do with e-mail using Outlook. When a mail message is open, you have three buttons in the Respond group of the Message tab of the Ribbon:
Reply: Creates a new message addressed to the person who sent you the original message. The new message contains the entire original message, and the subject of the new message is “Re:” followed by the subject of the original message.
Reply to All: Same as Reply except the new message is also addressed to any other people the original message was sent to.
Forward: Creates a new, unaddressed message. The new message quotes the entire original message and the subject is “FW:” followed by the subject of the original message.
At this point, the new message is ready for editing. You can add your own text to the body of the message, add or remove recipients (you must add at least one recipient when forwarding), add attachments, and so on. When you’re finished, click Send.
Another message forwarding option is to select Forward As Attachment from the Actions menu. A new e-mail message is created with the original message attached as a separate file rather than being inserted into the body of the new message.
Working with received attachments
Outlook lets you save attachments to disk and also lets you view attachments without opening them in their native application. The viewing option is available for many attachment types including most image files, Word documents, and Excel workbooks.
Saving attachments
When a received message includes one or more attachments, it will have a small, paper clip icon displayed in the Inbox. There are two ways to save attachments. The first method lets you save attachments without opening the message:
1. | Select the message in the Inbox (or whatever mail folder you are working in). |
2. | Choose File |
3. | |
4. | Navigate to the folder where you want the attachment saved. |
5. | Edit the attachment filename, if desired. Warning: Do not change the extension! |
6. | Click Save. |
Repeat these steps, if necessary, for other attachments.
If the message has more than one attachment, the menu that Outlook displays in the preceding Step 3 also has a Save All Attachments command. Selecting this command opens the Save All Attachments dialog box, as shown in Figure 27-24. Note that all attachments are listed and selected. Then:
1. | If you want to save just some of the attachments, select them by clicking and Ctrl+clicking (to select more than one individual attachment) or Shift+clicking (to select a group of adjacent attachments). |
2. | Click OK. Outlook displays the Save All Attachments dialog box. |
3. | Select the folder to save the attachments in. You cannot edit attachment names; they are saved under their original names. |
4. | Click OK. |
Figure 27-24. Saving all message attachments simultaneously.

You can use the other way to save attachments when the message is open or displayed in the reading pane:
1. | In the message header, right-click an attachment name. |
2. | Choose Save As from the shortcut menu. |
3. | In the next dialog box, select a folder for the attachment and the attachment name, if desired. |
4. | Click Save. |
Viewing attachments
When a message that you receive includes one or more attachments, they are listed below the message head (both in the reading pane and when the message is open). You also see a Message button next to the attachment names. You can take the following actions:
Click an attachment name to view the attachment.
Click the Message button to return to the message.
Figure 27-25 shows these elements along with an attachment that is being viewed.

Opening attachments
You usually open an attachment in its native application by saving the attachment to disk, as described previously, and then starting the application and opening the file as usual. You can, however, open an attachment directly from Outlook by following these steps:
1. | Open the message or display it in the Reading Pane. |
2. | Right-click the attachment name. |
3. |
The reason for the cautionary dialog box in Step 3 is security. Some kinds of files, such as Word documents and Excel workbooks, have the potential to contain malicious macro code that can harm your system. This code is harmless unless the file is opened, so you may want to save it to disk first and run a virus scan before opening it.
If you do open an attachment this way, you can work with it in the application as you normally would, including saving to disk.
Native ApplicationsAnative, or default, application is an application that is registered on your system for working with a particular kind of file. For some kinds of files, only one application can be “native,” such as Microsoft Word for Word files and Excel for Excel files. For other kinds of files, such as image files, there are many possibilities and it will depend on what’s installed on your system. For example, on my system, PhotoShop is registered as the native application for most image files, but on your system it might be Paint Shop Pro or Corel Draw. |