
Ribbons and Things
At the heart of Office 2007’s results-oriented interface is the Ribbon. The Ribbon is the area above the document workspace, as shown in the example from Word 2007 (Figure 2-4). Technically, I suppose, the Ribbon is just the area below the tabs for Home, Insert, and so on. Clicking a tab with Home, Insert, Page Layout, and so on controls which Ribbon tab is displayed.
Figure 2-4. Word 2007’s Ribbon, shown with the Home tab displayed, on a 19-inch monitor using normal-size fonts.

Exactly what you see in any given Ribbon tab is determined by a number of factors, including the size of your monitor, your screen resolution, the size of the current Office program window, as well as whether you’re using Windows’ display settings to accommodate low vision. Hence, what you see might not always be what you see pictured in this book. If you have a very large monitor operating at comparatively high resolution, you will see many more of the available options, such as on the Word Home tab shown in Figure 2-5.
Figure 2-5. At the highest resolution and largest screen size, the Ribbon displays additional gallery options and text labels.
Note
In Figure 2-5 Word’s Home tab Ribbon shows 12 styles from the style gallery, as well as additional tools and text labels in the Clipboard and Editing groups. This is the maximum amount of information you will ever see in the Home tab Ribbon. To “shoot” this picture, Word was stretched across two 19-inch monitors, and additional detail stopped appearing when Word was 35 inches wide. Therefore, if you’re wondering whether you need a 52-inch monitor for Office 2007, you’ll be happy to know that a 42-inch model would work just fine.
Tip
Ctrl+F1 toggles the Ribbon on and off. At times—especially at first—the Ribbon is going to look overly large to you. It will also seem imposing when you’re simply reading a document or when you’re trying to develop formulas in a worksheet. The Ribbon might also be distracting if all you’re doing is entering and formatting information and are fluent in the keystrokes you need to perform basic formatting. For those times, there is Ctrl+F1. To turn the Ribbon off using the mouse, double-click the current tab; click any tab to turn it back on temporarily. It will automatically hide when you’re done using it. Double-click any tab or press Ctrl+F1 to turn it back on full-time.
Title bar
The top bar of the current Office application window is called the title bar, exhibited in Figure 2-6. Double-clicking the title bar toggles the Office application between maximized and restored states. It’s the equivalent of alternately clicking the Maximize and Restore buttons at the right end of the title bar.

The title bar contains the Quick Access Toolbar (optionally), the name of the document in the current application window, and buttons for controlling the application window. If you’ve turned off the “Show all windows in the Taskbar” option (Office Button ![]() Program Name Options
Program Name Options ![]() Advanced
Advanced ![]() Display section), then these buttons control all of the application, rather than just the current document window. In your own installation, the title bar might contain other elements as well, such as items placed there by various Office and Windows add-ins.
Display section), then these buttons control all of the application, rather than just the current document window. In your own installation, the title bar might contain other elements as well, such as items placed there by various Office and Windows add-ins.
Tip
Right-click different areas of the title bar for available options. For example, if you right-click the Quick Access Toolbar (QAT), you’ll see that it can be customized or placed below the Ribbon; any tool on it can be instantly removed as well. If you right-click the middle area of the title bar, you’ll see a shortcut menu with commands for working with the window (Move, Size, Minimize, etc.). You also can display this menu by pressing Alt+spacebar.
The tab row
Shown below the title bar in Figure 2-6 is a row with the Ribbon tabs. I’m not sure if it has an official name, so I’ll use “tab row” here. In addition to the tabs themselves, which control which Ribbon is displayed, this line contains the Help button (which replaces Help ![]() Microsoft Application Name Help from Office 2003 and earlier). If you’ve turned off the “Show all windows in the Taskbar” option (Office Button
Microsoft Application Name Help from Office 2003 and earlier). If you’ve turned off the “Show all windows in the Taskbar” option (Office Button ![]() Program Name Options
Program Name Options ![]() Advanced
Advanced ![]() Display section), addition document and window control buttons will be present.
Display section), addition document and window control buttons will be present.
You can select a Ribbon tab using the mouse or using hot keys. Unlike in previous versions of the Office applications, however, there are no underlined letters showing you the hot keys.
As noted earlier, double-clicking the currently selected tab hides the Ribbon. Double-click any tab to unhide it. Ctrl+F1 toggles the Ribbons on and off as well. Once the Ribbon has been turned off, you can temporarily turn it back on by clicking a tab (or pressing its hot key). Once you’ve used a tool in that tab, the Ribbons automatically go back into hiding.
Key Tips
If there are no underlined letters, then how do you know which keys to press? Tap the Alt key. As shown in Figure 2-7, when you tap the Alt key, shortcut keys that work in the current context are displayed. “In the current context” might seem like an odd way to phrase it. Why context is relevant will become clear when we talk more about the Ribbon (described in the following section). For now, however, if you’re working in a Word document, pressing Alt+H will display the Home Ribbon, Alt+N displays the Insert Ribbon, and so on.
Figure 2-7. Tap the Alt key to display the Ribbon tab’s context-sensitive hot keys.

Note that I’ve added some additional tools to the QAT shown in Figure 2-7, and that numbered hot keys are associated with them. In addition to the first nine being accessible using Alt+1 through Alt+9, the last three are accessible using Alt+09, Alt+08, and Alt+07.
Ribbon
The Ribbon is divided into a number of different tabs that ostensibly correspond to each application’s former menus. Unlike 2003’s menus, however, there are no expanded drop-down lists under each main menu item. Instead, each tab exposes a different set of command buttons. Note that in Figure 2-4, the Home tab’s choices are exposed. Contrast that with Figure 2-8, which displays the Insert tab of the Ribbon.
Figure 2-8. Each of the tabs exposes a different set of commands; the Insert tab is shown here.

Note that the number of Ribbon tabs you see also varies according to user settings. In Figure 2-8 you can see the Developer tab. On your own setup, that tab might not appear.
Groups
We’ve already talked about the Ribbon—now it’s time to explore a few tricks and some odd nomenclature. At the bottom of the Ribbon tab shown in Figure 2-7, note the names Clipboard, Font, Paragraph, Styles, and Editing. These are known as groups. Each group contains individual tools or controls.
If you’re a veteran Office user—perhaps even if not—you’ve probably been wondering what to do, for example, if the Ribbon is displaying the Page Layout tab, and you really want to access the Home tab’s Editing tools (the group that contains Find, Replace, Go To, and Select).
Note
In this book, Ribbon command sequences typically name the Ribbon tab, the group, and then the specific button or option. So, for example, “Select Page Layout ![]() Page Setup
Page Setup ![]() Orientation” is telling you to choose the Orientation drop-down in the Page Setup group on the Page Layout tab of the Ribbon.
Orientation” is telling you to choose the Orientation drop-down in the Page Setup group on the Page Layout tab of the Ribbon.
In previous incarnations of Office applications, access to commonly used commands was always available via the menu, and often via the Standard and Formatting toolbars. Indeed, they are always available here as well, sort of. When the Page Layout tab (or any other) is displayed, you can access any of the Home tab items simply by pressing Alt, H (in sequence), or by clicking the Home tab.
What if you want to remained focused on Page Layout?
Any item on the Ribbon—individual tools, groups, and even dialog box launchers—can be added to the QAT. For example, right-click Bold and choose Add to Quick Access Toolbar. Now Bold will be available all the time, regardless of which Ribbon tab is displayed. Did I mention that Q stands for Quick? Don’t want Bold there? Right-click it and choose Remove from Quick Access Toolbar.
Let’s try another navigation trick. Tap Alt+P (Page Layout tab). Now press the arrow keys. If you’re unsteady with the mouse, you can use the four arrow keys to navigate. You can also use Tab and Shift+Tab to move forward or backward through all of the Ribbon commands. When you get to a command you want to use, press either the spacebar or the Enter key.
Note
In the previous section, I mentioned that hot keys are context-sensitive. Shouldn’t hot keys work the same way all the time? One would think so. Alas, Microsoft does not agree, so while 1 might activate the first QAT command when the Home tab in Word is displayed, you cannot count on it always doing the same thing. If you press Alt+H, now the 1 key applies bold formatting. Hence, context is vital. If you’re a touch typist who hardly ever looks at the screen, good luck. Meanwhile, press Alt+P and try not to laugh (or cry) when you notice that some commands have two—not one—hot keys. Any idea why AY means Rotate? Me neither.
Contextual tools
In addition to the default set of main tabs, additional context-sensitive or contextual tabs appear depending on what kind of document part or object is selected. For example, if you choose Insert ![]() Header and insert a header from the Header gallery in Word, the Design tab displays contextual Header &Footer tools, as shown in Figure 2-9.
Header and insert a header from the Header gallery in Word, the Design tab displays contextual Header &Footer tools, as shown in Figure 2-9.
Figure 2-9. When a header is selected, the Design tab displays Header & Footer contextual tools.

Notice that because this particular header format is enclosed in a table, the Table Tools tab is also exposed. The Table Tools tab has Design and Layout subtabs, each of which is also available in the current view.
Tip
As you are becoming acclimated to Office 2007, whenever a new tab appears, you should click it to explore what it has to offer. Think of contextual tabs as hidden drawers that might contain money! This is an aspect of Office 2007’s discoverability. If you don’t like the design choice in a given gallery, you very likely can change it (and even add new or changed items to the gallery for future use—more on this later).
Quick Access Toolbar
If you are a veteran Office user, you might be asking, “Where have all the toolbars gone?” If you’re a long-time veteran, in fact, you might be screaming that question at the top of your lungs, perhaps adding a colorful expletive or two. All of the toolbars have been collapsed into the single and less flexible Quick Access Toolbar, or QAT, as it is rapidly becoming known (the exact pronunciation is still under negotiation). Shown above the Ribbon in Figure 2-10, the QAT can also be placed below the Ribbon, where there is more room.
Figure 2-10. The Quick Access Toolbar (QAT) replaces all of Office’s earlier user-customizable toolbars.

Note
If you have custom templates that rely heavily upon carefully crafted custom toolbars and menus, there’s good news and bad news. The good news is that some of those toolbars might actually still work in Office 2007. Look for them in the Add-Ins Ribbon. The bad news is that Office 2007 no longer contains customization tools that let you create and modify multiple toolbars.
Live Preview
Live Preview is a brand-new feature in Office 2007. This feature applies the highlighted gallery formatting to the selection in the current document, enabling you to instantly see the results without actually having to apply that formatting, as shown in Figure 2-11. As the mouse pointer moves among the different gallery options, the formatting displayed in the body of the document instantly changes.
Figure 2-11. Live Preview, showing the results of the Intense Quote style in Word applied to the current paragraph.

Note that not all galleries and formatting options produce Live Preview results. For example, in the Page Layout tab in Word, none of the Page Setup items produce Live Previews, nor do the paragraph settings on that tab.
Another time you won’t see Live Preview is when working with dialog boxes, such as the Paragraph dialog box in Word. Many of those offer internal Preview sections but do not take advantage of Office 2007’s new Live Preview capability.
A gotcha in all this newfangled functionality is that sometimes the gallery itself covers up all or part of the Live Preview. This gets old quickly, and can negate much of the functionality, unless you’re blessed with unlimited screen real estate. Maybe that 52-inch monitor isn’t such a bad idea after all.
Fortunately, some galleries and controls have draggable borders that enable you to see more of what you’re trying to preview, as shown in Figure 2-12. If a control’s border is draggable, this is indicated by three dots. Notice the three dots in the lower-right corner of the Styles Gallery in Figure 2-11, and in the bottom border of Theme Fonts in Figure 2-12. On the lower-right corner, the three dots indicate that the border can be rolled up and to the left. On the bottom, the three dots indicate that the border can be rolled up.
Figure 2-12. Some Live Preview controls can be rolled up to reveal document details that otherwise would be covered.

Sometimes, however, it’s easiest simply to go ahead and apply the formatting, rather than jump through hoops. If necessary, you can always use the venerable Ctrl+Z (Undo) if you don’t like the result.
Caution
When using Live Preview, it’s very easy to forget to click the desired gallery or formatting command when you come to it. Particularly in extensive lists (such as lists of fonts, colors, or styles), it’s possible to get exactly the right effect without noticing what it’s called. In the case of colors, you usually don’t even have a name to use as a guide. Sometimes, the hand really is quicker than the eye. Once you move your mouse away from your selection, it’s lost. You might have to re-inspect that entire list to find exactly what you already found, so once you find what you’re looking for, don’t forget to click! Ctrl+Z is your friend!
Galleries
Up to now, I’ve thrown around the word gallery as if it were a common everyday word. Well, it is—but it’s taken on expanded meaning in Office 2007. Simply put, a gallery is a set of formatting results or preformatted object parts. Virtually every set of formatting results or object parts in Office 2007 might be called a gallery, although Office itself does not use the word gallery to refer to every feature set. Some, such as the list of bullets in Word, are called libraries instead.
Galleries include document styles, themes, headers, footers, page colors, tables, WordArt, equations, symbols, and more. The Word Styles Gallery is shown in the previous section, in Figure 2-11. Galleries often work hand-in-hand with the Live Preview feature. Imagine paging through a coffee-table volume of paintings, and each time you point to a different painting, your own house and garden are transformed to reflect the style and period of the painting. Point at a different painting, and your house and garden are retransformed.
As noted earlier, however, not every gallery results in a Live Preview. As you begin to take advantage of this new feature, you will quickly start to miss it when it’s not available. Perhaps galleries will become more prevalent in future releases!
The Mini toolbar
Another new feature in some of the Office 2007 applications is the Mini toolbar. The Mini toolbar is a set of formatting tools that appears when you first select text. It is not context sensitive and always contains the identical set of formatting tools. There is no Mini toolbar for graphics and other non-text objects.
When you first select text, the Mini toolbar appears as a ghostly apparition. When you move the mouse pointer closer to it, it becomes more solid, as shown in Figure 2-13. If you move the mouse pointer far enough away from it, it fades away completely. Click a button on the Mini toolbar to apply formatting to the selection.

Note
Once the Mini toolbar disappears, you cannot resurrect it by hovering the mouse over the selection. You can, however, display the Mini toolbar and the current context-sensitive pop-up menu by right-clicking the selection. Note also that only the mouse triggers the Mini toolbar. If you display the pop-up context menu by pressing Shift+F10 or by tapping the Menu button on a Windows keyboard, the Mini toolbar will not appear.
Some users will love the Mini toolbar, others will hate it. I recommend that you give it a try. It exists to provide convenient and discoverable access to commands that are otherwise less convenient and less accessible than they were in Office 2003 (with the disappearance of toolbars and menus).
When the Home tab is displayed, the Mini Toolbar might seem superfluous, as all of the Mini toolbar’s components are replicated in that tab. However, consider for a moment how far the mouse has to travel to access those formatting commands. With the Mini toolbar, the mouse pointer usually has to travel less than an inch or so. For those with repetitive motion injuries, this can save a lot of wear and tear on the wrist.
If you decide that the Mini toolbar gets in the way, you can turn it off. Even when turned off, however, it can still be summoned by right-clicking the current selection. To turn it off, see Appendix A.
Note
Unlike many Ribbon tools, the Mini toolbar tools do not produce Live Previews of formatting and other effects. If you need to see a Live Preview, use the Ribbon instead.
Shortcut or contextual menus
While the Office applications’ main menu system has been almost entirely replaced by Ribbon tabs, Office’s shortcut menus, often called contextual or pop-up menus, remain. Shown in Figure 2-14, shortcut menus remain largely unchanged from Office 2003, except for the fact that when text is selected, the Mini toolbar sometimes accompanies the menu.
Figure 2-14. When you right-click a selection, a context-sensitive shortcut menu appears, along with the Mini toolbar.

Note
While shortcut menus remain in Office 2007, the ability to customize them is gone.
Enhanced ScreenTips
Another new addition to Office 2007 is Enhanced ScreenTips. The very name makes you want to leap over tall buildings! In Office 2003 and earlier, ScreenTips showed only the name of the command under the mouse pointer. Enhanced ScreenTips, instead, are expanded feature descriptions designed to make features more discoverable, as well as to reduce the frequency with which you’ll need to press the F1 key for Help. (As it turns out, this is a blessing, because Office 2007’s Help system isn’t exactly what the doctor ordered.)
Shown in Figure 2-15, an Enhanced ScreenTip magically appears when you hover the mouse pointer over a tool. If you hover the mouse pointer over an exposed gallery item (such as a style), however, you will see a Live Preview of the gallery item instead of an Enhanced ScreenTip. Even better!
Figure 2-15. Enhanced ScreenTips explain the selected feature, reducing the need to press F1.

Dialog boxes and launchers
Even though Office 2007’s new philosophy focuses on the results-oriented Ribbon, some features and functions remain tied to traditional dialog boxes. Dialog boxes can be launched in several ways, including by direct keystrokes and what Microsoft calls Dialog Box Launchers. Dialog Box Launchers are indicated by an arrow pointing southeast in the lower-right corner of Ribbon groups, as shown in Figure 2-16.

In many instances, Office’s dialog boxes have not been overhauled or greatly enhanced for this release. However, if you look closely, you often will see a number of changes, some subtle and others not so subtle. Figure 2-17 contrasts the Paragraph dialog boxes from Word 2007 and 2003. Sometimes, if you look really closely, new features will leap out at you!
Figure 2-17. Can you spot the differences between the Word 2007 and Word 2003 dialog boxes? Without running the two versions side by side, you might never notice Word 2007’s new feature: Mirror Indents!

Task panes
Word 2003 sported a collection of 14 task panes (or more, depending on what features are installed and in use), and the other Office apps had numerous task panes, as well. The task pane was activated by pressing Ctrl+F1. As noted earlier in this chapter, in Office 2007, Ctrl+F1 now toggles the Ribbon on and off.
If Ctrl+F1 is now used for something else, how do you activate the task panes in Office 2007? The short answer is that task panes, as a cohesive concept, have been mostly abandoned. Office 2007 still has some task panes, but you can’t access them using a drop-down menu as you could in Office 2003, and you can’t access the entire collection of task panes using a single keystroke. Instead, they will appear as needed (and possibly when you aren’t expecting them). Think of them as dialog boxes that enable you to type while they’re onscreen.
For example, on the Home tab in Word, click the Styles Dialog Box Launcher. This displays the Styles task pane. Now click the drop-down arrow to the left of the X in the upper-right corner of the task pane, as shown in Figure 2-18. Instead of a list of task panes, you get three options that control only this task pane. Like their counterparts in earlier versions of Office, task panes in Office 2007 can be dragged away from the right side of the Word window and displayed wherever it’s convenient—including completely out of the application’s window frame. Just move the mouse pointer over the task pane title bar and drag. To return it, just drag it back, or double-click the floating task pane’s title bar.
Figure 2-18. Office 2007’s task panes are independent of each other and can’t be selected from a common pull-down control.

While it might seem a bit odd for Microsoft to have unbundled the task panes, a quick look at Figure 2-19 demonstrates a decided advantage of the new approach. While you probably won’t need to have them all onscreen at the same time, it’s nice to know that you’re no longer limited to just one at a time.
Figure 2-19. With Office 2007, you can display multiple task panes at the same time, should you feel a compelling need for clutter.

Status bar
Now we turn to the status bar, neglected until now. Shown in Figure 2-20, the status bar is the bar at the bottom of the application window. Depending on the application in use, the status bar provides dozens of optional pieces of information about the current document. Right-click the status bar to display the status bar’s configuration options.
Figure 2-20. Status bar display options have been greatly expanded in some Office 2007 applications.
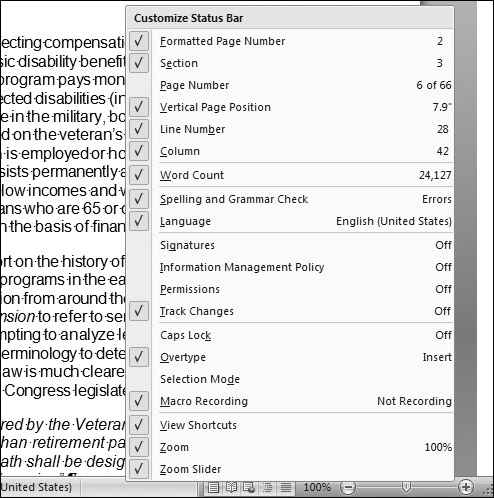
As an example of the type of information the status bar might display, not only does Word 2007 update the Word count continuously, but if you select text, it tells you how many words are selected: 180/5,644 means that 180 words are selected out of a total of 5,644.
Note
The status bar configuration menu stays onscreen until you explicitly dismiss it. That means that you can enable/disable as many options as you want without having to repeatedly right-click the status bar. Notice also that the configuration menu displays the current status too, so if you just want to quickly refer to it to find out what language you’re using—but don’t really want Language on the status bar—you don’t have to put it on the status bar and then remove it. Note additionally that the status items aren’t just pretty pictures. For example, clicking the Page item shown in Figure 2-20 takes you to the Go To Page dialog box in Word. Clicking the Macro Recording item opens the Record Macro dialog box.
To dismiss the configuration menu, simply click on the status bar or in the document, or press Esc, Enter, or the spacebar.