
Inserting Clip Art
Clip Art provides another source of decoration for your documents, frequently used in newsletters and flyers when visuals are useful. Part of Office’s Shared Features set, depending on what Office program you have and how much of them you have installed, Clip Art has hundreds or even thousands of little pieces of royalty-free topical art that you can use anywhere.
To insert Clip Art at the insertion point, click Insert ![]() Clip Art, in the Illustrations group. To accept the defaults, type a search term (for example, medicine) and click Go, shown in Figure 9-46. When clip art appears, scroll through the list. When you find something you want to use, click on it to insert it into your document.
Clip Art, in the Illustrations group. To accept the defaults, type a search term (for example, medicine) and click Go, shown in Figure 9-46. When clip art appears, scroll through the list. When you find something you want to use, click on it to insert it into your document.
Figure 9-46. The Clip Art pane uses local clip art as well as clip art from Office Online.

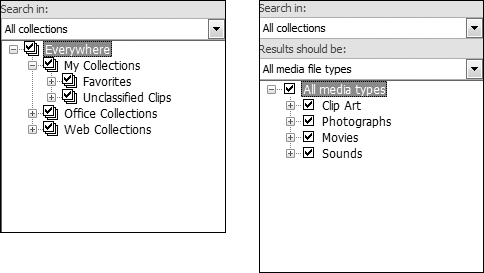
To control where Clip Art searches, use the drop-down Search In list, shown in Figure 9-47. To search only your local collection, remove the check next to Everywhere, and enable only My Collections and Office Collections. To include searching online, leave Web Collections checked. You can further control the scope of the search by limiting the search to only a particular kind of media. By default, Word searches for all media types—including movies and sounds! Note also that we talked earlier about where to find photographs on the web. Now you know another source. With Search In set only to Web Collections and Results Should Be set only to Photographs, you can quickly see a list of photographs available for download from Microsoft.
Figure 9-47. Use the Search In drop-down list to control the scope of a search for clip art.
Note
As shown in the section “If your picture format isn’t supported,” earlier in this chapter, if you lack local clip art, check Office 2007’s Setup settings and verify that Clip Art was actually fully installed; check Clip Organizer under Office Shared Features.
Microsoft Clip Organizer
At the bottom of the Clip Art pane (refer to Figure 9-46), notice the Organize Clips option. This runs Microsoft Clip Organizer, which is a separate application that comes with Office. I won’t go into a lot of detail about it except to say that it can be very useful. As shown in Figure 9-48, if you choose File ![]() Add Clips to Organizer, it can search your hard disk(s) and add items to the Clip Organizer. These added items will also be available from Word’s Clip Art pane.
Add Clips to Organizer, it can search your hard disk(s) and add items to the Clip Organizer. These added items will also be available from Word’s Clip Art pane.
Figure 9-48. The Clip Organizer can vastly expand the supply of clips to which Word has access.

Caution
If you have a lot of media files on your computer, this can take a long time, and it might appear that your computer has stopped. It hasn’t (not usually, anyway). Go out for some lunch and it might be done by the time you return.