
Assembling a Data Document
Regardless of which data document type you choose (letter, e-mail, envelopes, labels, or directory), the process is similar. There are some additional considerations for multi-record-per-page documents, however, so we will look at those separately after discussing the common elements.
When designing a letter or e-mail you plan to send to multiple recipients using the merge feature, it’s often a good idea to draft the document as you want it to appear, using placeholders for information pertaining to the intended recipient, as shown in the following example:
Dear [name]:
We are writing to inform you that the warranty for:
[product]
which you purchased on:
[purchase date]
will expire on [expirationdate].
If you would like to extend your warranty, you must take advantage of our extended warranty coverage plans before [expirationdate]. Costs for extending the warranty are:
1 Year: [oneyearwarranty]
2 Years: [twoyearwarranty]
3 Years: [threeyearwarranty]
Please use the enclosed card and envelope to extend your warranty before it’s too late!
Yours truly,
[salesagent]
When you’re done, edit your document and substitute merge fields for the placeholders.
Merge fields
After setting the data document type (using Start Mail Merge), associating a database with it (using Select Recipients), narrowing the list of recipients or records just to those records you plan to use, and drafting the data document, the next step is to insert merge fields into your document where you want the corresponding data fields to appear.
Note
Merge fields are special Word fields that correspond to the data fields in your database. For example, if you have a data field called Company, then you would insert the company name into your data document by using a MergeField field code with the name Company in it: { MERGEFIELD Company }. In your data document, that field displays either as «Company» or as the name of the company associated with the current record in the data set. Use the ribbon’s Preview Results button to toggle between the merge field name and actual data.
To insert a merge field, position the insertion point where you want the field to appear (or select the placeholder if you’re replacing a placeholder with a merge field). In the Mailings tab on the Ribbon, choose Insert Merge Field in the Write & Insert Fields group, as shown in Figure 10-11. Click on the field you want to insert. Using a combination of text, punctuation, and merge fields that you insert, complete the assembly and wording of your document. Note that in addition to individual merge fields that you can insert using the Insert Merge Field tool, you can use special sets of merge fields to save time: Address Block and Greeting Line.
Figure 10-11. Merge fields are data tokens that you use where you want actual data fields to appear in the data document.

Address Block
The address block contains a number of elements that you can select from the Insert Address Block dialog box. To determine the contents of the address block, click Address Block in the Mailings ribbon, as shown in Figure 10-12.
Figure 10-12. Use the Address Block tool to launch the Insert Address Block dialog box.

When you click Address Block, the Insert Address Block dialog box, shown in Figure 10-13, appears. Notice that it contains three sections for selecting, previewing, and correcting your address block information (if there are problems). Make your selections as indicated, and then click OK.
Figure 10-13. Use the Insert Address Block dialog box to choose the address block elements for the current data document.
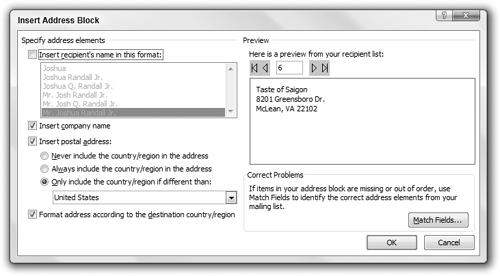
Specify address elements— Use this section to tell Word how to define the address block. You can include the recipient’s name (in a variety of formats), the company name, the postal address, as well as the country or region. If desired, you can suppress the country or region, always include it, or include it only if it’s different from the country selected. You can also tell Word to format the address according to the destination country or region.
Preview— Use the First, Previous, Next, and Last buttons to preview different addresses as they will appear with the selected options. It’s a good idea to preview a good sampling in case some parts of the address are treated differently from how you expect, or if there are problems with missing data that will leave “holes” in the address block.
Correct Problems— If the preview isn’t what you expect, click Match Fields to change the different data elements with which each of the fields listed is associated, as shown in Figure 10-14.
Figure 10-14. Use the Match Fields dialog box to associate each of the listed items with data fields from your database for the Address Block.
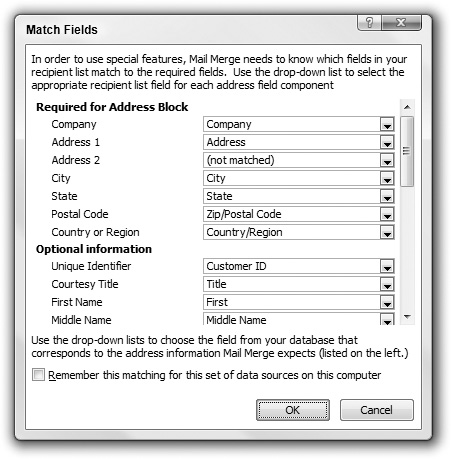
If you plan to reuse the address block data either for the same database or for other databases that contain the same field names, click to enable the “Remember this matching . . .” setting.
Greeting Line
The Greeting Line merge field, like the Address Block field, is a collection of different data elements and plain text designed to save you entry time when composing data documents. Click Greeting Line in the Write & Insert Fields section of the Mailings tab of the Ribbon. This displays the Insert Greeting Line dialog box shown in Figure 10-15. Proper operation of a number of aspects of the greeting line merge field depends upon your having several potentially obscure data elements available and filled out, such as nickname, spouse’s nickname, and the color of their children’s socks. Unless you or someone with whom you work is obsessively compulsive about data entry, you’re not likely to find some aspects of this terribly useful.
Figure 10-15. Set and preview greeting line components.
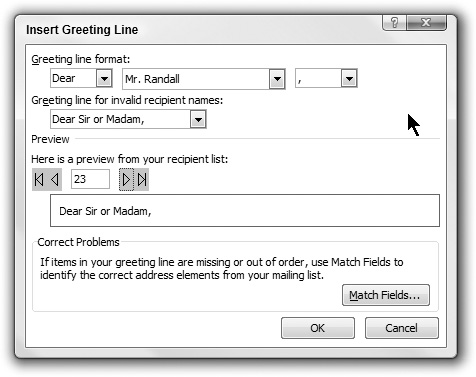
Use the Preview buttons to test your selected greeting line options against your actual data. If something doesn’t look quite right, click Match Fields and use the controls shown in Figure 10-16 to associate the Greeting Line components with the correct merge data fields.
Figure 10-16. Use the Match Fields dialog box to associate Greeting Line merge field components with data elements from your database.

Rules
In assembling a data document, you sometimes need to control or modify how data and records are processed. Word provides nine commands to help you do that, as shown in Figure 10-17. The entries shown in the Rules drop-down menu (click Rules in the Write & Insert Fields group of the Mailings tab) show how those rule keywords are displayed in the data document.
Figure 10-17. Use the Rules drop-down list of Word fields to control how data is merged with the data document.

These rules are tied to specific Word field codes, and are explained in Table 10-2. Note that many of these are supported by dialog boxes that guide you through proper syntax, making them easy to use and understand.
| Field | Usage/Purpose |
|---|---|
| Ask | This field prompts you to provide information and assigns a bookmark to the answer you provide; the information is stored internally. A reference to the bookmark can then be used in the mail merge document to reproduce the information you type. A default response to the prompt can also be included in the field. The Ask field displays as an empty bookmark in the mail merge document. You might use this field in conjunction with an IF field to prompt for missing information during a merge. |
| Fill-in | This field prompts you to enter text, and then uses your response in place of the field in the mail merge document. This is similar to the Ask field, except that the information can be used only in one place. |
| If...Then...Else... | This is used in mail merge documents to control the flow and to create a conditional statement that controls whether specific mail merge fields are printed or included in the merged document. |
| Merge Record # | When doing a mail merge, the Merge Record # field serves as a counter of records in the data file and doesn’t count the number of documents actually printed. This field is incremented by the presence of Next Record and Next Record If fields. If you skip records using Skip Record If, Merge Record # is incremented nonetheless. |
| Merge Sequence # | This field provides a counter of mail merge documents that actually result from a merge. If you merge the entire database and do not change the base sorting, and if no records are skipped, then Merge Sequence # and Merge Record # will be identical. |
| Next Record | The Next Record field is used to include more than one record in a given document. Ordinarily, when doing a mail merge, one document is printed for each record. With the Next Record field, however, you can include multiple records in a single document. This can be useful when you need to refer to several addresses from a data file. When doing a label merge, the Next Record field is provided automatically, and appears as « Next Record ». |
| Next Record If | The Next Record If statement works like the Next field except that it advances to the next record only if an expression being evaluated is true. A typical use is to skip a given record if a particular key field is blank. For example, in an e-mail merge, if you haven’t otherwise excluded records with blank e-mail addresses, you can use Next Record If to do it. |
| Set Bookmark | The Set Bookmark field is used to change the text referred to by a bookmark. Set Bookmark often is used in conjunction with If...Then...Else... to conditionally change how particular text is defined based on external factors, such as the current date, or internal factors, such as the value(s) of particular fields. |
| Skip Record If | The Skip Record If field is used to cancel processing of the current database record during a mail merge. For example, you might use it to screen out a particular zip code. |
Match Fields
The Match Fields button in the Write & Insert Fields group of the Mailings tab on the Ribbon displays the Match Field dialog box shown in Figure 10-18. If the dialog box and fields look familiar, it’s no accident. The “special features” notation referred to at the top of the Match Fields dialog box refers to the Address Block and Greeting Line. If you’ve already visited the Match Fields dialog boxes in those respective dialogs, you can forego the pleasure of another visit. In addition, if you aren’t using Address Block and Greeting Line fields, you can safely ignore this tool.
Figure 10-18. When launched from the Mailings tab, the Match Fields dialog box is a marriage of the Match Field dialogs available from within the Insert Address Block and Insert Greeting Line dialog boxes.

Preview Results
At any time as you go along, if you want to see what actual data will look like in your document, click the Preview Results button in the Preview Results group of the Mailings tab to toggle between a data token (merge field name) and actual data, shown in Figure 10-19. Note that because the merge fields actually are field codes, they can also be displayed in a third way, also shown in Figure 10-19.
Figure 10-19. Data merge fields can be displayed in three different ways in your document.

In the Preview Results section of the Mailings tab, shown in Figure 10-20, you can use the First Record, Previous Record, Next Record, Last Record, and Go To Record tools to display any data record.
Figure 10-20. Use the Preview Results tools to ensure that the merge will produce the results you want.
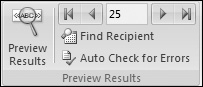
Find Recipient
To search for a specific data record or for records whose data you want to preview, click the Find Recipient button in the Preview Results group. This displays the Find Entry dialog box shown earlier in Figure 10-9. Refer to the discussion earlier in this chapter.
Update Labels
When the data document type is Labels, there are two ways to proceed. The easy way is to carefully edit just the first label cell by inserting whatever merge fields you need. When you’re finished, click Update Labels in the Write & Insert Fields group of the Mailings tab. Word copies all text, merge fields, and formatting from the first cell into each of the other cells, after the Next Record control. The result is that each sheet of labels will contain data from the same number of label cells. A sheet containing nine labels will use data from nine database records.
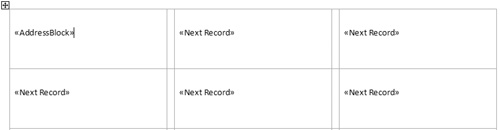
The hard way to do labels is to ignore the existence of the Update Labels tool and to carefully edit each of the table cells, inserting the merge fields you want to use. Note that Word automatically provides the NEXT (Next Record) field in each of the table cells, as shown in Figure 10-21. If you manually populate the cells, additional merge fields should be inserted after the Next Record control. If you insert merge fields before the Next Record control, data from the same record used for the first cell will be used.
Figure 10-21. When you insert a merge field into the first label cell, Word automatically puts the Next Record control into each of the other cells.
Why would you choose to do it the hard way? You might do it that way if you need to do something else in each data field that can’t be accomplished by Word automatically copying the first table cell to each of the other label cells. What might that be? Who knows? After all, they’re your labels!
Highlight Merge Fields
Use the Highlight Merge Fields button in the Write & Insert Fields group of the Mailings tab to highlight all of the merge fields in your data. This can be useful if you’re working on a complex document and need to recheck the logic and placement of merge fields. This is especially true if you’ve turned on Preview Results and are looking at actual data results, rather than the merge fields themselves.
If, for example, you expect a given merge field result to appear in two places in the document, this tool enables you to find those locations more easily so you can verify that the correct text appears. If you’re using conditional rules, such as Skip Record If, Next Record If, and If, this also helps you focus on the results so you can verify that the rules are working as expected.
Auto Check for Errors
To avoid wasting paper and other resources, when you think you’re done, click Auto Check for Errors in the Preview Results group on the Mailings tab to display the options shown in Figure 10-22.
Figure 10-22. Rather than waste paper or send out errant e-mails, use the error checking tool to avoid logical errors or other unwanted surprises.

Options are as follows:
Simulate the Merge and Report Errors in a New Document— Use this option to examine any and all errors in a new document.
Complete the Merge, Pausing To Report Each Error As It Occurs— Use this option once you’ve determined that there are errors, so you can observe the error in action.
Complete the Merge Without Pausing. Report Errors in a New Document— Use this option to go ahead and complete the merge without stopping at each error, sending the error report to a new document.
Finishing the merge
Once the data document is ready and has been thoroughly debugged and certified as error free, it’s time to go through the final motions. The Finish & Merge button in the Finish group on the Mailings tab provides three options, shown in Figure 10-23, regardless of the type of data document chosen. Think twice before accidentally clicking Send E-mail Messages if the document is a set of labels or a directory!
Figure 10-23. It’s usually a good idea not to send a merge directly to a printer until the results have been thoroughly examined.

Edit Individual Documents
Use the Edit Individual Documents choice if you want to save your merged results for future use. For example, suppose you have a set of labels that seldom changes and which you need to print out every week. Rather than go through the mail merge exercise each week, save a copy of the labels and then print them each time you need them. That way, you don’t need to go through the whole mail merge routine unless the underlying database has changed.
You might also choose this option if you don’t trust other ways of proofing the results. Instead of printing from the Mailings ribbon controls, send the results to a new document where you can examine each of them, and then print when you’re ready.
When you choose this option, Word displays the Merge to New Document dialog box shown in Figure 10-24. If you want Word to create a limited number of output documents, choose either Current Record or indicate a From/To range. Click OK to commit those electrons to a Word window that displays your results.
Figure 10-24. Even if you’re sure you’re ready, Word wants to make sure you’re sure.

Note
If you choose this option for an e-mail merge, the resulting document(s) will not be useful except for proofing the e-mails. To actually send the e-mails, you have to choose the Send E-mail Messages option.
Print Documents
Choose the Print Documents option when you’re certain that the merge will give you the results you want, and your boss is at the door asking “Where are those letters?” When you click Print Documents, Word displays the dialog box shown earlier in Figure 10-24, this time sporting a Merge to Printer title bar. The same options prevail. Choose wisely and click OK to immediately . . . launch yet another dialog box, the Print dialog box. Make any additional choices and decisions, including which printer to use, cross your fingers, and click OK.
Tip
If you don’t trust all of the previews and error checks at this stage, you’ve probably been burned by mail merge in the past. If you still want to be sure before wasting a tree, use the Name drop-down list to see whether you have an option that produces electronic images of printed pages, rather than actual printed pages. If you have Adobe Acrobat, Microsoft Office Document Image Writer, SnagIt, or a host of other options, choose one of those. Then you can review what actually amounts to your best possible print preview.
Send E-mail Messages
Choose the Send E-Mail Messages option if you’re working on an e-mail merge. When you click Send E-mail Messages, Word displays the Merge to E-mail dialog box, shown in Figure 10-25.
Figure 10-25. Make sure you fill out the Subject Line field!

In addition to the Send Records options (All, Current Record, and From/To), Word provides three additional options:
To:— If the proposed e-mail address data field is not correct, use the drop-down arrow to replace it with the correct address field.
Subject line— This is very important. Studies show that 73.4% of all non-spam e-mail merges sent omit the subject line.[1] Don’t become a statistic! Replace that blank Subject line.
[1] This statistic was made up by the author. Nonetheless, don’t send subjectless e-mails!
Mail format— Many e-mail recipients wisely have their e-mail options set up to read all e-mail as plain text (this gives them a shot at preventing any automatic naughtiness from being executed when e-mail is opened). Options provided are Attachment, Plain Text, and HTML, the latter being the default. While Attachment seems like a good compromise for formatted e-mail, this option provides no way for you to include any message text for the body of the e-mail. When and if you use that option, make sure the Subject line isn’t blank.