
Attaching a Data Source
After you establish the type of data document for the merge, you need to attach a data source to it. In the Mailings tab, choose Select Recipients, as shown in Figure 10-2. If you choose Use Existing List, the Select Data Source dialog box appears so that you can navigate to and select a data source file. If you choose Type a New List, click Create, and then use the dialog box that appears to enter names and addresses.
Figure 10-2. A document isn’t really a data document until you attach a data source to it using one of the Select Recipient options.

Note that once you’ve attached a data source to the document, Edit Recipient List and a number of other tools on the Mailings tab are no longer grayed out. If you plan to use the entire database, you can skip following section.
Selecting recipients
If you don’t plan to use the entire database, you can use the Mail Merge Recipients dialog box, shown in Figure 10-3, to select just the recipients you want to use. To open the dialog box, click Edit Recipient list in the Start Mail Merge group of the Mailings tab. Use the check boxes shown to include or exclude records. To quickly deselect all records, clear or select the checkbox at the top of the list, just to the right of Data Source.
Figure 10-3. Select just the target recipients using the Mail Merge Recipients dialog box.

Editing data
Depending on your data source, you sometimes can edit it by clicking the database in the Mail Merge Recipients dialog box and then clicking Edit. When your data source is Outlook contacts, note that Edit is not an option. To change your Outlook data, you must use Outlook. Once you’ve made your change in Outlook, you can then refresh the records you see in the Mail Merge Recipients list by highlighting the data source and clicking Refresh.
Sorting records
When editing non-Outlook data, you can sort using Word controls. Click the down arrow for a field name in the Mail Merge Recipients dialog box to drop down a list of sort options, shown in Figure 10-4. For example, if you want to filter out records for which company name is blank, click the Company drop-down arrow and choose Blanks. To select only records for which the e-mail address is not blank, click Nonblanks. To restore the list to show all records, choose the All option.
Figure 10-4. Quickly select records for which the current field is blank or nonblank by choosing Blanks or Nonblanks.

To sort by multiple fields at the same time, in the Mail Merge Recipients dialog box, choose Sort under Refine Recipient List. This displays the Filter and Sort dialog box, shown in Figure 10-5.
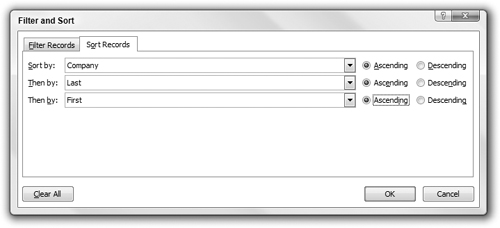
Use this dialog box to sort by multiple criteria. For example, if letters are being hand-delivered within a company, it might be useful to sort by floor and then by room number, assuming those are separate fields. (Often, sorting just by room number accomplishes both at the same time.)
Filtering records
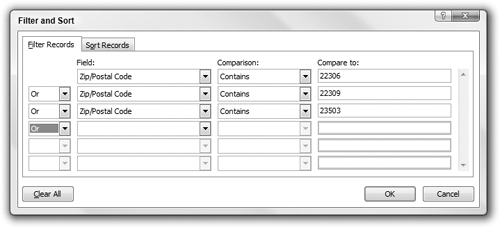
Word also enables you to filter records to either include or exclude records with data fields matching specific criteria. To filter records, click Filter under Refine Recipient List. Here, you again get the Filter and Sort dialog box, but the Filter Records tab this time, as shown in Figure 10-6. Use the options shown to filter by specific values. As shown here, you can use it to include specific zip codes. While the dialog box initially shows just six filter fields, you are not limited to that many. It’s not clear what the upper limit is, but you can specify at least 45 (that’s the point at which I got bored trying to discover an upper limit).
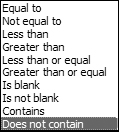
While the dialog box shown in Figure 10-6 shows just the Contains comparison, you can make a total of 10 comparisons (see Figure 10-7).
Figure 10-7. Include records based on 10 comparison operators.
Tip
When filtering by ZIP code, if your database contains nine-digit ZIP codes, use the Contains filter rather than the Equal To filter. Using Equal To, you would need to specify all nine digits in the filter, and specifying as many as 9,999 different filters doesn’t seem like a productive use of your time.
Understanding And and Or
When setting up filters, there are two kinds of comparisons you can make: And and Or. If all we had were one or the other, there would be no problem, but we have both, and we don’t have parentheses to help clarify the comparisons.
It helps to understand that And and Or apply to each pair of rules. You also need to understand that the And rule is harder to satisfy, in that it requires that two conditions be met. Depending on what comes before or follows, each and/or effectively divides the list of filters into sets of filters that are being evaluated. However, by being careful with filters, you can avoid combinations that are impossibly difficult to understand.
Suppose the filters contained the comparisons shown in Table 10-1. The first And applies to the Alexandria and VA filters. The second And applies to the Hampton and VA filters. This set of filters requires that records must be in Alexandria, VA, or in Hampton, VA.
| Operator | Field | Comparison | Compare to |
|---|---|---|---|
| City | Equal to | Alexandria | |
| And | State | Equal to | VA |
| Or | City | Equal to | Hampton |
| And | State | Equal to | VA |
Finally, understand that it’s perfectly possible to set up filters that make no logical sense. Hence, Table 10-1 could have been set up with all of the Operators set to And. There would be no matching records, of course. It’s up to you to examine the collection of resulting data records to make sure that your logic is being applied as you think it should be.
Duplicates
Databases often contain duplicate records. When mailing or e-mailing, especially, you want to avoid sending the same person duplicate messages. When sending invoices to large companies, this can cause problems, especially if they are received and processed by different people, resulting in double payment and further paperwork downstream.
To find duplicates, click the Find Duplicates link in the lower section of the Mail Merge Recipients dialog box. Word now displays the Find Duplicates dialog box, shown in Figure 10-8. If you identify duplicates, remove the checks next to them to exclude them from the data merge. Look carefully, however, because Word’s criteria for what constitutes a duplicate might be different from your own.
Figure 10-8. Beware of Word’s ability to find duplicates. Some “duplicates” aren’t duplicates at all!

Caution
Caveat duplicates! In Figure 10-8, Word identified nine entries as duplicates, which they clearly aren’t. Word uses First and Last name to identify duplicates. If your database contains only company names and no First and Last name fields (which isn’t unexpected when all you have is the name of the establishment), you cannot use this feature to reliably identify duplicates.
Find Recipient
If your database is especially large, using Find Recipient can be faster than pawing through the listings manually. Click the Find Recipient link in the lower portion of the Mail Merge Recipients dialog box to display the Find Entry dialog box shown in Figure 10-9. Alternatively, click the Find Recipient tool in the Preview Results section of the Mailings tab.
Figure 10-9. Use Find Entry to search for text in any or all data fields.

Type the search text in the Find field, choose All fields or a specific field, and then click Find Next. Note that the search is not case sensitive. If there are matches, Word highlights the first match in the Mail Merge Recipients dialog, and the Find Entry dialog box stays onscreen. Click Find Next to move to successive matches in the database.
Return to this tool later, after your data document has been constructed, to preview specific data records. It’s better to iron out problems before committing your merge to paper or e-mail.
Validate Addresses
The Validate Addresses link works with third-party software, such as that provided with stamps.com and other electronic postage services. If you don’t have such software installed, you’ll see the message shown in Figure 10-10. These services vary, but basically they check against a huge database of valid street addresses to determine whether the selected address and zip code combination really exists. This can save considerably on costs, as it can prevent you from mailing to addresses that might actually be somewhere in the middle of a lake (if the street were extended to where an address logically would fall). Unless you are targeting fish, you might find having such a capability handy.
Figure 10-10. If you don’t have address validation software installed, Word invalidates your attempt to run the Validate Address command.
