Selecting Fields
There are several ways to add fields to a query. You can add fields one at a time, select and add multiple fields, or select and add all fields. You use your keyboard or mouse to add fields.
Adding a single field
You add a single field in several ways. One method is to double-click the field name in the Field List (also called a Table window); the field name immediately appears in the first available column in the QEB pane. Alternatively, drag a field from a table in the top portion of the query designer, and drop it on a column in the QBE grid. Dropping a field between two other fields in the QBE grid pushes other fields to the right.
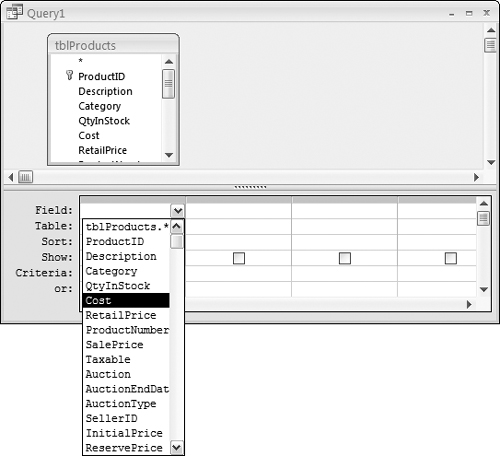
Another way to add fields to the QBE grid is to click an empty Field cell in the QBE grid, and select the field name from the drop-down list in the cell, or type the field’s name into the cell. Figure 36-7 shows selecting the Cost field from the drop-down list. Once selected, simply move to the next field cell and select the next field you want to see in the query.
Figure 36-7. Adding fields in the QBE grid. Clicking the down arrow reveals a drop-down list from which you select a field.

You’ll find a similar list of all the tables in the query in a drop-down list in the Table row of the QBE grid.
After selecting the fields, run the query by clicking the Datasheet button or the Run button on the Design tab of the Ribbon. Click the Design View button on the Design tab to return to the design window.
Adding multiple fields
You add multiple fields in a single action by selecting the fields from the Field List and dragging them to the QBE grid. The selected fields do not have to be contiguous (one after the other). Hold down the Shift key while selecting multiple fields. Figure 36-8 illustrates the process of adding multiple fields.
The fields are added to the QBE grid in the order in which they occur in the table.
You can also add all the fields in the table by clicking on the Field List’s header (where it says tblProducts in Figure 36-9) to highlight all the fields in the table. Then drag the highlighted fields to the QBE grid.
Figure 36-9. Adding the asterisk to the QBE grid selects all fields in the table.

Alternatively, click and drag the asterisk (*) from the Field List to the QBE grid. Although this action does not add all the fields to the QBE grid, the asterisk directs Access to include all fields in the table in the query.
Unlike selecting all the fields, the asterisk places a reference to all the fields in a single column. When you drag multiple columns, as in the preceding example, you drag names to the QBE grid. If you later change the design of the table, you also have to change the design of the query. The advantage of using the asterisk for selecting all fields is that changes to the underlying tables don’t require changes to the query. The asterisk means to select all fields in the table, regardless of the field names or changes in the number of fields in the table.
The downside of using the asterisk to specify all fields in a table is that the query, as instructed, returns all the fields in a table, whether or not every field is used on a form or report.

