
Working with Clip Art Collections
The Clip Organizer is a utility that manages the clips from various collections. You can use the Clip Organizer to browse entire clip collections by subject, regardless of keyword. It also manages clips of other types, including bitmap images (such as scanned photos), sounds, and video clips. In the following sections, you learn how to browse, categorize, and organize clips in the Clip Organizer, as well as how to add clips to it.
Opening and browsing the clip organizer
To open the Clip Organizer, click the Organize Clips link at the bottom of the Clip Art pane. The Collection List pane lists the three default groups: My Collections, Office Collections, and Web Collections. Within each of these collections are nested folders, or sub-collections, containing clips. To expand or collapse a folder, double-click it, or click the plus or minus sign to its left, as shown in Figure 24-28.
Figure 24-28. You can browse clip art by collection, as well as by category within a collection.

The My Collections group contains two collections by default:
Favorites: This is where clips are placed when you make them available offline. (This is covered in the section “Making clips available offline.”)
Unclassified Clips: This is where clips are placed when they are manually added to the Clip Organizer. (This is covered in the section “Working with clip keywords and information.”)
You can add more collections to the My Collections group, as well as more clips. It is the only group that you can modify. The Office Collections group contains collections that Microsoft provides and stores on your hard disk. The Web Collections group contains collections that you access through the Internet.
Using the clip organizer to insert clip art
As you saw at the beginning of this chapter, when you insert clip art from the Clip Art pane, you cannot browse for it. You can only search based on keywords. If you would rather peruse the available clip art in a more leisurely fashion, you can open the Clip Organizer to do so.
The Clip Organizer is not really designed for easy insertion of clips into a presentation, but it is possible to do this using the Clipboard. To select a clip from the Clip Organizer for insertion in your presentation, do the following:
1. | From the Clip Art pane, click Organize Clips. The Clip Organizer window opens. |
2. | Make sure that Collection List, and not Search, is selected on the toolbar. Click Collection List, if necessary. |
3. | Click the collection that you want to browse. The Clip Organizer displays the available clips. When you find the clip that you want to insert, right-click it and choose Copy. |
4. | Close or minimize the Clip Organizer. Display the slide in PowerPoint on which you want to place the clip, and then right-click and choose Paste. Alternatively, you can drag-and-drop clips from the Clip Organizer window onto a PowerPoint slide. |
Creating and deleting folders
Each folder in the Clip Organizer represents a collection (or a sub-collection within a collection). The folders that you create are placed in the My Collections group, and you can place clips into a collection or sub-collection by dragging and dropping them into the desired folder. To create a folder in the Clip Organizer, follow these steps:
1. | In the Clip Organizer, choose File |
2. | In the Name text box, type a name for the new collection. |
3. | To create a top-level collection, click My Collections. To create a folder within a collection, click that collection within My Collections. |
4. | Click OK. The Clip Organizer creates the new folder. |

To delete a folder, right-click it and choose Delete foldername, where foldername is the name of the folder.
Moving clips between collections
A clip can exist in multiple collections simultaneously; only one copy actually exists on your hard disk, but pointers to it can appear in multiple places. When you drag a clip from one collection to another, you are actually making a copy of its pointer to the new location. The shortcut to the clip is not removed from the original collection. You can delete a clip from a collection by right-clicking it and choosing Delete, or pressing the Delete key.
Cataloging clips
There are probably images elsewhere on your PC that you would like to use in PowerPoint besides the Microsoft Office clip art collection. For example, perhaps you have some scanned photos or some clip art that you have downloaded from a Web site that offers free clips. If you need to use this downloaded clip art only once or twice, you can simply insert it with the Picture button on the Insert tab. However, if you want to use the clip art more often, you can add it to your Clip Organizer.
You can include images in all image formats in the Clip Organizer, not just the default format that PowerPoint’s clip art uses. The image formats that PowerPoint supports are shown in Table 24-1.
| BMP | EPS | PCX |
| CDR | FPX | PNG |
| CGM | GIF | RLE |
| DIB | JPG/JPEG/JPE/JFIF | TGA |
| DRW | MIX | TIF/TIFF |
| DXF | PCD | WMF |
| EMF | PCT/PICT | WPG |
The Clip Organizer is not only for clip art, but also for scanned and digital camera photos, video clips, and sound clips. It can accept many sound and video formats.
Adding a clip to the Clip Organizer does not physically move the clip; it simply creates a link to it in the Clip Organizer so that the clip is included when you search or browse for clips.
Note
Any clips that you add are placed in My Collections; you cannot add clips to the Office Collections or Web Collections categories. This is the case whether you add them automatically or manually.
Adding clips automatically to the Clip Organizer
The quickest way to catalog the clips on your hard disk is to allow the Clip Organizer to import the clips automatically. To automatically catalog your clips, follow these steps:
1. | From the Clip Organizer, choose File |
2. | (Optional) In the dialog box that appears, click the Options button to open the Auto Import Settings dialog box. You can then select or deselect checkboxes for various locations that you want to include in the automatic cataloging, as shown in Figure 24-30. The first time you open this dialog box, the utility scans the hard disk for clips, and you must wait for a minute or so while it does this. Figure 24-30. You can specify the locations that you want the Clip Organizer to catalog.
|
3. | |
4. | Wait for the Clip Organizer to catalog the clips. This process takes several minutes and includes several steps, including creating the collections, adding the clips, and adding keywords to them. |

Adding clips manually to the Clip Organizer
Not all clips are picked up automatically during the cataloging process, and so you might need to manually add some clips. For example, the automatic cataloging process only looks for clips on your local hard disks, and you might want to catalog some clips in a network location.
Caution
Some earlier versions of Office stored the local collection of clip art in a different place. For example, Office XP stored this collection in Program FilesCommon FilesMicrosoft SharedClipartCatcat50. By default, the clip art in this old location does not appear in the collections for Office 2003 or 2007 applications. In addition, it is not detected by the automatic cataloging process. The only way to import it into the Clip Organizer is by manually cataloging it, as described here.
To manually add one or more clips, do the following:
1. | From the Clip Organizer window, choose File |
2. | Navigate to the clips that you want to add. They can be in a local, network, or Internet location. |
3. | Select the clips. To select more than one clip, hold down the Shift key to select a contiguous group or the Ctrl key to select a non-contiguous group. |
4. | Click the Add To button. A list of the existing collections in the Clip Organizer appears, as shown in Figure 24-31. Figure 24-31. You can specify the location to which you want to add the clips.
|
5. | Select the collection in which you want to place the new clips, and click OK. If you would rather create a new clip collection, click My Collections and then click New. Type a name for the new collection and click OK. Then select the new folder on the list and click OK. |
6. | Click the Add button. The Clip Organizer adds the clips to the specified collection. |
Working with CIL or MPF files
Occasionally, you might encounter a file that claims to be clip art but that has a .cil or .mpf extension. Both of these are clip art “package” formats that Microsoft has used to bundle and transfer clip art at one time or another. MPF is the newer format, for Office XP and higher; CIL is the older format, for Office 97 and 2000.
These packages are executable, which means that executing them copies the art to the Clip Organizer. When you find one of these files, you can choose to run it rather than save it to immediately extract its clips, or you can download the file and then double-click it to extract the clip art from it later.
Deleting clips from the Clip Organizer
After the automatic cataloging process (and possibly after the manual one), you might end up with some clip collections within My Collections that you don’t want. The automatic cataloging process sometimes identifies files that are not really useful as clip art—for example, little graphics that are part of some other application’s operation.
To remove a graphic—or even an entire folder—from your Clip Organizer, right-click it and choose Delete. Figure 24-32 shows a situation where the Clip Organizer has cataloged the clips from of a folder labeled i386; this folder is actually used for installing Windows. In the example, you can right-click the i386 folder in the folder tree and choose Delete “i386” to get rid of it. This does not delete the pictures or the folder from the hard disk; it simply removes its reference from the Clip Organizer. You can also delete individual clips in the same way.
Figure 24-32. You can remove a clip or a category from the Clip Organizer by right-clicking it and choosing Delete.

Making clips available offline
Most of the clips that appear in the Clip Organizer are not on your local hard disk; they are online. This means that you do not have access to them when you are not connected to the Internet. If you find some clip art in the Clip Organizer that you want to have available offline, you can add the clip to your local hard disk, as follows:
1. | In the Clip Organizer or the Clip Art pane, open the menu of the clip that you want (the arrow to its right) and choose Make Available Offline. The Copy to Collection dialog box opens. If the Make Available Offline command is not present, it means that this clip is already on your local hard disk. |
2. | Select the collection in which you want to place the clip. (You can also click New to create a new collection.) Then click OK. |
Browsing for more clips on Office Online
When you browse for clip art while connected to the Internet, the Office Online clip art automatically appears. However, you can also visit the Office Online Web site to browse the clip art directly.
To open a Web browser window for the Office Online clip art gallery, do one of the following:
From the Clip Art pane, click the Clip art on Office Online link.
From the Clip Organizer window, click the Clips Online toolbar button.
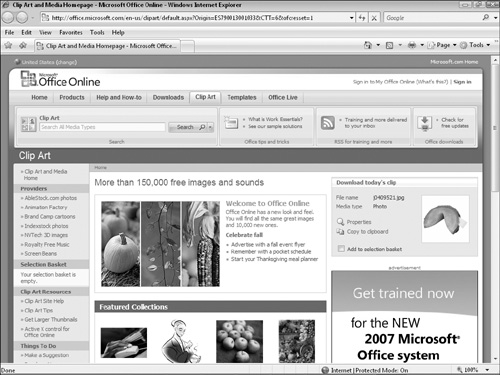
Either way, the same Web page displays (provided you have Internet access). It contains information about clip art, links to art collections, featured clips, and more. It is constantly changing, but Figure 24-33 shows how it looked on the day I visited.
Figure 24-33. Visit the Office Online clip art Web page for more information and more clip art.
If you have a full-time Internet connection, there is little reason to download clips to your hard disk from the Office Online Web site because your clip art search by keyword will always include this Web site. However, if your Internet connection is not always active, you might want to download the clips you need in advance so that they will be available when you need them.
To copy clips from the Office Online Web site to your hard disk for later use, follow these steps:
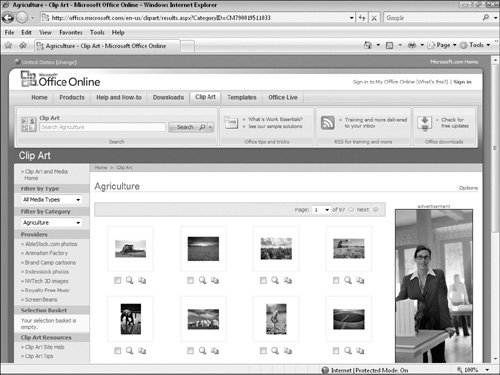
1. | From the Office Online clip art Web page, scroll down to the Browse Clip Art and Media Categories list and click a category to display it. The available clips in the category appear, as in the example in Figure 24-34. |
2. | In the list of clips, select the checkboxes for the clips that you want. You may find multiple pages of clips in that category; click the Next arrow to go to the next page. |
3. | When you finish making selections, click the Download hyperlink at the left. For example, if you select five items, the link is labeled “Download 5 items.” |
4. | If this is the first time that you have used the service, a Terms of Use screen appears. Scroll down to the bottom and click Accept to continue. |
5. | Click Download Now. |
6. | A dialog box appears, saying that it is downloading the file Clipart.mpf, and asking whether you want to save or open it. Choose Open. |
Note
MPF stands for Media Package File. When downloading one of these files, you should choose to open it rather than save it, because opening it integrates its content automatically with the Clip Organizer. Saving the file stores it somewhere on your hard disk without adding the clips to the Clip Organizer. However, you might need to do this if you download clips that you want to use on another PC; in this case, you can transfer the MPF file to the other PC before double-clicking to open it.
Caution
When an MPF file unpacks, it uses the Temporary Internet File folder to do so. If this folder is too full (indicating that there is insufficient space remaining on the hard disk), the clips may not import into Clip Organizer.
The selected clips appear in the Clip Organizer, in the Downloaded Clips folder under My Collections. They are now ready for you to use.