
Working with Outlook Folders
Outlook folders let you organize all the myriad items that you work with in Outlook. Outlook comes with a default set of folders that is a good starting point, but many users find these folders insufficient. This section shows you how to create new folders and work with folders and folder items.
As mentioned earlier, Outlook folders are designed to hold a specific type of item. The choices are as follows:
Calendar folders hold appointments and other scheduling items.
Mail folders hold e-mail messages.
Contacts folders hold contact information.
Journal folders hold journal entries.
Task folders hold task items.
Notes folders hold notes.
You cannot move an item into a folder of the wrong type, such as moving an e-mail message into a Contacts folder. The one exception to this rule is the Deleted Items folder, which can hold any type of item.
Note
Note that RSS feed items are treated like e-mail messages by Outlook when it comes to folder types.
Outlook’s default folders
When installed, Outlook has a set of default folders that are located at the top level in your Personal Folders file. You cannot rename, move, or delete these default folders. They are as follows:
Calendar: Holds calendar items (appointments, and so on.).
Contacts: Holds your contacts.
Deleted Items: Holds any and all items you have deleted before they are permanently deleted. See the section “Deleting Items and Using the Deleted Items Folder,” later in this chapter.
Drafts: Holds e-mail messages you have started composing but not yet sent.
Inbox: Holds received e-mails.
Journal: Holds your journal items.
Junk E-Mail: Holds e-mail that has been flagged as junk (spam).
Notes: Holds your notes.
Outbox: Holds e-mails that you have sent but that have not yet been transferred to your e-mail server.
Quarantine: Holds e-mails that have been flagged as containing a virus, worm, or other malicious element.
RSS Feeds: Holds content from your subscribed RSS feeds.
Sent Items: Holds copies of e-mail messages that you have sent.
Creating a new e-mail folder
E-mail folders get their own section because Outlook treats them a bit differently from other folders. To be more specific, you cannot organize e-mail folders into groups but rather have to organize them hierarchically when you create them.
When you create a new e-mail folder, you can place it at the top level under Personal Folders—the same level as Outlook’s default folders. You can also put it in an existing folder. You can put folders within folders to essentially any level and thereby organize your e-mail messages in the way that best suits you.
Look at the example in Figure 27-27, which shows Outlook’s default e-mail folders. You can see that they are all at the same level within Personal Folders.

Suppose that you want to organize e-mails from your clients by creating an e-mail folder for each client. For this example, I assume that you have three clients: Acme, Consolidated, and National. One approach is to create three new folders at the top level. The resulting structure is shown in Figure 27-28.
Figure 27-28. New e-mail folders can be created at the top level of the folder hierarchy.

Another approach, one that I prefer, is to use the ability to create folders within other folders, resulting in a hierarchy of folders that is structured according to the folder contents. This approach can be implemented by creating a Clients folder at the top level and then creating Acme, Consolidated, and National folders in the Clients folder. This structure is shown in Figure 27-29. Note that a folder that contains other folders—Clients, in this case—displays an adjacent plus or minus icon that you can click to show or hide the subfolders.
Figure 27-29. New e-mail folders can also be created in a hierarchical structure by placing folders within other folders.

In any event, you do not have to decide all the details of your e-mail folder structure ahead of time because you can always move the folders around if needed.
Now you can get to the details of creating a new e-mail folder. Here are the steps to follow:
1. | If necessary, click the Mail button on the Navigation Pane to display the mail folders. |
2. | If you want the new folder at the top level, right-click Personal Folders (or whatever name you have assigned to the top level). Otherwise, right-click the folder that you want the new folder in. |
3. | Select New Folder from the shortcut menu. Outlook displays the New Folder dialog box (Figure 27-30). The location for the new folder is shaded in the folder display—Inbox, for example, in the figure. You can, if necessary, change the location at this point. Figure 27-30. Creating a new folder to hold e-mail items.
|
4. | Type the name of the new folder in the Name box. |
5. | Make sure that Mail and Post Items is selected in the Folder Contains list. |
6. | Click OK. |

The new folder is created and you can start using it to store mail items.
Creating a new non-e-mail folder
Non-mail folders—those for tasks, calendar, journal, and contacts—are handled a bit differently than mail folders. Rather than organize folders by placing them in other folders, as you do with mail folders, you use groups. First, the following steps show how to create a non-mail folder:
1. | |
2. | Choose Folder from the File menu and then select New Folder from the next menu. Outlook displays the Create New Folder dialog box (Figure 27-31). The folder for the type of item you selected in Step 1—Calendar in the figure, for example—is highlighted in the folder list. Figure 27-31. Creating a new folder, Tasks, in this case, to hold non-e-mail items.
|
3. | Enter the name of the new folder in the Name box. |
4. | Make sure that the Folder Contains list displays the appropriate type of item for the folder you are creating. |
5. | Click OK. |

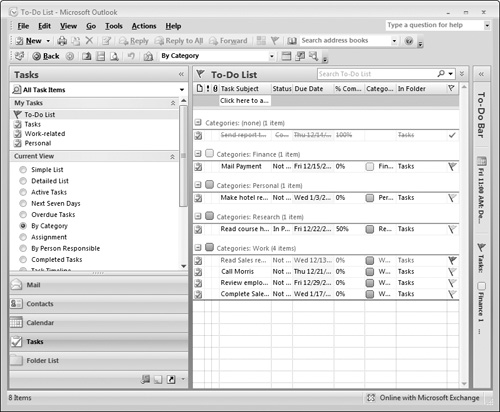
After you create a non-e-mail folder, it is displayed near the top of the Navigation Pane along with other folders, including the default one, for that type of item. Figure 27-32 shows an example for Tasks after creating two new task folders called Work-related and Personal.
Figure 27-32. User-created folders for non-e-mail items are displayed along with the default folder in the Navigation Pane.
Warning
You can create new Task folders if you want, but be forewarned that task items you move from the default task folder to a new folder are not updated if you have assigned the task to someone else and receive accept, decline, or progress update messages.
Organizing folders in groups
Outlook folders that are not e-mail folders can be organized into groups. This is similar in concept to organizing e-mail folders by their location in the folder hierarchy, but the procedures are a bit different.
By default, every category of non-e-mail item has a single group with a name such as My Contacts, My Tasks, and so on. If you create new folders, they are displayed as part of this default group. For example, Figure 27-33 shows the Contact folders after adding four new folders to the default Contacts folder. They are all part of the default My Contacts group (which can be expanded or collapsed using the adjacent arrow).
Figure 27-33. All folders for non-e-mail items are initially part of the default group, which is My Contacts in this figure.

By creating new groups, you can organize these folders as desired. In this example, there are five Contacts folders, and you might want to arrange them as follows:
The Contacts folder, for miscellaneous contacts, remains in the My Contacts group.
The Personal Contacts and Family Contacts go into a new group named Personal.
The Work Contacts and Freelance Contacts folders go into a new group called Work.
The result of this reorganization (which I show you how to do in a moment) is shown in Figure 27-34. Now you can expand and contract individual groups to find just the items you need.
Creating a new group
To create a new group, right-click an existing group (for example, My Contacts in Figure 27-34) and select New Group from the context menu. Then, type in the name for the group and press Enter.
A newly created group is empty, as you might well expect. To move a folder to it, point at the folder, press and hold the left mouse button, and drag it to the destination folder. Figure 27-35 shows how you would move the Personal Contacts folder to the My Contacts group.

To create a new folder within a group, follow the procedures earlier in this chapter for creating a new folder; then move it to the desired group.
Working with groups
You can take the following actions with a group by right-clicking it and selecting one of the following options from the context menu:
Rename (the group)
Remove (the group and any folders it contains)
Arrange by Name—order the folders in the group alphabetically.
Move Up/Down in List—change the position of the group in the list.
Additional actions you can take with groups are covered in the next section.
Working with folders, groups, and items
This section covers the everyday tasks that you need to perform with your folders, groups, and Outlook items to keep them organized.
Viewing folder contents
When you switch from one type of item to another—for example, from viewing mail items to viewing contact items—Outlook automatically displays the contents of one folder, usually the default one, in the main Outlook window. To view the contents of another folder (also called opening the folder):
Click the folder to display its contents in the main window.
Right-click the folder and select Open in New Window to view the folder’s contents in a new window.
You can open as many new windows as you want. When you close a window, Outlook continues running as long as at least one window is open.
Moving or copying items
Outlook lets you move or copy items between folders. For some types of items, only moving, not copying, is allowed. To move or copy one or more items, you must first select them, as follows:
To select a single item, click it.
To select multiple contiguous items, click the first item and then hold down the Shift key and click the last item.
To select multiple noncontiguous items, click the first item and then hold down the Ctrl key and click each additional item.
To select all items in the folder, press Ctrl+A. You can then deselect individual items with Shift+click.
To deselect multiple items, release any key and click any nonselected item.
Now you can move or copy the selected items in one of several ways:
Drag the item or group of items to the destination folder and drop.
Choose Cut (to move) or Copy from the Edit menu. Then, open the destination folder and choose Paste from the Edit menu.
Choose Move to Folder from the Edit menu. Outlook opens the Move Items dialog box, shown in Figure 27-36. Select the destination folder from the list and then click OK. You can also click the New button in this dialog box to create a new folder.
Figure 27-36. Use this dialog box to move an item or items to a different folder.

Moving, copying, deleting, and renaming folders
As you fine-tune your Outlook organization, you may want to move folders to new locations. Depending on the type of folder, you may be able to copy a folder as well. E-mail folders can be moved to a new location in the folder hierarchy, whereas other folders can be moved from one group to another.
To move an e-mail folder, point at it and drag it to the new location. For example, Figure 27-37 shows how you move the National folder from its location in the Clients folder to a new location in the Work Stuff folder.

Shortcut Keys for Copy, Cut, and PasteThe standard Windows shortcut keys work in Outlook: Ctrl+C for copy, Ctrl+X for cut, and Ctrl+V for paste. |
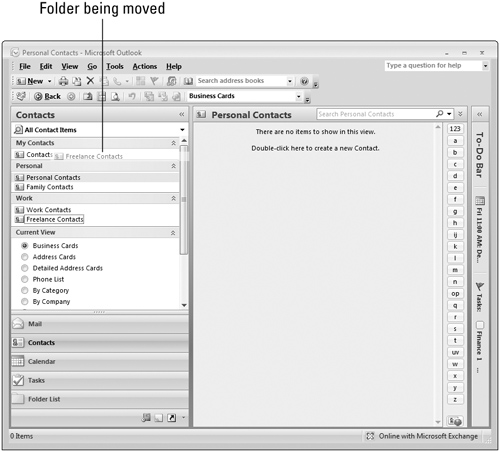
To move a non-e-mail folder, point at it and drag it from the current group to the new group. Figure 27-38 shows how you move the Freelance Contacts folder from the Work group to the My Contacts group.
You can also use the Copy (when allowed), Cut, and Paste commands on the Edit menu to copy and move folders.
To delete a folder, right-click it and select Delete XXXX (where XXXX is the name of the folder) from the context menu.
To rename a folder, right-click it and select Rename XXXX (where XXXX is the name of the folder) from the context menu; then type in the new name and press Enter.