
Printing a File
With the crisp, vibrant output produced by today’s cheap color printers, who would want a paperless office? Although the Internet and faster computer networks have made electronic transmission a common and accepted means of sharing documents, many circumstances still call for—if not require—that information be shared on paper:
Legal documents such as contracts that need to be signed, initialed, dated, or otherwise stamped are still largely handled on paper. Standards for digital signatures are still evolving, and most users still print a hard copy of a contract or agreement for official filing.
When a reader or viewer won’t have a computer or connection at hand and will need to take notes, you need to provide a hard copy. For example, participants in seminars typically don’t bring along a notebook and prefer to take their notes on a hard copy of a presentation.
When you want to make a strong impression, hard copy is still preferred. Although e-mail is increasingly accepted as a standard business practice for many communications, sometimes it doesn’t measure up. For example, it might be acceptable to e-mail a proposal to a potential new client, but hand-delivering a hard copy and then following up by e-mail shows that you still care enough to make a personal effort to get the business.
When you need a fresh perspective on a document, you can get it by working from hard copy. Reading through a printed copy of a document can help you catch text and formatting mistakes you previously missed, while also enabling you to make additional notes and engage in proofreading tricks such as reading the document backwards.
When you want to provide a more constant, visible reminder, you need hard copy. Whether it’s putting up a flyer at the grocery store about a found cat or giving a recognition certificate to a valued volunteer, hard copy is still the only useful format.
With all the great documents you can create in Office, you’ll be proud to publish and share hard copies. This section explains how to set up and print your files.
Note
Of course, this section on printing assumes that a printer is installed on your system or network and that the printer is powered on and has ample paper and ink or toner in it.
Performing a quick print
A quick print operation prints the file as it stands, sending the job directly to the default printer and using the current settings for the printer. When you use this printing method, you do not have the opportunity to make changes such as specifying how many copies of the file to print. On the other hand, if you have previously set up all the desired document and printer settings, you don’t need to repeat the whole process for every print job.
Not all of the Office 2007 applications offer the quick print capability, but for those that do, performing a quick print is easy:
1. | Click Office Button Figure 3-9. Perform a quick print with this command.
|
2. | Click Quick Print. The document prints. |

If you prefer the keyboard to the mouse, you can use this rather long keyboard shortcut for performing a quick print: Alt+F+W+Q.
Tip
In Office applications that use the Ribbon, you can add a Quick Print button to the Quick Access toolbar. Clicking that button then prints the current file directly. To add the button, click the Customize Quick Access Toolbar drop-down arrow at the right end of the Quick Access toolbar; then, click Quick Print.
Previewing a print job
You can check out how a document will look before committing it to paper by using the Print Preview feature. Print Preview is a special view designed to provide you with a more accurate view of how a particular file will look when you print it. Print Preview can help you diagnose issues that are matters of preference, such as having a text heading appear at the bottom of one page rather than at the top of the next page in a Word document, as well as issues that can save paper, such as squeezing one more column of an Excel worksheet onto the page to reduce a printout from two pages to one. The Print Preview includes buttons for sending the document to the printer and for working with the page design, although the latter choices vary depending on which application you’re using.
To view and use Print Preview in an Office application:
1. | Click Office Button |
2. | Click Print Preview. The Print Preview appears, as in the example shown in Figure 3-10. Note In some applications, you just select File |
3. | Click with the magnifying glass pointer as needed. Clicking the document the first time zooms in; clicking again zooms back out. |
4. | Click other choices as available to work with the preview and document. Beyond giving you the ability to zoom in and out, the choices for working with the preview and the document vary depending on the application and the length of the document. For example, if the document includes multiple pages, you can click Next Page or Previous Page to navigate between pages. In the example from Word shown in Figure 3-10, you can work with Page Setup settings or change the display to show Two Pages or the full Page Width. |
5. | Click Close Print Preview. The application redisplays the file in the previous view you were using. |

Understanding page design settings
Some document settings affect the overall page design not only in terms of its look but also in making the document print correctly from the printer. The most important page settings you need to specify when it comes to printing fall into three categories:
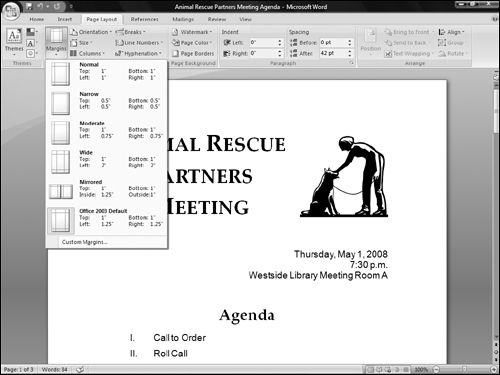
Margins. The margin is the white space between the edge of the paper and the information printed on the page. Most printers require at least .25 inches of margin on each edge of the document; specifying a smaller margin than required by your printer could cause some of the printed information to appear “cut off.” In some cases, you need to specify special-purpose margins such as mirrored margins, for which the inside (center) margins of each two-page spread are wider to allow for binding the pages.
Orientation. You can choose to present information from a file in portrait (tall) or landscape (wide) format. When you choose a portrait orientation such as that used for a typical letter, the printer prints the text parallel to the shorter edges of the paper. When you choose a landscape orientation such as that often used for worksheets or presentation slides, the printer rotates the information and prints horizontal to the longer edges of the paper.
Size. If you want to print on paper other than a standard letter-sized sheet, you need to choose that paper size for the document’s page design or setup. This choice automatically adjusts the document contents to fit within the margins on the specified sheet size.
Because page design settings vary quite a bit between applications, it’s not possible to cover each and every choice here. Later chapters detail some of the settings that pertain to particular Office applications. So, here’s an idea of where you can find the page settings you need to check or change them before sending a file to the printer:
On the Page Layout or Design tab of the Ribbon. The Ribbon tab used to format the page or design typically includes a Page Layout section with the options for changing crucial page settings. Clicking a choice here typically displays a menu or gallery (Figure 3-11) of specific settings; click the one you want to apply to the document.
Figure 3-11. The Page Layout or Design tab of the Ribbon offers page design settings.
In the Print Preview. As shown previously in Figure 3-10, the Print Preview Ribbon or toolbar often offers settings for working with the page layout. These settings work just like the corresponding settings found on the Ribbon.
In the Page Setup dialog box. The Page Setup dialog box for an application offers general page formatting options such as margin settings, as well as choices specific to the application that you’re using. For example, the Page Setup dialog box for Excel includes a Sheet tab, on which you can indicate such details as whether gridlines should print (Figure 3-12). To open the Page Setup dialog box, you can click the Dialog Box Launcher for the Page Setup group on the Page Layout or Design tab of the Ribbon (Figure 3-13). Or, for applications that don’t use the Ribbon, you can select File
 Page Setup. After you make your choices in the dialog box, click OK to apply them to the document.
Figure 3-12. Page Setup options vary from application to application.


Choosing print settings and printing
As opposed to being specific to the design of the pages of the document to be printed, additional settings pertain to the nature of the hard copy produced, such as which printer to use, which pages of the file to print, how many copies to print, what print quality to use, and so on. You choose all these types of settings in the Print dialog box.
Although settings such as which pages to print and how many copies to print are the same in all circumstances, other choices vary depending on the application or the selected printer. For example, Excel has additional options for enabling you to print only the current worksheet or the entire workbook file. And choosing an inkjet printer generally enables you to select whether you want to print in just black ink or in full color.
Despite those types of differences, the process for choosing a printer and print settings and finishing the print job is about the same in every application:
1. | Click Office Button |
2. | Select the printer to use from the Name drop-down list. The printer becomes the current or active printer (see Figure 3-14). |
3. | Specify what pages to print in the Page Range area of the dialog box.
Figure 3-14 shows how these choices look in Word’s Print dialog box. |
4. | Specify how many copies to print in the Copies area of the dialog box. In some cases, you also can choose to collate the printed pages. |
5. | Choose other print settings as desired. For example, you might be able to change zoom settings or print to a file rather than paper. Note Clicking the Options button in the lower-left corner of the dialog box opens another dialog box that includes additional print options, such as whether to print hidden text in Word. |
6. | Click the Properties button beside the selected printer. The dialog box that appears has additional print quality settings, as in the example shown in Figure 3-15. Figure 3-15. Properties for the selected printer enable you to fine-tune the print job even further.
|
7. | Choose settings in the printer’s Properties dialog box as needed and then click OK. The Print dialog box reappears. |
8. | Click Print. The application prints the file to the specified printer. |


Tip
You can download add-ins that “print” a document as a PDF (Portable Document Format) or XPS (XML Paper Specification) file. These special file formats preserve all the file’s formatting while making the file easier to share. In Word 2007, find the downloads by choosing Office Button ![]() Save As right arrow
Save As right arrow ![]() Find Add-Ins for Other File Formats. (This command is not available if you’ve already installed the add-ins.)
Find Add-Ins for Other File Formats. (This command is not available if you’ve already installed the add-ins.)
Tip
If you insist on doing things the easy way and prefer to e-mail a file rather than print it, you can send it from right within the application. Select Microsoft Office Button ![]() Send
Send ![]() E-mail File
E-mail File ![]() Send To
Send To ![]() E-Mail Recipient in some applications to begin the process.
E-Mail Recipient in some applications to begin the process.