
Using Certificates and Digital Signatures
A certificate, also known as a digital ID, provides a higher level of security with Outlook. You can use a certificate to send encrypted e-mails so that only the intended recipient can view the contents. You can also use them to sign messages to prevent tampering and prove your identity. Finally, you can use a digital ID in lieu of a username and password to access certain restricted Web sites, although this use is not relevant to Outlook.
Digital IDs are based on the technique of a public/private key pair. These are two long numbers that are related to each other. You can use either key of the pair to encrypt data, and only people who have the other key of the pair are able to unencrypt the data. When you have a digital signature, you keep your private key secret and make your public key freely available. Here’s how it works:
To send an encrypted message to people, you use their public key to encrypt it. Only they can unencrypt the message because no one else has their private key.
To prove your identity, encrypt some data using your private key. When recipients of a message decrypt the data using your public key, if the data is intact they will know that you must have encrypted it because nobody else has your private key.
Digital certificates have expiration dates, typically one year after they are issued.
Obtaining a digital ID
If you are using Outlook at work, your employer may provide a digital ID to you that you’ll import as described in the next section. Otherwise, you can get your own. Digital IDs are provided by independent companies for a small fee. A digital ID is linked to a specific e-mail address and cannot be used with other addresses.
To get your own digital ID:
1. | Choose Trust Center from the Tools menu to open the Trust Center. |
2. | Select E-mail Security from the list on the left to display the E-Mail Security page (Figure 28-17). |
3. | Click the Get a Digital ID button. Your Web browser opens and displays a Microsoft page that lists companies that sell digital IDs. |
4. | Select the company you want and follow the prompts to register for and pay for your digital ID. |

After you complete the ordering process, the issuing company will send you an e-mail containing instructions for installing the digital ID.
Importing/exporting digital IDs
Digital IDs can be provided to you in a file as well as obtained over the Web, as described in the previous section. Your employer may provide you with an ID in a file; you can also export an existing ID to a file for backup purposes. These files are password protected for security reasons.
To import a digital ID:
1. | Choose Trust Center from the Tools menu to open the Trust Center. |
2. | Select E-mail Security from the list on the left. |
3. | Under Digital IDs, click the Import/Export button to display the Import/Export Digital ID dialog box (Figure 28-18). Figure 28-18. The Import/Export Digital ID dialog box.
|
4. | Select the Import Existing Digital ID option. |
5. | Enter the name of the file in the Import File box, or use the Browse button to locate it. Digital ID files have the .epf, .pfx, or .p12 extension. |
6. | Enter the file password in the Password box. |
7. | Enter a name of your choosing for the certificate in the Digital ID Name box. |
8. | Click OK. |

Exporting a digital ID uses the same dialog box as shown in Figure 28-18 except that you must select the Export option. Then, follow these steps:
1. | If you have more than one digital ID, use the Select button to choose the ID to export. |
2. | Enter the export filename in the File name box, or use the Browse button to select an export location. |
3. | Enter and confirm the password in the boxes provided. |
4. | Select the Microsoft Internet Explorer 4.0 Compatible option only if you will use the exported ID with older versions of Internet Explorer. |
5. | Select Delete Digital ID From System if you want to completely delete the ID rather than export it. |
6. | Click OK. |
Receiving digitally signed messages
When you receive a digitally signed message, the only difference is that the message says Signed By XXXX (where XXXX is the sender’s e-mail address) in the header, just below the subject line. You can use such a message to add the sender’s public key to your Contacts list, as explained in the next section.
Just because a message is signed does not mean that the signature is legitimate. On the same line that Signed By XXXX is displayed, Outlook displays a red ribbon icon, as shown in Figure 28-19, to indicate that the signature is valid. If the signature is not valid, the message There are problems with the signature is displayed, and you can click a button to view the details. A digital signature could be invalid because it has expired, the issuing authority has revoked it, or the server that verifies the certificate is invalid.
Figure 28-19. This icon indicates that the digital signature in a message is valid.

Obtaining other people’s public keys
To send an encrypted message to people, you must have their public key. You can get this from a signed message that an intended recipient sent you. That recipient’s certificate will be added to his or her entry in Contacts, and it will be available for you to use to send encrypted e-mail. Follow these steps to send an encrypted e-mail message:
1. | Open the digitally signed message. |
2. | Right-click the sender’s name or address in the From box. |
3. | Choose Add to Outlook Contacts from the shortcut menu. |
4. | If the contact already exists in your Contacts folder, Outlook notifies you. Select Update Information of Selected Contact. |
You can view a contact’s certificates by opening the contact and clicking the Certificates button in the Show section of the Ribbon. Outlook displays a list of the contact’s certificates, if there are any, as shown in Figure 28-20. You can take the following actions by clicking the buttons at the right side of this window:
Properties: View the certificate details, including the name of the issuing company and its expiration date.
Set as Default: If the contact has more than one certificate, this command sets the one that will be used as the default for encrypting messages to the contact.
Import: This option lets you import a person’s certificate from a file. Certificate files have the .p7c or .cer extension.
Export: This option lets you export the certificate to a file. Doing so can be useful when you want to transfer a contact’s certificate to another computer.
Remove: This option deletes the certificate from the contact information.

Encrypting and digitally signing messages
It’s important to understand that encrypting a message and signing a message are two different things, as follows:
Encrypting uses the recipient’s public key to encrypt the message and attachments so that only the recipient can read them.
Signing uses your digital ID to mark a message so that recipients can verify that it really came from you.
A message can be signed, encrypted, or both.
Encrypting messages
You can send an encrypted message to anyone for whom you have the public key—in other words, you have that recipient’s certificate as part of his or her contact information. You can encrypt single messages or specify that all messages be encrypted (when possible).
To encrypt a single message:
1. | Create the new message. |
2. | Click the arrow in the Options section of the Message ribbon to display the Message Options dialog box. |
3. | |
4. | Select the Encrypt Message Contents and Attachments option. |
5. | Click OK; then, click Close to return to the message. |
6. | Compose and send the message as usual. |
Of course, messages can be encrypted only when they are going to one or more recipients for whom you have a certificate. If you request encryption for a message going to people for whom you do not have a certificate, Outlook displays a message and gives you the option of sending the message without encryption.
You can also tell Outlook to encrypt all outgoing messages and attachments. Of course, this capability affects only messages that you send to people whose public key you have. To tell Outlook to encrypt all outgoing messages and attachments, follow these steps:
1. | Choose Trust Center from the Tools menu to open the Trust Center window. |
2. | Select E-Mail Security from the list on the left. |
3. | Select the Encrypt Contents and Attachments for Outgoing Messages option. |
Digitally signing messages
As with encryption, you can apply digital signatures to individual outgoing messages or to all of them.
To add a digital signature to an individual message:
1. | Create, compose, and address a new e-mail message as usual. |
2. | Click the arrow in the Options section of the Message ribbon to display the Message Options dialog box. |
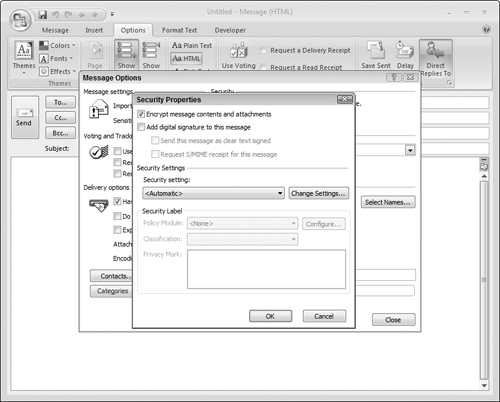
3. | Click the Security Settings button to open the Security Properties dialog box (shown previously in Figure 28-21). |
4. | Select the Add Digital Signature to the Message option. |
5. | Click OK; then, click Close to return to the message. |
To add a digital signature to all outgoing messages:
1. | Choose Trust Center from the Tools menu. |
2. | Click E-mail Security. |
3. | In the Encrypted E-Mail section, select the Add Digital Signature to Outgoing Messages option. |
4. | Click OK. |