
The Contacts Window
When you select Contacts in the Navigation pane, the top part of the pane displays the name of your address book. Usually, this name is Contacts. If you have more than one address book, they are all displayed here. Using multiple address books is covered later in this chapter; most people have and need only one.
Below the address book name is a section titled Current View (see Figure 29-1). Here you can select how information will be displayed in the Contacts window. You have several options, including through business cards, by phone list, by company, and by location. Simply click the view you want and the Contacts window changes immediately.

At the bottom of the Current View section (you may need to scroll to bring these into view) are two commands: Add New Group and Customize Current View. The next sections look at these in turn.
Adding a new contact group
By default, an address book is not subdivided. As the number of contacts grows, you may find it useful to define groups to organize contacts in a way that makes them easier to find and use. You might have Work, Personal, and Family groups, for example. To define a group, follow these steps:
1. | Make sure that Contacts is selected in the Navigation pane. |
2. | At the bottom of the Current View list, click the Add New Group link. Outlook adds a group called New Group under My Contacts (Figure 29-2). |
3. | |
4. |
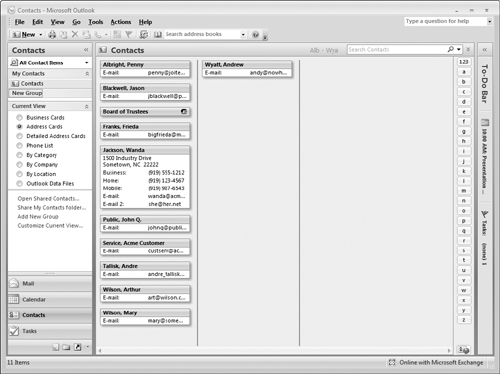
Figure 29-3 shows how the Navigation pane looks after you create three new groups.

After you have created one or more additional groups, you can simply drag a contact from its current group to the group that you want it in. For example, Figure 29-4 shows how you would move Wanda Jackson from the Contacts group to the Personal Contacts group. If you want a given contact to be in more than one group, follow these steps:
1. | Select the contact. |
2. | Press Ctrl+C to copy the contact to the Clipboard. |
3. | Display the destination group. |
4. | Press Ctrl+V to paste the contact. |

Enabling Instant SearchThe Instant Search feature is available by default in the Windows Vista operating system, but not in Windows XP. You may be prompted to download and install the search components when you start Outlook or another Office program. If you do not do so and then try to use Instant Search in Outlook, you will be prompted again. If you do not enable Instant Search, your search capabilities in Outlook will be limited compared to what is described here. |
Customizing a Contacts view
The different views that Outlook provides for contacts can be customized to suit your need. You cannot, however, create a new view from scratch. To customize a view:
1. | Select the view that you want to customize in the Current View list. |
2. | At the bottom of the Current View list, click the Customize Current View link. Outlook displays the Customize View dialog box (Figure 29-5). |
3. | Click one of the buttons to change related view settings (explained in more detail in the text). The text next to each button describes the purpose of each. |
4. | If necessary, click Reset Current View to return the view to its original default settings. |
5. | Click OK to save your changes and close the dialog box. |

Depending on the view you are customizing, you may have only some of the buttons in the Customize View dialog box available. This is because certain aspects of a view are not relevant to some views. The aspects of the view that you change with the different buttons are described in Table 29-1.
| Button | Action |
|---|---|
| Fields | Specify which fields (items of information) are included in the view. |
| Group By | Define grouping for the displayed contacts based on one or more fields. For example, you can group contacts by company or state. |
| Sort | Define how contacts are sorted. You can sort by last name, for example. |
| Filter | Display only those contacts that meet your defined criteria. |
| Other Settings | Specify fonts, grid lines, and other details of Contact View layout. |
| Automatic Formatting | Define special formatting for contacts that meet certain conditions, such as for a contact associated with an overdue task or that one that has been flagged. |
| Format Columns | Define formatting for columns in the view. |
Finding contacts
As your Contacts list grows, you may find it helpful to search for contacts rather than simply look through the list hoping to find what you are looking for. At the top right of the Contacts window is a search field in which you type the text you are looking for. Outlook automatically filters the contacts to show only those that match what you have entered. An example is shown in Figure 29-6. If no matches occur, a message to that effect is displayed.
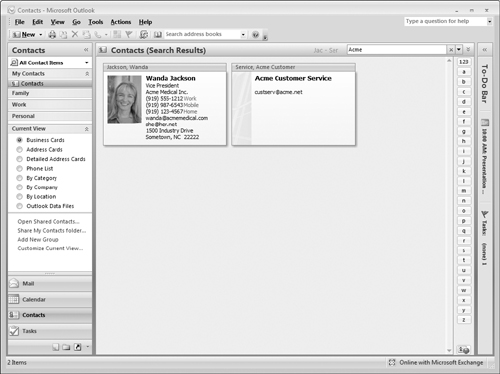
After conducting a search, click the X next to the search box to clear the search and return to displaying all contacts.
Searching by CategoryAssigning your contacts to categories, as is explained later in this chapter, can make the advanced search tool even more useful. When you add criteria to the search, one of your choices is Categories. You can use this criterion to find all contacts that fall into a certain category. Searching by category can be particularly useful when you want to perform a mail merge, as described later in this chapter. |
Finding Contacts AlphabeticallyIn some Contacts views, Outlook displays a column of index buttons at the right side of the Contacts window; the first of these buttons is labeled 123, followed by buttons labeled A through Z. Click one of these buttons to scroll the Contacts display to entries that begin with the specified letter. |
The search I have just described searches all the contact fields for the text you entered. If you want to search in specific fields, you can perform an advanced search by clicking the double down arrow to the right of the search box. Outlook displays the advanced search tools, as shown in Figure 29-7. (Your screen may show different fields than are shown in the figure.) Following are ways to use these tools:
Type in any of the search fields to search in that field only.
Type in two or more search fields to display records that meet all your criteria.
To include more fields in the search, click the Add Criteria button and then select the desired fields from the menu.
To clear each criteria and return to a display of all contacts, click the X next to the search box.
To close the advanced search tools (while keeping the search active), click the double up arrow to the right of the search field.
