
Spell Checking
Typos have no place in professional business documents, whether delivered electronically or in hard copy form. You always want to put your best foot forward and make sure that your files are attractive, clear and easy to follow, and typo free.
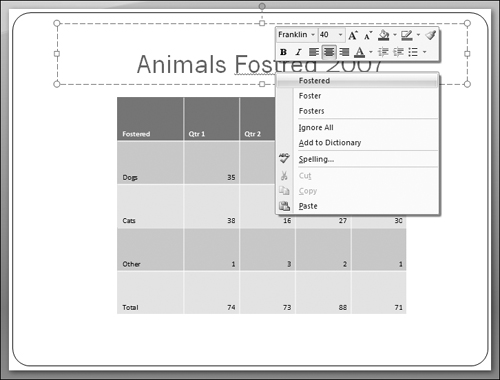
By default, many of the Office applications quietly check your spelling for you as you type. If you see a tell-tale red squiggle appear underneath a word, that means that the application thinks you’ve misspelled the word—according to the application’s own dictionary, anyway. If you see a wavy red underline underneath a word, right-click the word. As shown in Figure 3-25, you can then click a correction in the shortcut menu that appears to replace the typo with the correction, or click Add to Dictionary so that the word is no longer flagged as a misspelling.
Figure 3-25. Right-click any word with a red wavy outline and then click a correction.
If you’ve finished creating the document and have moved on to the fine-tuning stage, you should always run a complete spell check to catch any typos that you may have missed earlier. Use these steps to run the check, and use the most common options for dealing with potential misspellings:
1. | Press Ctrl+Home. This step moves to the beginning of the document so that the spell checking operation will start from there. |
2. | Click the Review tab on the Ribbon. |
3. | Click Spelling & Grammar (Word) or Spelling (other apps) in the Proofing Group. The Spelling dialog box appears with the first potential misspelling highlighted, as shown in Figure 3-26. Some applications enable you to start a spelling check simply by pressing F7. Figure 3-26. The spelling check highlights the suspected word and displays it in the Not in Dictionary text box of the Spelling dialog box.
Note Word can check grammar in addition to spelling every time you run a spell check. A green squiggle may appear under any potential grammar error in the document. Appendix A explains where you can find the settings for controlling how spelling and grammar checking behave in Word. |
4. | Click a button to tell the spelling check how to proceed:
|
5. | |
6. | Click OK in the message that tells you that the spelling check has been completed. |
Tip
It’s critical to proofread your files even after spell checking. Because no spelling checker can pick up on every wrong word choice—such as when you use “then” instead of “than” or “their” instead of “there,” you still need to apply your own intelligence in perfecting your documents.