
Using Form View
Form View is where you actually view and modify data. Form View enables you to enter and review the data in a user-friendly format.
You can use the form to add records into the database. Click the New navigation button to start a new record, if needed (see below), and then type or select data in the fields, pressing Tab to move between fields.
To demonstrate the use of the Form View, follow these steps to create a new form based on tblProducts:
1. | Select
tblProducts
in the Navigation Pane. |
2. | Click the Create tab on the Ribbon. |
3. | Click on the Form command in the Forms group. |
4. | Click the Form View button on the Home tab’s Views group to switch from Layout View to Form View. |
Figure 35-22 shows the Access window with the newly created form displayed in Form View. This view has many of the same elements as Datasheet View. At the top of the screen, you see the Access title bar, Quick Access toolbar, and the Ribbon. The form in the center of the screen displays your data, one record at a time.
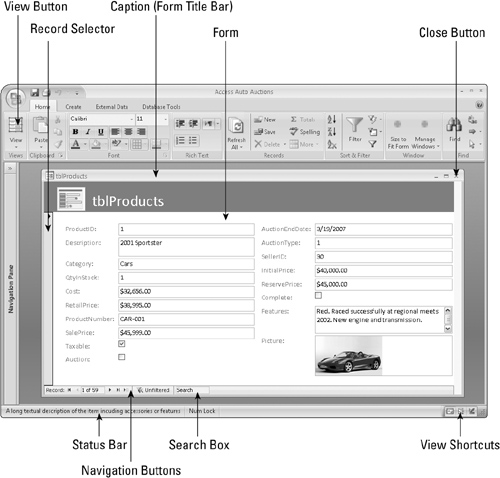
If the form contains more fields than can fit onscreen at one time, Access 2007 automatically displays a horizontal and/or vertical scroll bar that can be used to see the remainder of the data. You can also see the rest of the data by pressing the PgDn key. If you’re at the bottom of a form, or the entire form fits on the screen, and press PgDn, you’ll move to the next record.
The status bar at the bottom of the window displays the active field’s Field Description that you defined when you created the table (or form). If no Field Description exists for a specific field, Access displays the words Form View. Generally, error messages and warnings appear in dialog boxes in the center of the screen (rather than in the status bar). The navigation buttons, search box, and view shortcuts are found at the bottom of the screen. These features let you move quickly from record to record, find data quickly, or switch views.
The Form view Ribbon appearance
In the Form view, the Ribbon (shown in Figure 35-23) provides commands for working with the data. The Home tab has some familiar objects on it, as well as some new ones. This section provides an overview of the Home tab in the Form view; the individual commands will be described in more detail later in this chapter.

The first group is the View group, which allows you to switch between Form View, Datasheet View, PivotTable View, PivotChart View, Layout View, and Design View. You can see all six choices by clicking the command’s down-arrow. Clicking Form View lets you manipulate data on the form. Datasheet View shows the data in a row-and-column format. Design View permits you to make changes to the form’s design. Layout View lets you change the form’s design while viewing data. PivotTable View and PivotChart View let you create PivotTables and PivotCharts based on the form’s data. All these commands may not be available on all forms. By setting the form’s properties, you can limit which views are available. You’ll learn more about form properties later in this chapter.
The Clipboard group contains the Cut, Copy, and Paste commands. These commands work like the commands in other applications (Word, Excel, and so on). The Paste command’s down arrow gives you three choices: Paste, Paste Special, and Paste Append. Paste Special gives you the option of pasting the contents of the Clipboard in different formats (Text, CSV, Records, etc.) Paste Append pastes the contents of the Clipboard as a new record—provided a record with a similar structure was copied.
The Font group lets you change the look of the datasheet in Datasheet View. Use these commands to change the font, size, bold, italic, color, and so on. Use the Align Left, Align Right, and Align Center commands to justify the data in the selected column. Click the Gridlines command to toggle gridlines on and off. Use the Alternate Fill/Back Color command to change the colors of alternating rows, or make them all the same. When modifying text in a memo field with the Text Format property set to Rich Text, you can use these commands to change the fonts, colors, and so on.
The Rich Text group lets you change a memo field’s data if the field’s Text Format property is set to Rich Text. Use these commands to add bullets or numbered lists and change the indentation levels.
The Records group lets you save, delete, or add a new record to the form. It also contains commands to show totals, check spelling, freeze and hide columns, and change the row height and cell width in Datasheet View.
The Sort & Filter group lets you change the order of the records, as well as limit the records being displayed—based on criteria you want.
The Find group lets you find and replace data and go to specific records in the datasheet. Use the select command to select a record or all records.
Navigating between fields
Navigating a form is nearly identical to navigating a datasheet. You can easily move around the form window by clicking the field that you want and making changes or additions to your data. Because the form window displays only as many fields as can fit onscreen, you need to use various navigational aids to move within your form or between records.
Table 35-3 displays the navigational keys used to move between fields within a form.
| Navigational Direction | Keystrokes |
|---|---|
| Next field | Tab, right-arrow (→) or down-arrow (↓) key, or Enter |
| Previous field | Shift+Tab, left-arrow (←), or up arrow (↑) |
| First field of current record | Home or Ctrl+Home |
| Last field of current record | End or Ctrl+End |
| Next page | PgDn or Next Record |
| Previous page | PgUp or Previous Record |
If you have a form with more than one page, a vertical scroll bar displays. You can use the scroll bar to move to different pages on the form. You can also use the PgUp and PgDn keys to move between form pages. You can move up or down one field at a time by clicking the scroll-bar arrows. With the scroll-bar button, you can move past many fields at once.
Moving between records in a form
Although you generally use a form to display one record at a time, you still need to move between records. The easiest way to do this is to use the Navigation buttons, as shown in Figure 35-24. The Navigation buttons let you move to the desired record.
Figure 35-24. The Navigation buttons of a form.

The Navigation buttons (shown in Figure 35-24) are the six controls located at the bottom of the Form window, which you click to move between records. The two leftmost controls move you to the first record or the previous record in the form. The three rightmost controls position you on the next record, last record, or new record in the form. If you know the record number (the row number of a specific record), you can click the Record Number box, enter a record number, and press Enter.
The record number between the Navigation buttons is a virtual record number. The number is not attached to any specific record—it’s just an indicator as to the record number you’re on given the current filter or sort. It will change with each time you filter or sort the records. The number to the right of the record number displays the number of records in the current view. The number of records displayed might not be the total number of records in the underlying table or query; this number changes when you filter the data on the form.
Tip
You can also press PgDn to move to the current field in the next record, or PgUp to move to the current field in the preceding record.