
Designing a Form Template
When you start InfoPath by clicking Start and then choosing All Programs ![]() Microsoft Office
Microsoft Office ![]() Microsoft Office InfoPath 2007, InfoPath displays its Getting Started dialog box, shown in Figure 39-2. That dialog box gives you the option of filling out an existing form (as an end user) or designing a new form template. This section focuses on the latter, more challenging task.
Microsoft Office InfoPath 2007, InfoPath displays its Getting Started dialog box, shown in Figure 39-2. That dialog box gives you the option of filling out an existing form (as an end user) or designing a new form template. This section focuses on the latter, more challenging task.
Figure 39-2. InfoPath opens this dialog box at startup, presenting you with the option to open or design (create) a form.

Open a new form
If you just started InfoPath, click the Design a Form Template under Design a Form in the lower-left corner of the Getting Started dialog box to begin the design process. If you’ve already started working in InfoPath and want to start the process for creating a new form, choose File ![]() Design a Form Template. Either method of starting displays the Design a Form Template dialog box shown in Figure 39-3.
Design a Form Template. Either method of starting displays the Design a Form Template dialog box shown in Figure 39-3.
Figure 39-3. Choose whether to create a blank template or connect it to an existing data source.

If you want to start with a totally blank template and design the data source by adding fields, leave the Blank icon selected in the Based On list. If you instead want to either use the form template to submit or retrieve data from an existing data source such as a database, click the icon for the desired type of data source. Then click OK.
If you opted to create a blank form template, the template appears right away onscreen. If you instead specified that the database should connect to a data source, InfoPath prompts you to specify information about the data source, such as the location of a database file and what tables to use from it. Fill out the Data Connection Wizard dialog boxes that appear to establish the connection. Figure 39-4 shows the wizard’s dialog box that appears after you select Database in the dialog box shown in Figure 39-3, click the Change Database button to select a database, and then select a table or query to use in the Select Table dialog box. You can select which fields to use in the data source for the form and then click Next. In the next dialog box, enter names for the source data connection and connection for submitting information to the data source in the text boxes at the top; then click Finish to finish creating the data source connection.
Figure 39-4. Selecting the fields to use from an existing data source, and Access database in this example.

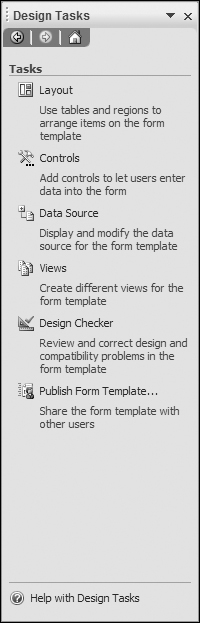
When the new form template appears in InfoPath, the Design Tasks task pane automatically opens at the right side of the screen. As shown in Figure 39-5, this task pane lists the overall steps of designing the form, so you can just follow its links to finish the process. After you click and use one of the task links in this task pane, click the Design Tasks link that appears at the top of the task pane to return to the initial list so that you can click the next link and continue the design process.
Figure 39-5. The Design Tasks task pane leads you through the overall steps of designing your form.
Adding layout items
Layout items help separate and label the fields of information in a form, both to give it an attractive appearance and to make it easy to navigate. When you click Layout in the Design Tasks task pane, the Layout task pane and its choices appear.
Click a choice in the Insert Layout Tables list in the upper part of the pane, and the initial table appears on the form, as shown in Figure 39-6. To continue building the content of such a table, you can click in the title area and type a title. You can then click in the Click to Add Form Content area and type text, or you can click another Insert Layout Tables choice to nest table cells within table cells. Figure 39-7 shows how doing so looks.

Figure 39-7. A Two-Column table nested within the bottom cell of a Table with Title.

You also can click outside table cells and type text directly in the form background, as well as add single-cell tables by clicking the Draw Table button on the Tables toolbar to draw a table. When you click in a cell of a table that you’ve already drawn, you can use the Choices in the Merge and Split Cells list at the bottom of the Layout task pane to further determine how the table lays out.
After you finish arranging your table(s), click the Design Tasks link at the top of the Layout task pane to go back to the Design Tasks task pane.
Adding controls
Controls create the fields that accept the user input for your form. Click the Controls choice in the Design Tasks task pane to display the list of controls that you can insert into the table(s) on your form. If you based the form template on an existing data source such as a database, you can skip this process and move on to the next section, because you can add the controls simply by dragging fields from the Data Source task pane.
To add a control on a form template that you’ve created as a blank, use these steps:
1. | Click in the table cell into which you want to add the control. |
2. | Type any needed label text and press Enter if needed. |
3. | Click the desired control in the Insert Controls list. The control appears at the insertion point location on the form. |
4. | Double-click the control on the form. The control’s Properties dialog box appears. If the control appears with its own label, be sure to double-click the control itself, not the label, to open the Properties dialog box. You also need to edit the label manually. |
5. | Specify the desired information for the control. For example, type a field name to give the field a unique name in the data source, such as in the example shown in Figure 39-8. Note that you cannot include spaces in the field name. Figure 39-8. You should enter a friendly field name for each form to better identify the field in the data source.
|
6. | When you have applied the desired property settings to the control, click OK. |
Repeat the preceding process to add as many controls as needed to your form. When you finish, click the Design Tasks link at the top of the task pane to return to the design tasks task pane.
Note
If you checked the Enable Browser Compatible Features Only checkbox when creating the template (refer to Figure 39-3), some controls will not be available to you and you will see the Some Controls Have Been Hidden Based on the Current Compatibility Settings message in the Controls task pane, as shown in Figure 39-8.
Working with the data source
If you created a form template from scratch, that process set up the fields in the data source—one field for every control you added. If, however, you based the form template on an existing database or data source, you need to come to this task pane to add the fields or controls to the template.
Click Data Source in the Design Tasks task pane to list the available fields from the connected data source. Drag the desired field onto the template and then size and position it as desired.
If you want to add a new field, click the Add a Field or Group link at the bottom of the Data Source task pane. Enter the desired field information in the Add a Field or Group dialog box that appears and then click OK. Click the Design Tasks link at the top of the task pane when you finish working with data source fields to return to the Design Tasks task pane.
Note
If you want to connect the template you’re designing to a data source after the fact, click the Manage Data Connections link at the bottom of the Data Source task pane to open the Data Connections dialog box, in which you can click the Add button to open the Data Connection Wizard and choose the new connection. Keep in mind, however, that the data you make in this way will not be the main data connection for the form template.
Checking and saving the template
As with files you create in most other Office applications, you should save your form template file to give it a unique name and preserve its information. Choose File ![]() Save or the Save button on the InfoPath Standard toolbar to perform the save as usual.
Save or the Save button on the InfoPath Standard toolbar to perform the save as usual.
Then, click the Design Checker link in the Design Tasks task pane. This action displays the Design Checker task pane (Figure 39-9), which identifies any errors you need to correct before continuing. Clear up the errors and rerun the check, and then save any changes you made to the form template. Then click the Design Tasks link at the top of the task pane to return to the Design Tasks task pane.
Figure 39-9. Run the Design Checker to see whether your form template has errors before publishing.
Setting up submit behavior
If you started with a blank form template, one last area to check before distributing the form template is the submit behavior—telling InfoPath to display a submit button and specifying what happens when the user clicks it after filling in the form. Choose Tools ![]() Submit Options to display the Submit Options dialog box. To set the submit behavior, click the All Users to Submit This Form checkbox to check it. Doing so enables the rest of the settings in the dialog box, as shown in Figure 39-10.
Submit Options to display the Submit Options dialog box. To set the submit behavior, click the All Users to Submit This Form checkbox to check it. Doing so enables the rest of the settings in the dialog box, as shown in Figure 39-10.
Figure 39-10. Set up submit behavior in this dialog box.
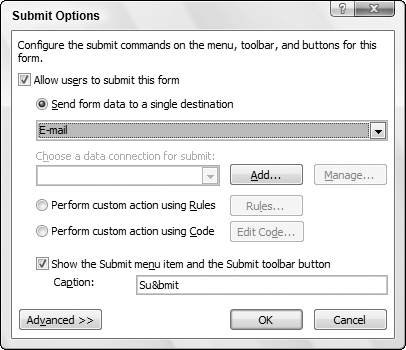
You can then choose what single destination the form results get sent to or add a data connection. You also can control whether the Submit button and menu item appear using the Show the Submit Menu Item and the Submit Toolbar Button checkbox. After you choose your settings in this dialog box, click OK to apply them.
Note
Setting a submit behavior doesn’t prevent the user from saving individual form instances as XML files so that you can merge them.