
Character Formatting
There are at least six ways of directly applying various kinds of character formatting:
Using the Font group on the Home tab
The Font dialog box (Ctrl+D or Ctrl+Shift+F, or click the Font group Dialog Box Launcher)
The Mini Toolbar (hover the mouse over selected text)
Using shortcut keys
With the Font group or components placed on the QAT
Using the Language tool on the status bar
In this section, I’ll describe these methods and try to give you a sense of which ones to use. A lot depends on your working style, but it can also depend on what you happen to be doing. On any given day, I’ll probably use at least five of the six methods.
Formatting techniques
To apply character formatting, you have three basic options:
Stream method— Apply formatting before you start typing a word or passage, and then turn it off when you’re done. For example, click the Bold tool, type a word, and then click the Bold tool again.
Selection method— Select the text you want formatted by dragging over it or using a keyboard shortcut and/or the mouse, and then apply the formatting.
Whole-word method— Click anywhere in a word and then choose the desired formatting.
Note
The whole-word method is settings dependent. It will work by default, but it will not work if you’ve turned off “When selecting, automatically select entire word” in the Editing Option section of the Advanced category in the Word Options dialog box.
It would be redundant to repeat the basic steps for each and every formatting type. The techniques described here apply to all character formatting described in this chapter.
Repeat formatting (F4)
A tremendous time saver in Word is the Repeat Formatting command, invoked by pressing F4. Actually, F4 will repeat typing and many other actions too, but I find it most useful for repeating formatting.
Suppose, for example that you’re scanning a newsletter looking for people’s names, which need to be made bold. There’s John Smith, so you select his name and press Ctrl+B. Thereafter, however, it might be faster to position one hand on the mouse and the other at the F4 key. Click on Jane; press F4. Click on Doe; press F4. Or, click to select Jane Doe as a phrase, and then press F4. The F4 key enables you to temporarily forget about pressing Ctrl+B, right-clicking, or traveling to the top of the Word menu in search of a formatting tool.
Now, let’s try something else. Click on a word and press Ctrl+B to make it bold. Now press Ctrl+I. Now the text is bold and italic. Click on another word and press F4. It’s only italic! That’s because F4 repeats only the most recent formatting (or other action).
Note that F4 and Ctrl+Y both do the same thing. Which you use is your choice. Many prefer F4 because it can be pressed with one finger. Others prefer Ctrl+Y because it doesn’t involve as much of a stretch as F4.
Tip
If you have multiple or compound character formatting to repeatedly apply to a non-style-formatted series of words or selections, use the Font dialog box instead of individual commands. When you use the Font dialog box, all changes applied when you click OK become a single formatting event to the F4 key, so F4 can now apply multiple types of character formatting all at once.
Copy formatting
Sometimes, the moment for using F4 has passed, yet you’re still left needing to reapply compound formatting. I’m assuming that for whatever reason you’re not using a character style. Be that as it may, there are two common methods for copying formatting: the Format Painter and the Copy Formatting keystroke. Note that these techniques aren’t limited to character formatting. They’ll work with many other kinds of formatting as well.
Format Painter
To use the Format Painter, click or select the item whose formatting you want to copy. If you want to clone that formatting just once, click the Format Painter in the Clipboard group on the Home Ribbon, shown in Figure 5-3. If you want to apply that formatting multiple times, then double-click the Format Painter.
Figure 5-3. Use the Format Painter in the Clipboard group to copy formatting.
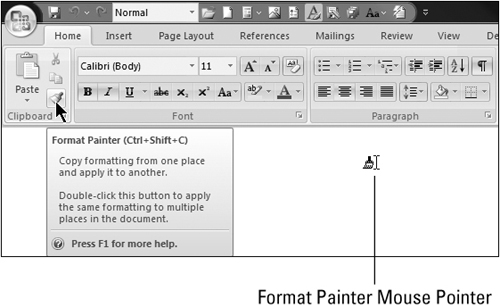
Note that the mouse pointer turns into a paintbrush. Honestly! That’s what it’s supposed to be!
Next, if you’re copying formatting to a whole word, click the word you want formatted. Presto! If you’re copying to any other group of characters, then use the mouse pointer to select the destination text. If you double-clicked the Format Painter, continue this until you’re done. Press Esc or click the Format Painter again to exit format painting mode.
Keyboard method
If you don’t care for the Format Painter, that’s perfectly okay. You’ll need to know about two keystrokes:
Ctrl+Shift+C— Copy Format
Ctrl+Shift+V— Paste Format
You might have noticed Ctrl+Shift+C in the Format Painter’s tooltip in Figure 5-3. This works very similarly to the Format Painter. Click in or select the text whose formatting you want to copy, and press Ctrl+Shift+C. Observe the mouse pointer. It’s the Format Painter pointer! Now, move to or select the text where you want the formatting copied and press Ctrl+Shift+V. Note that there is no keyboard equivalent for the multi-copy method (double-clicking on the Format Painter), but you can combine the two methods, initiating the process by double-clicking the Format Painter and then following through using Ctrl+Shift+V.
Clear formatting
There are several degrees of clearing formatting. Here, I’ll talk about two of them:
Clear direct character formatting (ResetChar)
Clear all formatting (ClearAllFormatting)
The first is the venerable Ctrl+Spacebar command known and loved by many in every version of Word they can remember. It’s also a widely misunderstood command. This command does not remove all character formatting. It removes all direct character formatting. So, if the selected text’s formatting all comes from styles applied to the text—regardless of how bizarre or compound the formatting might be—Ctrl+Spacebar will have no effect whatsoever.
For example, when you apply Heading 1 to a section of text, it becomes bold. Ctrl+Spacebar can’t touch that bold formatting since it was applied though the style rather than by pressing Ctrl+B or clicking the bold tool. If you use direct formatting to italicize a word in an otherwise non-italicized heading, however, now Ctrl+spacebar can remove it.
New feature alert!
The second type of format removal is completely new to Word 2007. It is accessible using the Clear Formatting tool on the Home Ribbon, shown in Figure 5-4. This command is quite different from Ctrl+spacebar.
Figure 5-4. The Clear Formatting tool is actually misplaced in the Ribbon. It affects not only character/font formatting but paragraph and style formatting as well.

This new command is the moral equivalent of copying a selection to the Clipboard and then using Paste Special ![]() Unformatted Text to paste it back into the document. It strips out all formatting.
Unformatted Text to paste it back into the document. It strips out all formatting.
The Font group
The Font group (or chunk as it’s more affectionately called) on the Home tab is shown in Figure 5-5. The Font group is compressed or expanded depending on the width of the current Word window. In its full glory, the Font group can display up to 14 separate controls.
Figure 5-5. The Font group is Word 2007’s “discoverable” new way of applying character formatting.

Four of the Font tools feature Live Preview:
Font (e.g., typeface name, such as Calibri)
Size
Highlight color
Text color
As shown in Figure 5-6, Live Preview shows you the results of the selected (but not yet applied) formatting. Two of the Live Preview controls—font and size—can be rolled up and out of the way, as shown in Figure 5-6. The other two cannot.
Figure 5-6. Dots at the bottom of a Live Preview control indicate that it can be rolled up and out of the way.

As shown in Figure 5-7, there’s also a fifteenth control—the Font Dialog Box Launcher. The Font dialog box is nearly identical to its counterpart from Word 2003, with most of the differences owing to the removal of the Text Effects tab.
Figure 5-7. Use the Font Dialog Box Launcher to display the nearly full-service dialog box.

Some of the icons in the Font group might seem a bit obscure and indistinct. Hover the mouse pointer over each of the controls to see what they do. Notice that for many of the controls, if shortcut keys exist, they are indicated in the Enhanced ScreenTip. However, this is not the end of the story. Some tools, for whatever reason, might not show the shortcuts. Jump ahead to the section “Character formatting shortcut keys” later in this chapter if you’re just dying to know what’s assigned to what.
Typeface or font
Some call it font, some call it typeface. Some skirt the nomenclature issue simply by saying what typeface or font they want (Times New Roman, Arial, etc.). Whatever you call it, it’s key to a document’s appearance.
Note
In Word 2003, you could move the focus to the Font tool in the toolbar by pressing Ctrl+Shift+F. That precise functionality no longer exists in Word 2007. Instead, that keystroke now does the same thing as Ctrl+D, which is to show the Font dialog box.
Point size
Size controls the height of the font, generally measured in points. A point is 1/72 of an inch, so 12 points would be 12/72 of an inch. For Word, a font set’s point size is the vertical distance from the top of the highest ascending character to the bottom of the lowest descending character.
You aren’t limited to the range of sizes you see in the Home tab of the Ribbon. Word can go as low as 1 point and as large as 1,638 points. Plus, you can set the height in increments of .5. Hence, a point size of 1637.5 is perfectly valid.
As with typeface, Word 2007 will no longer let you make a key assignment that takes you directly to the exposed size control. While Ctrl+Shift+P did that in Word 2003 and earlier, Ctrl+Shift+P now simply takes you to the Font dialog box, where size is highlighted.
Grow/Shrink tools and keyboard shortcuts
Text size can also be controlled using the Grow Font and Shrink Font tools (refer to Figure 5-5). If you hover the mouse pointer over each, you’ll also learn that they both have shortcuts, Ctrl+Shift+> and Ctrl+Shift+<, respectively.
Note
The ScreenTip actually says Ctrl+> and Ctrl+<, and technically that’s right because > and < are a shifted period and comma, respectively. Personally, though, I’d rather have you understand exactly what keys to press than to stand on ceremony.
If you click the drop-down arrow next to the Point Size tool, you’ll notice that the fonts listed are not all even increments of 2. Instead, they go from 8 to 28 in steps of 2, but then they leap to 32, 48, and 72. The Grow and Shrink font tools follow the listed increments.
If you want a finer degree of control (for example, when you’re trying to make text as large as possible without spilling onto an additional page), you should know about two additional default shortcut keys: Ctrl+[and Ctrl+]. These two commands shrink or grow the selected characters by 1 point. The extra granularity often is just what you need to find the largest possible font you can fit inside a given space, such as a page, table, or text box.
Color
Word has three color settings that can be applied at the character level:
Text color— The color of the characters themselves
Shading— The color of the background immediately behind text
Highlighting— The electronic equivalent to those neon-colored felt markers you use to annoy people who ask you to read things you don’t want to read
Text color
Text color is pretty self-explanatory, except when it’s not. Most of us know what red, black, and blue are, but what is Automatic? Automatic can be Black or White and is based on the shading. If the shading is so dark that black text can’t be read without difficulty, Word automatically switches the display color to white.
Shading
We’ll talk about design considerations in a later chapter. For now, note a few things about shading that sometimes escape notice. Looking at the Home tab and the placement of Shading (second from the right under Paragraph), you might be tempted to believe that shading is paragraph-level formatting. Indeed, it sure acts that way. With nothing selected, Shading acts on the entire current paragraph. (You’ll learn more about this later.)
However, if you select a single word or character, Shading suddenly acts like a character formatting attribute. Well, that’s what it is. Because people seldom vary the shading within any given paragraph, it is treated as a paragraph attribute by Word’s interface. Yet, just like font, point size, bold, and italic, shading is a character attribute.
As shown in Figure 5-8, shading also affects the display of text color. In this case, the shading color is maroonish, which you can’t tell in the printed version of this book. Keep the character aspect of shading in mind when we look at the Font dialog box, coming up shortly.
Figure 5-8. Despite its placement in the Paragraph group of the Home tab, shading can be applied to a selection of characters.

Highlighting
The Text Highlight Color control—more generally known as the highlighter—is shown in Figure 5-5. It actually has four modes of operation. Most people are aware of one mode or another, but not all four.
One mode is to select text and then click the highlighter. This is the mode that most users are aware of. It’s pretty effective, but it might not reflect the actual highlighting process.
A second mode is to turn the highlighter on by clicking the Text Highlight Color tool and then use the mouse to drag areas you want highlighted. The highlighter mouse pointer stays active until you click the Text Highlight Color tool again, or until you press the Esc key.
A third mode can be used to apply highlighting to all occurrences of a given word or phrase in a document, using the most recently applied highlighting color. Press Ctrl+F to open the Find dialog box. Type the word or phrase of interest, and then choose Reading Highlight ![]() Highlight All, as shown in Figure 5-9.
Highlight All, as shown in Figure 5-9.
Figure 5-9. Use Find to apply a reading highlight to every occurrence of a word or phrase in your document.

A fourth highlight method is one I find a bit more useful than the Reading Highlight feature. It works from the Replace dialog box. Press Ctrl+H (Replace). In Find What, type the word or phrase you want to highlight. Clear the contents of the Replace With field, and in Replace’s lower-left corner, choose Format ![]() Highlight. Click Replace All to apply highlighting to all occurrences of the Find What text. Highlighting inserted this way is more robust than that inserted using the Reading Highlight and will not disappear if you choose to manually manipulate highlighting.
Highlight. Click Replace All to apply highlighting to all occurrences of the Find What text. Highlighting inserted this way is more robust than that inserted using the Reading Highlight and will not disappear if you choose to manually manipulate highlighting.
Note that when the Replace With field is blank but has associated formatting, the formatting is applied to text that matches the Find What text. If both formatting and Replace With text are absent, then Replace deletes all occurrences of the matching text.
You can also choose not to print highlighting. This gives you the best of both worlds. You can mark up a document for your own benefit, and then—if desired—print it out without the highlighting. Not only is this good for keeping internal guides private, but it also saves money on yellow ink. To prevent printing (or displaying) highlighting, choose Office Button ![]() Word Options, select the Display tab, and remove the check next to Show Highlighter Marks. If you hover over the information while you’re here, the tip informs you that this controls both display and printing. Click OK when you’re done.
Word Options, select the Display tab, and remove the check next to Show Highlighter Marks. If you hover over the information while you’re here, the tip informs you that this controls both display and printing. Click OK when you’re done.
Tip
One very annoying thing about highlighting is that if you use the select-and-highlight method, Word undoes the selection after you apply highlighting. This can be really irritating if you use the wrong color, but if you immediately press Ctrl+Z or click Undo, Word not only undoes the highlighting, it also reselects that section of text so you can take another stab at highlighting.
Change case
Change case doesn’t really fit in here, but that’s precisely why it’s included. Case is not formatting. Case is a choice of which characters to use—uppercase, lowercase, or some combination thereof. Why does Microsoft put it in the Font group? I don’t know for sure, but it’s probably because it can affect groups of characters and doesn’t really fit anywhere else.
The first thing you need to know is that you cannot use any variation of this command to affect style definitions in your document. For example, you can’t apply lowercase to text, turn it into a style, and then use that style to format Internet keywords. It could be useful, but this feature must await some distant version of Word as yet unannounced. For now, you can include All Caps or Small Caps as elements of a Word style, not that that helps with Internet addresses.
Language
Note that language is not included in the Home tab’s Font group. You’ll also notice that it’s not present in the Font dialog box either, so how do you know it’s a character formatting attribute? Two reasons: First, it can be applied to a single character in a document. Second, it can be included in a character style definition, as shown in Figure 5-10. (To display the Modify Style dialog box, click the Styles group Dialog Box Launcher button on the Home tab. In the Styles pane that appears, point to any style with the mouse, click the drop-down list arrow that appears, and click Modify.)
Figure 5-10. Language is included among the attributes associated with a character style.

You set the language using the Language tool on the status bar. Click the status bar area that displays the language (the Language tool) to open the Language dialog box. If you don’t see the Language tool, then right-click the status bar and click to enable Language. Among the language tools’ more useful features is that Do Not Check Spelling or Grammar setting you can apply to text. This can be handy for technical jargon and programming keywords that you might not want checked.
Conversely, Detect Language Automatically, the last feature, shown in Figure 5-11, can be a real troublemaker. With that setting turned on, it’s possible for text to unintentionally be tagged as some other language, resulting in large sections of text being flagged as misspelled. You should turn that setting off unless you actually need it. It is enabled by default!
Figure 5-11. The Do Not Check Spelling or Grammar option can be useful for technical writers. Detect Language Automatically can cause problems for chronically bad spellers!

To set the default for all documents based on the current template, choose the desired language as well as the desired settings for the last two options, and then click Default. Confirm the settings by clicking Yes. Note that even though the confirmation box doesn’t mention the latter two settings, they are included in the changes made to the underlying template.
The Font dialog box
The Font dialog box, shown in Figure 5-12, can be a useful tool when applying multiple character format changes at the same time. Note, however, that the Font dialog box and the Font group on the Home tab of the Ribbon do not provide identical capabilities. Not only doesn’t the Font dialog provide any live preview at all (just the static preview box), it contains different commands and settings.
Figure 5-12. Only some of the functionality of the Font dialog’s two tabs is replicated on the Home tab of the Ribbon.

Most font attributes are largely self-explanatory. Experiment with them to see the different effects. Conspicuously missing from the Home Ribbon are the controls in the Font dialog box’s Character Spacing tab, shown in Figure 5-12. Note the Scale and Spacing controls.
Scale is used to stretch or compress the actual characters. Spacing is used to expand or condense only the spacing. Scaling and spacing expansion are demonstrated on the identical text shown in Figure 5-13. The top sample was scaled up 150%. The characters and spaces were all stretched horizontally. The bottom sample was expanded by 2.8 points. An additional 2.8 points of spacing were inserted between each character. Even though both samples are nearly identical in height and width, the top sample actually looks larger.
Figure 5-13. Scaling and horizontal spacing can yield text of identical length and height, but with a very different appearance.

Position is used to raise or lower the selected characters by a specified number of points. Unlike spacing, which can vary by as little as .1 points, position’s smallest gradation is .5 points. This is sometimes used to adjust subscripts and superscripts if the built-in versions don’t accomplish the desired effect or you need the subscripts and superscripts to be the identical size as the surrounding text.
Tip
If you have a chronic need to adjust subscripts and superscripts, you might consider creating a character style that gives you the desired formatting.
The Mini Toolbar
Yet another tool for applying formatting is the Mini Toolbar. New in Word 2007, this feature is fully explained in Chapter 2. Shown in Figure 5-14, The Mini Toolbar has a sampling of character formatting tools from the Home tab of the Ribbon. Unlike the Ribbon tools, however, none of the Mini Toolbar’s tools provide Live Preview.
Figure 5-14. The Mini Toolbar has a sampling of character formatting tools from the Home tab of the Ribbon.

The Mini Toolbar’s singular but important claim to fame for many users will be its ergonomic utility. When you need something on it, it’s right there, close to the text. Just select the text, move the mouse pointer over the upper-right corner of the selection, and then move the mouse over the faint version of the toolbar that appears. Conversely, many of its tools are easily accessible with direct keystrokes, as you’ll see in the next and final section in this chapter.
Character formatting shortcut keys
Many of the character formatting commands discussed in this chapter are accessible via built-in keyboard shortcuts. Longtime users of Word undoubtedly have many of them committed to memory. Newcomers, however, might need a quick guide. As you navigate your way through Word 2007, keep your eyes open. Quite often, Word will show you its built-in key assignments. To make sure this happens, do the following:
In Office Button
 Word Options
  Popular, set the ScreenTip Style setting to Show Feature Descriptions in ScreenTips.
In Office Button
 Word Options
  Advanced
  Display section, enable (check) Show Shortcut Keys in ScreenTips.
Table 5-1 provides a quick reference of keyboard shortcuts related to character formatting. This list might not be exhaustive.
| Command | Keystroke |
|---|---|
| All Caps | Ctrl+Shift+A |
| Bold | Ctrl+B, Ctrl+Shift+B |
| Copy formatting | Ctrl+Shift+C |
| Font dialog box | Ctrl+D, Ctrl+Shift+F |
| Highlighting | Alt+Ctrl+H |
| Hyperlink | Ctrl+K |
| Italics | Ctrl+I |
| Paste formatting | Ctrl+Shift+V |
| Point size: decrease by 1 point | Ctrl+[ |
| Point size: decrease to next preset | Ctrl+Shift+< |
| Point size: increase by 1 point | Ctrl+] |
| Point size: increase to next preset | Ctrl+Shift+> |
| Remove non-style character formatting | Ctrl+Space |
| Small capital letters | Ctrl+Shift+K |
| Subscript | Ctrl+= |
| Superscript | Ctrl+Shift+= |
| Symbol font | Ctrl+Shift+Q |
| Toggle case of selected text | Shift+F3 |
| Underline | Ctrl+U |
| Word underline | Ctrl+Shift+W |