
Adding Header and Footer Material
You can put a variety of things into headers and footers, ranging from filenames and various other document properties (author, title, date last printed/modified, etc.) to page numbers and even watermarks. Inserting most text and graphics that will actually be printed in the top or bottom margin is straightforward. There are some special cases, however, such as page numbers, side margin matter, and background images and watermarks, that require special attention.
Page numbers
A common use for headers and footers is to display page numbers. To include page numbers in Word 2007, several methods are available—some new, and some old. This section focuses mostly on the new ways because they provide extraordinary ease, flexibility, and variety not found in any previous version of Word. When the old ways are best, however, that’s where we’ll turn.
Insert page numbers
Inserting page numbers in Word has never been easier. First, decide where you want the page numbers to appear (top, bottom, or side margin). Then click anywhere on the first page in the document section where you want the number to appear. As noted earlier, documents can contain multiple sections, and each section can have independent headers and footers, which means they also can be numbered independently.
In the Insert tab’s Header & Footer group, click the Page Number button to open its menu, as shown in Figure 8-18, and choose one of the top for items.
Figure 8-18. Word 2007 has extensive new galleries with a variety of page number formats from which to choose.

To see the gallery that corresponds to where you want the page number to appear, click the applicable choice in the Page Number menu:
Top of Page
Bottom of Page
Page Margins (see “Where do page margin numbers really go?” a little later in this section)
Current Position (use this option, for example, when the insertion point is already exactly where you want the page number to appear)
The bottom of the page is the most common choice for word processing documents, but there are times when the top or side works better for a particular publication. Select the desired destination. Word displays a number of preset page number options.
When you find a page number gallery item that suits your fancy, click on it to insert the page number into the header or footer (according to which option you chose to get here). Note that you can also right-click the gallery item to see additional options, which are shown in Figure 8-19.
Figure 8-19. Right-click a page number gallery item for additional options.

To see the true nature of a page number gallery item, right-click it and choose Edit Properties.
Where do page margin numbers really go?
When you insert the page number in the page margin, Word 2007 inserts it into the header as a floating shape to which a page field code was added. If you try to double-click on that page number, nothing happens! In fact, you can even try the Select Objects tool (in the Editing group in the Home tab, choose Select ![]() Select Objects), which normally can grasp any graphic. It can’t grab it either. The reason is because it’s out of reach, located below the text in the header/footer layer.
Select Objects), which normally can grasp any graphic. It can’t grab it either. The reason is because it’s out of reach, located below the text in the header/footer layer.
To bring it into reach, in the Insert tab, choose Header ![]() Edit Header. You can now click on the side page number and edit to your heart’s content.
Edit Header. You can now click on the side page number and edit to your heart’s content.
Deleting page numbers
To delete page numbers, move to the document section that contains the numbering you want to remove. In the Insert tab, click Page Numbers ![]() Remove Page Numbers.
Remove Page Numbers.
Remove Page Numbers removes all page numbers from headers and footers in the current section. It does not remove page numbers from other document sections.
Formatting page numbers
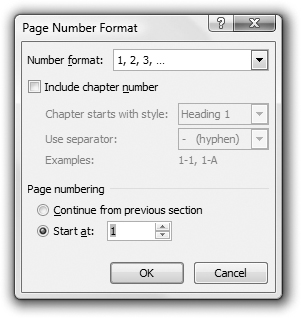
You can choose the page numbering format before or after you insert a page number. On the Insert tab, choose Page Number ![]() Format Page Numbers, to display the Page Number Format dialog box, shown in Figure 8-20. Options are explained in Table 8-1.
Format Page Numbers, to display the Page Number Format dialog box, shown in Figure 8-20. Options are explained in Table 8-1.
Figure 8-20. Word provides flexible page numbering options.
| Option | Purpose |
|---|---|
| Number format | Numbering using 1, 2, 3; A, B, C; a, b, c; I, II, III; or i, ii, iii. Provides an additional option to bracket Arabic numbers with dashes (to bracket others, edit the header or footer directly, as shown later in this chapter). |
| Include chapter number | Use a chapter numbering scheme such as I-1, II-5, III-43, where I, II, and III are chapter numbers, and chapters are formatted using a Heading 1–9 style with numbering applied. |
| Chapter starts with style | Available only if Include Chapter Number is enabled. For this option to work, chapter numbers must be formatted using a Heading 1 through Heading 9 style, and numbering must be included in the style. |
| Use separator | Specify the separator to use between chapter and page numbers. |
| Continue from previous section | Indicates whether the current section’s numbering is connected with that of the previous section. Use this option when distinct sections are being used for a reason other than to create distinct numbering, such as when switching sections to accommodate changes from portrait to landscape and back again. |
| Start at | Use this to specify a starting number other than 1. |
Additional options that affect page numbers, such as whether headers or footers are displayed on the first page of a document or document section, are discussed earlier in this chapter, under “Different first page.”