
Mail Merge Task Pane/Wizard
YAHOO stands for you always have other options. YAHOO applies here, as well. Your other option is to use the Mail Merge Wizard, rather than the individual tools in the Mailings tab of the Ribbon. If you need a little more hand-holding when doing a mail merge, Word has the hand ready and waiting, in the form of the Mail Merge Wizard. To travel this particular yellow brick road, start a new blank document (or open a document you want to use as the basis for a data document). In the Start Mail Merge group of the Mailings tab on the Ribbon, click the Start Mail Merge button and choose Step by Step Mail Merge Wizard. This opens the Mail Merge task pane, shown in Figure 10-26.
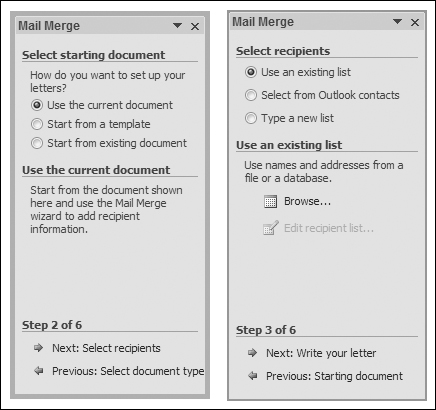
Figure 10-26. Choosing the Mail Merge Wizard opens the Mail Merge task pane.

Step 1: Document Type
In Step 1, shown in Figure 10-26, choose the type of data document you want to create. Later, if you need to restore this to a normal document, in the Start Mail Merge group of the Mailings tab, choose Start Mail Merge ![]() Normal Word Document. In the Mail Merge task pane, click Next: Starting Documents.
Normal Word Document. In the Mail Merge task pane, click Next: Starting Documents.
Step 2: Starting Document
In Starting Document, Word provides three options. Note that when you choose any of these options, Word explains the option in the lower part of the task pane. The options are as follows:
Use the Current Document— Start from the current document and use the Mail Merge Wizard to add recipient information (merge fields).
Start from a Template— Start from a template, which you can customize as needed by adding merge fields and/or other contents. If you choose this option, click Select Template to be shown a list of all of the available templates (at least the ones that Word knows about). Note that despite the option’s wording, it does not present you with a list of “ready-to-use mail merge” templates.
Start from Existing Document— Open an existing mail merge or other document and change it to fit the current need by changing the contents or recipients. Recent mail merge documents, if any, will be listed. If the one you want isn’t listed, click Open to navigate to the one you want, select it, and then click Open.
After homing in on the starting document, click Next: Select Recipients at the bottom of the task pane.
Step 3: Select Recipients
In Step 3, select from Use an Existing List, Select from Outlook Contacts, and Type a New List. If you select Use an Existing List, you will need to select a file that holds the recipients in the dialog box that appears. If you choose Type a New List, click Create, and then use the dialog box that appears to enter names and addresses. These options appear in Figure 10-27.
Figure 10-27. Choose whether to use the existing document or a new document, and then choose the data source (list of recipients).
After selecting the data source and the data, it is ready. Click Next: Write Your Letter at the bottom .
Step 4: Write Your Letter
In Step 4, shown in Figure 10-28, you are greeted with four options:
Address block— This leads to the dialog box shown in Figure 10-13. See the discussion under “Address Block” for additional details.
Greeting line— The Greeting line option displays the dialog box shown in Figure 10-15. See the “Greeting Line” heading for more information.
Electronic postage— As indicated previously, the functioning of this option requires the installation of third-party software that enables you to apply postage to items you send.
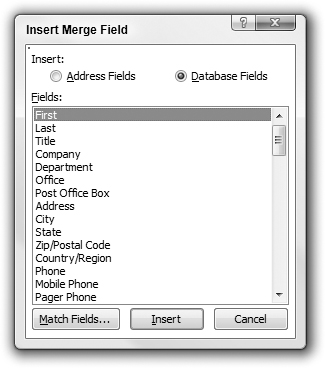
More items— This option displays the dialog box shown in Figure 10-28. It is a shame that this thoroughly confusing dialog box appears as part of the Mail Merge Wizard. If you choose Address Fields, the dialog box shows you a list of all of the fields in its vocabulary, many or most of which are probably irrelevant to the attached database. Choose Database Fields instead to see a list of what’s actually available for use in this merge.
Figure 10-28. Ignore the Address Fields option. The associated database fields are listed when you choose Database Fields.
Tip
In theory, you move the insertion point to where you want a merge field to appear, click More items, select the field, and click Insert. Dismiss the dialog box and repeat this series of actions for each merge field. In practice however, if you know which fields you want to insert, go ahead and insert them all at once, and then cut and paste them where you want them to go.
Use a combination of text and merge fields to write the data document, inserting merge fields where you want database fields to appear. When you’re done, click Step 5: Preview Your Letter at the bottom of the Mail Merge task pane.
Step 5: Preview Your Letter
In Step 5, shown in Figure 10-29, use the controls shown to move from record to record in your database. Note that the << and >> tools correspond to the Previous and Next button in the Preview Results group in the Mailings tab. There’s no reason you can’t use the far more flexible and useful tools in the ribbon.
Figure 10-29. Use Steps 5 and 6 to preview the data document and complete the merge.

Notice that the Find a Recipient and Edit Recipient list perform identical actions, respectively, as the Find Recipient and Edit Recipient List ribbon tools discussed earlier in this chapter. About the only useful tool in this set is the Exclude This Recipient button, which is the equivalent of choosing Edit Recipient List from the Ribbon and removing the check next to the currently selected record.
Step 6: Complete the Merge
The contents of the Step 6 panel vary depending on the document type. As shown in Figure 10-29, when the document type is a letter, the options are to send the merged results to the printer or to send them to “individual letters.” Actually, that’s not at all what the option does. Instead, it sends all of the merged letter results to a single new document, in which the individual letters are separated by section breaks.