
Feedback Loops
One thing Nuendo is not capable of doing is routing an instantaneous feedback loop inside the mixer. Delay compensation of this nature is not physically possible due to the nature of digital processing. If you try to route channels in such a fashion as to create a feedback loop, Nuendo will simply gray out destinations that result in this occurring.
However, using external hardware, you can create a feedback loop with some amount of inherent delay. Since one of the primary uses of a feedback loop is in delay processing, this is not necessarily a problem.
Many delay plug-ins (including those from Steinberg) have feedback built in to their processing. Some, such as ModMachine, even allow you to adjust the character of the feedback signal. (See Figure 14.18.)
Figure 14.18 The ModMachine delay plug-in with adjustable filters and drive control on the feedback circuit.

While ModMachine and similar plug-ins are wonderful sounding, creating your own hardware feedback loop opens up possibilities that no single plug-in can offer. Here’s how to create a hardware feedback loop in Nuendo. This example will be for a feedback loop that uses a delay line as the effect. This can be done with any type of effect plug-in for all sorts of wild results:
1. Create a mono VST Output bus named Feedback Send or something similar.
2. Connect this bus to either a digital or analog output of your audio interface. (See Figure 14.19.)
Figure 14.19 Mono VST Output for feedback send.

3. Physically patch that hardware output back into a hardware input, whether digital or analog. This is the hardware part of the loop. You must create a physical loopback for the audio since Nuendo won’t allow that sort of routing. In this case, I’ve connected the output Analog 8 to the input Analog 8 of the FireStudio.
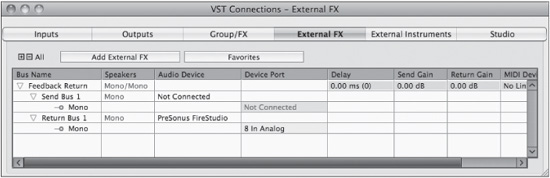
4. Create a mono external effect. This is where we trick Nuendo into giving us a live input back into the mixer. You could name this Feedback Return or something similar. (See Figure 14.20.)
Figure 14.20 Creating a mono external effect.

5. Do not connect the send of the External FX to any device port. Connect the return of the External insert to the hardware input you patched in step 3. (See Figure 14.21.)
6. Add an FX channel with a delay plug-in such as the stock Stereo Delay. Set the delay time fairly long just to get a feel for how this works, 300–600 ms. Set the mix to 100% wet or effect.
Figure 14.21 External FX for creating a hardware feedback loop.
Note This could also be a mono delay if you wish. The feedback loop will work with either mono or stereo FX. It is also possible to create a stereo feedback loop using two hardware channels. The steps would be the same.
7. While the FX channel is routed directly to the Main Mix, create a send routed to the VST Output Feedback Send. Set the level at unity (0 dB). (See Figure 14.22.)
Figure 14.22 FX channel with a mono delay and a send to the Feedback Send output.

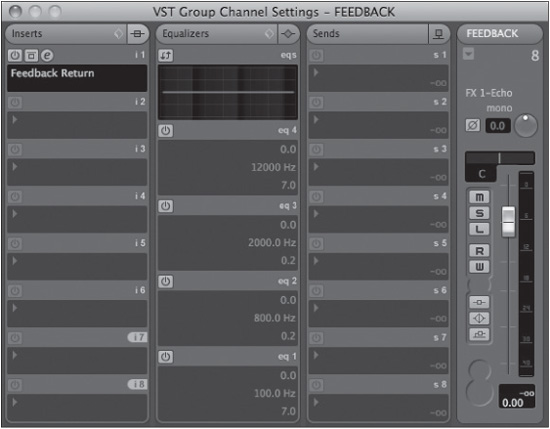
8. Create a mono group channel track. This will be the controlling channel for feedback. This could be named Feedback Control or a similar name.
9. Insert the External FX Feedback Return on the first insert of the group channel. This allows the feedback signal back into the Nuendo mixer. It will be delayed from the rest of the signals in Nuendo, but for a delay feedback line, this should not be a problem.
10. Route the output of this group channel to the FX channel that has the delay—FX 1-Echo in this example. Now the loop has been created. Depending on the gain structure, you might begin to develop feedback as soon as this routing is complete. If so, turn down this group channel to stop the feedback from growing. (See Figure 14.23.)
Figure 14.23 The feedback channel is ready.
11. Insert other plug-ins such as compressors, flangers, EQs…anything interesting that you think might work in a feedback loop. Just simple EQ on the feedback chain can create dramatic results. Compressors keep the feedback very dense. Experiment here to find new sounds. (See Figure 14.24.)
12. Use automation to change the feedback amount over time, turning it up when you wish to hear longer echoes and down when you want the echoes to stop.
Simply turning up the feedback control channel can create an infinite repeat of the delay time. When you add EQ, compression, and other processing, the feedback signal takes on a different dimension, pulsing and resonating as the loop feeds back upon itself. When you automate the fader level of this channel, you can create dynamic effects not possible with the conventional routing that Nuendo provides by itself.
