
Read and Write
The most basic functions available in the automation system are the Read and Write status of channels in the mixer. Automation can be used with virtually every parameter within the VST Mixer (with some exceptions for third-party plug-ins). The way to do this is to put a channel in Write status by pressing the Write button found in the mixer, channel settings, inspector, or plugin GUI. Pressing Write in any of those locations places the entire channel into Write mode. (See Figure 15.1.)
When you enable Write on any channel, Nuendo automatically enables Read on that channel so that any automation that you write can then be read back on the next pass. You cannot have a track in Write mode without it also being in Read mode.
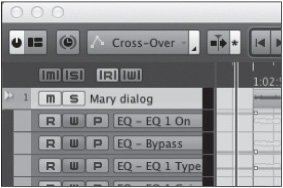
Once automation has been written, you may turn off Write mode to prevent any alteration or addition to the automation data. This can be done on a per channel basis or with the use of the global Read and Write buttons found at the top of the track list, in the mixer, or in the Channel Settings window. Pressing the global Read button will turn Read off for all channels in the project. Pressing it again will enable Read on all channels, regardless of whether they have any automation data present.
Figure 15.1 Channel Write buttons.

Pressing the global Write button will turn Write off for any channel that is in Write mode. Pressing it again will put every channel in Write mode regardless of whether it has data present or not.
Caution The global Write button can be dangerous if you are only writing automation data for specific channels. Be very careful using it because you can inadvertently create a great amount of automation without realizing it. It is safer to attend to individual channels for automation, especially in complex projects with many channels in the mixer. (See Figure 15.2.)
Figure 15.2 The global Read and Write buttons in the track list.
Global Automation Read and Write Control
Using the Automation Panel, you can control the types of data that are either written or read back by Nuendo. For example, if you want to automate only the fader levels in a project, you can disable Write for everything except Volume. That way you can adjust EQs, sends, and plugins on write-enabled channels without writing automation data for those types. (See Figure 15.3.)
Figure 15.3 The Automation Panel defeating some automation parameters.

As another example, I do not use mute automation as a rule, preferring to edit the audio events instead with the Mute tool. In order to prevent any inadvertent mute automation from affecting a complex project, the suspend mute read can be activated. Any mute automation within the project is ignored for all channels.
Recovering from Accidental Automation Writing
Being able to suspend certain types of data from being written helps you avoid the situation of accidental automation writing common in older versions of Cubase and Nuendo. The scenario goes like this: You place a channel in Write mode. You grab the fader and automate some levels. During playback, you notice an EQ issue and start adjusting the EQ controls. This inadvertently writes a whole mess of automation when all you were trying to do was make a static EQ change.
Not only do you have to remove that automation, but you also have to figure out how to get the setting you desired in the first place. Here’s a quick way to get back to the place you were, with the right settings on the EQ. Let’s re-create the situation:
1. Create an audio track with an audio event.
2. Put the channel in automation Write mode.
3. Start playback and adjust the fader.
4. Open the Automation Panel from the Project menu or project window’s toolbar.
5. Press the Show Used button on the Automation Panel to see the volume automation line. (See Figure 15.4.)
Figure 15.4 Volume automation.

6. Play back the event and volume automation.
7. Start adjusting the EQ controls during playback, enabling bands and making adjustments.
8. Press Show Used again on the Automation Panel. See how many automation lanes were created. There could be many. (See Figure 15.5.)
9. Move the cursor to a position where the EQ was set to the desired settings. This could be toward the end where the setting was finally reached. (See Figure 15.6.)
10. Shift+select all the automation lanes for the EQ. Leave the volume lane alone.
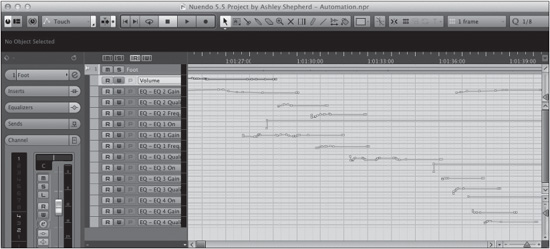
Figure 15.6 Cursor placed where the desired setting was reached.

11. From the Project menu, choose Remove Selected Tracks. Those automation lanes will disappear, and the EQ will remain at its last setting. (See Figure 15.7.)
Figure 15.7 EQ setting remains after automation tracks are removed.

12. Proceed with caution so as to avoid the same problem. Suspend all automation types that you are not dealing with at the moment. They can be re-enabled later as you need them.