
The Sample Editor
The sample editor is used to isolate single audio files for editing and processing. Think of it as a mini project window for one audio file only. But before we can discuss the sample editor, we must explore how Nuendo refers to audio files and processed audio files.
The Audio File, Clip, and Event Relationship
Nuendo uses a special method of addressing audio files on the disk that allows you to endlessly process, edit, and manipulate them without altering the original audio file at all through the use of audio clips. The relationship between the audio files and audio clips can be confusing because usually they are identical and only vary once we begin to process the audio files.
Audio Clips
An audio clip is a container for one or more audio files related to each other in that they are all derived from the same original audio file. Everything in a clip is derived from one single audio file on disk. Portions of that file may have been processed in one way or another, and those processed portions will be contained in the clip. This appears seamless to the user, as if there is only one audio file in the sample editor.
For example, let’s say you record a vocalist and during the take, she pops the mic on the word please creating unwanted low-frequency noise (plosives are caused by air bursts hitting the microphone diaphragm). In order to correct this, you want to process just that syllable using a highpass filter to remove the pop from the recording.
To begin with, the original audio file is contained in a clip. When you process just that one syllable, the new processed audio is written to disk in another audio file. Inside the clip, this new audio file is placed at the same location as the original pop sound. The clip plays the original audio file until it reaches the point where the processing starts, switches to the newly processed audio file, and then returns to the original after that section.
To you, this is invisible. You do not see any indication that this has occurred. It still appears as if you have destructively altered the original audio file by processing that one section. However, this is not the case. The clip container keeps track of any and all the various changes you make to an audio file so that, at any point in time, you can revert all the way back to the original unprocessed file because it has remained on the disk, untouched.
Note Even when the entire audio file is subject to processing, the clip keeps references to both the original and newly processed files. The clip may only play the fully processed version, but if you should decide to revert back to the original, the clip can easily do so as the original file is untouched.
Think about this for a second. You could process a file in various ways, perhaps 50 or 60 different times, and still be able to return to the untouched original at any time. It is even possible to remove intermediate processing from the clip while retaining all other processes (with certain limitations, including time-stretching and non-linear processes). This is unprecedented flexibility, allowing you to try out any editing or processing steps without fear of altering the original sound file. Nuendo keeps track of all of this in the offline process history discussed in detail in Part III, “Editing.”
Audio Events
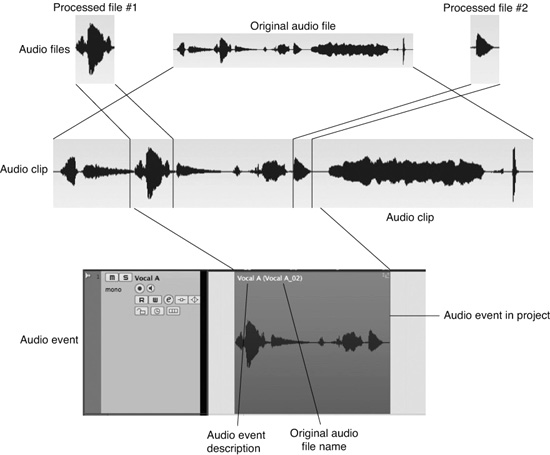
An audio event is some portion or all of an audio clip that is played back as part of the project. The chunks of audio you see in the project window are all events. The audio file on disk is part of an audio clip, which is then used to create an audio event in the project window. Figure 4.15 illustrates this by showing how three audio files are used to make one audio clip, which then can be used to create an audio event in the project.
Figure 4.15 Audio files, clips, and events.
Pro Tools User Tip In Pro Tools, this kind of processing (offline) is known as Audiosuite processing. The difference between the two is mainly in how files are handled. In Pro Tools, each processing step creates a new audio file that is used directly in the session as a region. In Nuendo, processed audio files are merely referenced by the clip, which is then used in the project as an event. This difference allows for Nuendo to have the offline process history with complete historical undo functionality for each processing step performed to audio files.
Sample Editor Layout
The sample editor could really be called the Clip Editor for all intents and purposes. It is the tool that is used to edit the audio clip, process various parts of the audio file, and even define the boundaries of the audio event. (See Figure 4.16.)
Figure 4.16 The sample editor for the event in Figure 4.15.
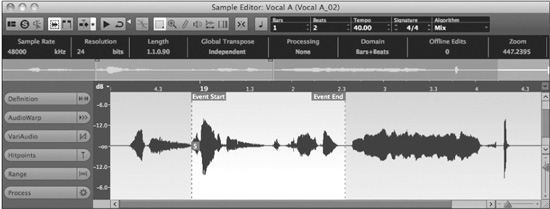
The layout of the sample editor is similar to the project window with several tabs on the left side; overview, info, and tools on top; and the waveform display in the middle. The sample editor can only display one audio clip at a time.
Note You can have multiple sample editors open at the same time, allowing you to edit more than one clip at a time.
Regions
Audio clips may also contain regions, which are basically defined portions of the clip. These regions are defined and then contained within the sample editor and can be used to create events, mark certain areas for processing, or to simply note things within a clip.
For example, loop CDs (audio) often contain a complete drum loop and then component parts such as kick, snare, hats, and crashes all within one ID marker on the CD. After importing tracks from such a CD, you can use the sample editor to define the drum loop and individual sounds as regions within the clip. These regions can then be dragged into the project window to create events that are prepared and ready to use.
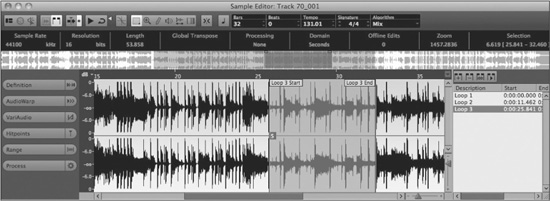
In order to access regions, you must set the sample editor layout to display the region list. Once open, the region tools are available at the top of the list. Click the Add Region button (+) to create a region from the selection made in the sample editor. Figure 4.17 shows the sample editor with three loop regions defined for this clip. These regions can be used later to create events in the project window.
Figure 4.17 Region list and tools.
The second method of creating regions involves the Cycle Record mode. When you use this mode described in Part II, “Recording,” each recorded pass during a cycle record will automatically create a region in the resulting clip. This facilitates easier editing of takes afterward.
Sample Editor Inspector Tabs
Down the left side of the sample editor are the tabs that give you access to many of the processing possibilities. I will go through a brief description of each tab as an overview in this section. The specific uses and details will be covered in Part III, “Editing.”
Definition
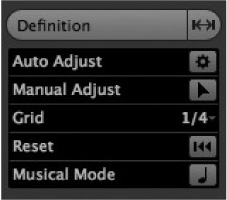
The Definition tab, shown in Figure 4.18, provides tools to edit the musical time aspects of an audio file. For example, drum loops can have relevant musical time intervals defined so that they may be matched to the tempo of the project.
AudioWarp
Audio warping is time stretching that is used to actually do the tempo matching of an audio clip. The tools in this tab, shown in Figure 4.19, determine how time stretching is applied to the clip. AudioWarp and the Definition tabs work together.

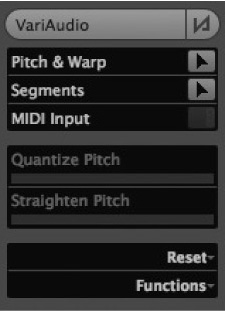
VariAudio
This powerful set of tools gives you pitch and envelope control over audio clips. VariAudio functions similar to Celemony’s Melodyne software. The pitch of each note can be modified in order to tune vocals, for example. You may also change the length of individual notes and control the transition from one note to the next. (See Figure 4.20.)
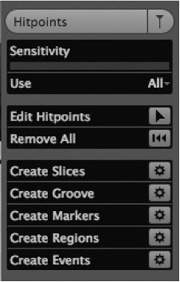
Hitpoints
The Hitpoints tab, shown in Figure 4.21, is related to audio warping in that it allows you to detect and edit percussive and transient sections in an audio clip. Once these sections have been determined, you can do such things as reorder the sections, process individual sections, and apply time stretching in order to match tempos similar to the Audio Warp features.
Range
The Range tab, shown in Figure 4.22, provides a display for the currently selected range in the sample editor. There are also two menus for zooming and selecting. You can also manually enter values for start, end, and length to create a selection.

Process
The Process tab, shown in Figure 4.23, gives you access to the processing history of a clip, plus functions such as flattening of any real-time processes (time-stretching, pitch shifting/tuning) into a new audio file in order to conserve CPU resources.
