
The Crossfade Dialog Box
To start, the Crossfade dialog box offers a wide variety of tweaks to the crossfade shape and placement. (See Figure 10.1.) Here’s where you can tweak a crossfade to your heart’s content.
Figure 10.1 The Crossfade dialog box.

The Crossfade dialog box is a single window that can be used to modify crossfades. You can modify one at a time or many together at once. The way to access this dialog box is to select one or more events that have crossfades at either the start or the end of the event and choose Open Fade Editor(s) from the Audio menu.
Note Before you can access the fade editor, a crossfade must already be present on the selected event(s). In order to quickly create a crossfade for editing, select one or more events and choose Crossfade from the Audio menu or press the default key command X. Note that if two adjacent events are selected, a crossfade will be created between them. If a single event is selected, a crossfade will be created between it and any adjacent event.
Caution Events separated by less than 100 ms will have crossfades created between them when using the Crossfade command. This assumes that the underlying audio clips contain enough data for a crossfade to exist. If a crossfade cannot be created between events, you will get a warning message to that effect.
Crossfade Selection
Several rules apply when selecting events as to which crossfades will be affected by changes made in the Crossfade dialog box.
![]() Events with Crossfades at the Start Only: If the selected event has a crossfade at the start but not at the end of the event, that crossfade will be edited in the dialog box.
Events with Crossfades at the Start Only: If the selected event has a crossfade at the start but not at the end of the event, that crossfade will be edited in the dialog box.
![]() Events with Two Crossfades: If one event is selected that has crossfades at both the start and end of the event, only the ending crossfade will be opened and adjusted by the dialog box.
Events with Two Crossfades: If one event is selected that has crossfades at both the start and end of the event, only the ending crossfade will be opened and adjusted by the dialog box.
![]() Events with Crossfades at the End Only: If the selected event has one crossfade at the end only, that crossfade will be edited by the dialog box.
Events with Crossfades at the End Only: If the selected event has one crossfade at the end only, that crossfade will be edited by the dialog box.
![]() Multiple Events: If multiple events are selected, crossfades will be edited according to the rules above regardless of where each event is located.
Multiple Events: If multiple events are selected, crossfades will be edited according to the rules above regardless of where each event is located.
If multiple events are selected in a row (contiguously on a single track), all the crossfades will be edited at once. (See Figure 10.2.)
Figure 10.2 Contiguous events crossfade editing.

Events can be selected across multiple tracks and edited at once. (See Figure 10.3.)
Figure 10.3 Events across multiple tracks crossfade editing.

Even completely noncontiguous events on different tracks can have all their crossfades edited at once. The rules above always apply to determine which crossfades will be edited no matter where each event is located. (See Figure 10.4.)
Figure 10.4 Noncontiguous event crossfade editing.

Everything you do in the Crossfade dialog box will affect all crossfades selected according to these rules. Changes made to crossfades are absolute, not relative, so each selected crossfade will become identical once it is altered using the dialog box.
Select Crossfade Buttons
The Select Crossfade buttons found in the lower-right corner of the dialog box can be used to select crossfades on one track at a time moving contiguously up or down the timeline. This lets you tab through all the crossfades on a track without leaving the Crossfade dialog box. If the Project selection follows checkbox is active, the current selection will be reflected in the project window.
The Crossfade Sliders
There are three sliders for each side of the crossfade. When Symmetric Fades is checked, the Length and Overlap sliders are connected and work together. The volume sliders are always independent.
![]() Length: Moving the Length slider will increase the length of the fade in or fade out. If symmetric fades is active, both length sliders move together to keep the fade in and fade out the same.
Length: Moving the Length slider will increase the length of the fade in or fade out. If symmetric fades is active, both length sliders move together to keep the fade in and fade out the same.
![]() Overlap: The Overlap slider, shown in Figure 10.5, determines where the fade in or fade out occurs relative to the edit point or where the two events meet. One-hundred percent overlap means that the fade portion will occur completely outside the boundary of the event. Zero percent overlap has the fade occur entirely within the event boundaries. When symmetric fades is active, these controls are inversely linked between fade in and fade out. Their values added together must always equal 100 percent.
Overlap: The Overlap slider, shown in Figure 10.5, determines where the fade in or fade out occurs relative to the edit point or where the two events meet. One-hundred percent overlap means that the fade portion will occur completely outside the boundary of the event. Zero percent overlap has the fade occur entirely within the event boundaries. When symmetric fades is active, these controls are inversely linked between fade in and fade out. Their values added together must always equal 100 percent.
![]() Volume: This slider is simply a duplicate control for the event volume handle. It offers a handy way to adjust the volume of an event from within the Crossfade dialog box to facilitate quicker editing because it might be necessary to adjust the level of either event to create a smooth transition.
Volume: This slider is simply a duplicate control for the event volume handle. It offers a handy way to adjust the volume of an event from within the Crossfade dialog box to facilitate quicker editing because it might be necessary to adjust the level of either event to create a smooth transition.
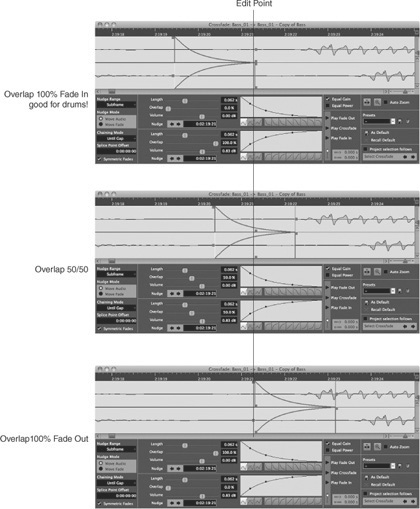
The overlap feature is very helpful when editing percussive material such as drums. Often drums are edited right on a transient point in the waveform. Placing a crossfade directly on a transient can cause distortion of the peak signal and loss of punch in the case of drums. (See Figure 10.6.)
The overlap feature can be used to move the crossfade ahead of the transient, thereby allowing quick crossfade creation without fear of smearing the transient. I set my default crossfade to 100 percent overlap on the fade in to prevent this type of transient distortion while still allowing me to place the edit point precisely on the transient. (See Figure 10.7.)
By keeping the crossfade to the left of the edit point, you are not in danger of softening the transient with a crossfade. With its ability to edit multiple crossfades at once, the Crossfade dialog box can fix these problems if they already exist.
Note The default crossfade that I use maintains the 100 percent overlap on the fade in and a short duration of 5 ms. The fade shape is equal gain with spline interpolation.
Figure 10.5 Overlap slider in action.
Crossfade Shape
The shape of the crossfade is freely adjustable although several useful shapes are provided and should be familiar from the event fade editors described in Part III, “Editing.” All the same choices are available here except that they are duplicated for both the fade in and fade out.
Figure 10.6 Crossfade distorting transient, 50/50 overlap.
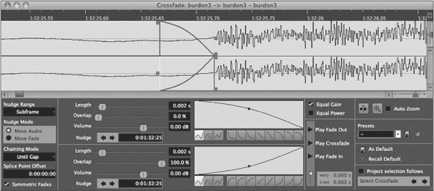
Figure 10.7 Crossfade with 100 percent overlap on fade in.

When symmetric fades is active, choosing one shape for either the fade in or the fade out will cause the inverse shape to be chosen automatically for the other fade. The same is true for the three choices of curve interpolation.
Adjusting the individual curve points in the display is also inversely linked to achieve symmetric fades. (See Figure 10.8.)
If symmetric fades is unchecked, you may adjust each fade independently for a more customized crossfade.
Figure 10.8 Adjusting curve points of a symmetric crossfade.

Nudging
The Crossfade dialog box gives you some nudging options for fine-tuning the placement of the crossfade or the position of the audio around the crossfade. The Nudging mode can either move the audio or move the fade.
When you’re moving the fade, the Symmetric Fade option comes into play so that both the fade in and fade out will be moved together if it is active. Otherwise, moving each fade independently is possible.
When you’re moving audio, the Chaining mode has an effect. Three settings can be accessed from the Chaining mode’s pop-up menu. (See Figure 10.9.)
Figure 10.9 Chaining mode pop-up menu.

![]() Until End: If the Chaining mode is set to Until End, any nudging of the audio will result in a rippling of that nudge to every audio event on that track from the crossfade point until the end of the project timeline.
Until End: If the Chaining mode is set to Until End, any nudging of the audio will result in a rippling of that nudge to every audio event on that track from the crossfade point until the end of the project timeline.
![]() Until Gap: If chaining is set to Until Gap, the rippling effect of a nudge will move all contiguous audio events that come after the edited event. Once a gap between events is reached, the nudge will no longer have an effect.
Until Gap: If chaining is set to Until Gap, the rippling effect of a nudge will move all contiguous audio events that come after the edited event. Once a gap between events is reached, the nudge will no longer have an effect.
![]() None: When chaining is set to None, no rippling effect will occur. Only the audio event that is being nudged will be altered.
None: When chaining is set to None, no rippling effect will occur. Only the audio event that is being nudged will be altered.
Splice Point Offset
The splice point offset only works for asymmetrical fades. Similar to the overlap setting, the splice point between two events can be offset from each other. This offset can only be as positive as the length of the fade. Otherwise, the two events would no longer overlap or create a cross-fade. However, this value can be negative to a greater degree, allowing the two audio events to overlap a great deal more without crossfading.