
Changing Values in a Form
You can add, change, and delete data within a table by using a form. Table 35-4 summarizes these techniques.
| Editing Technique | Keystrokes |
|---|---|
| Move insertion point within a control | Press the right-arrow (→) and left-arrow (←) keys |
| Insert a value within a control | Select the insertion point and type new data |
| Select the entire text in a control | Press F2 |
| Replace an existing value with a new value | Select the entire field and type a new value |
| Replace value with value of preceding field | Press Ctrl+’ (single quotation mark) |
| Replace current value with default value | Press Ctrl+Alt+Spacebar |
| Insert current date into a control | Press Ctrl+; (semicolon) |
| Insert current time into a control | Press Ctrl+: (colon) |
| Insert a line break in a Text or Memo control | Press Ctrl+Enter |
| Insert new record | Press Ctrl++ (plus sign) |
| Delete current record | Press Ctrl+- (minus sign) |
| Save current record | Press Shift+Enter or move to another record |
| Toggle values in a checkbox or option button | Spacebar |
| Undo a change to the current control | Press Esc or click the Undo button |
| Undo a change to the current record | Press Esc or click the Undo button a second time after you Undo the current control |
Controls that you can’t edit
Some controls can’t be edited, such as:
Controls displaying AutoNumber fields: Access maintains AutoNumber fields automatically, calculating the values as you create each new record.
Calculated controls: Access uses calculated controls in forms or queries; these values are not actually stored in your table.
Locked or disabled fields: You can set certain properties to prevent editing for specific controls.
Controls in multiuser locked records: If another user locks the record, you can’t edit any controls in that record.
Working with pictures and OLE objects
OLE (Object Linking and Embedding) objects are objects not part of an Access database. These commonly include pictures but an OLE field can also contain links to objects such as Word documents, Excel spreadsheets, and audio files such as .mp3, .wav, or .wmv files. You can also include video files such as .mpg or .avi files.
In Datasheet View, you can’t view a picture or any OLE object without accessing the OLE server (such as Word, Excel, or the Microsoft Media Player). In Form View, however, you can size the OLE control area to be large enough to display a picture, business graph, or any visual OLE object. You can also size text-box controls on forms so that you can see the data within the field—you don’t have to zoom in on the value, as you do with a datasheet field.
Any object supported by an OLE server can be stored in an Access OLE field. OLE objects are entered into a form so that you can see, hear, or use the value. As with a datasheet, you have two ways to enter OLE fields into a form:
Paste them in from the commands in the Home tab’s Clipboard group.
Right-click on the OLE field and click Insert Object from the pop-up menu to display the Insert Object dialog box, shown in Figure 35-25.
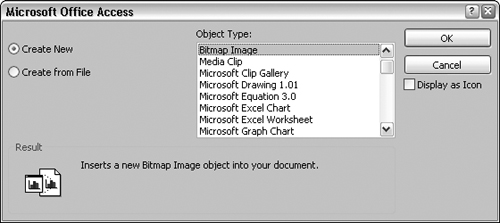
Use the Insert Object dialog box to add a new object to the OLE field, or add an object from an existing file. Choose the Create from File option button to add a picture or other OLE object from a file that already exists.
When displaying a picture in an OLE control, set the Size Mode property to control how the picture is displayed. The settings for this property are:
Clip: Keeps the picture at its original size and truncates any portion of the picture that doesn’t fit in the control.
Zoom: Fits the picture in the control and keeps it in its original proportion, which may result in extra white space.
Stretch: Sizes picture to fit exactly between the frame borders; this setting may distort the picture.
Memo field data entry
The Features field in the form shown in Figure 35-22 is a Memo data type. This type of field allows up to 65,535 bytes of text for each field. The first two sentences of data appear in the text box. When you click in this text box, a vertical scroll bar appears. Using this scrollbar, you can view the rest of the data in the control.
Better yet, you can resize the Memo control in the form’s Design View if you want to make it larger to see more data. You can also press Shift+F2 and display a Zoom dialog box, as shown in Figure 35-26, which lets you see more data.

Date field data entry
The AuctionEndDate field in the form shown in Figure 35-26 is a Date/Time data type. This field is formatted to accept and show date values. When you click in this text box, a Date Picker icon appears next to it, as shown in Figure 35-27. Click the Date Picker to display a calendar from which you can choose a date.
Figure 35-27. Using the Date Picker, new to Access 2007.

If the Date Picker doesn’t appear, switch to Design View and change the control’s Show Date Picker property to For dates. Set the Show Date Picker property to Never if you don’t want to use the Date Picker.
Using option groups
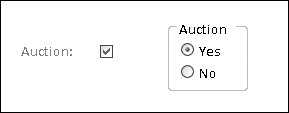
Option groups let you choose values from option buttons (sometimes called radio buttons). Option buttons let you select one value while deselecting the previous value. Option groups work best when you have a small number of choices to select from. Figure 35-28 shows an option group next to the Auction checkbox; both controls perform the same operation.
Figure 35-28. Using an option group to select a numeric value.
The easiest and most efficient way to create option groups is with the Option Group Wizard. You can use it to create option groups with multiple option buttons, toggle buttons, or checkboxes. When you’re through, all your control’s property settings are correctly set. This wizard greatly simplifies the process and enables you to create an option group quickly. To create an option group, switch to Design View and select the Option Group command from the Design tab’s Controls group. Make sure the Use Control Wizards command is selected.
Tip
Option groups can only be bound to numeric fields. When creating an option group for a Yes/No field (which is numeric), set the Yes value to –1 and the No value to 0.
Using combo boxes and list boxes
Access has two types of controls—list boxes and combo boxes—that enable you to show lists of data from which a user can select. The list box is always open and ready for selection, whereas the combo box has to be clicked to open the list for selection. Also the combo box enables you to enter a value that is not on the list and takes up less room on the form.
You may want to replace the Category text box with a combo box containing values from tblCategories, as shown in Figure 35-29. The easiest way to do this is with the Combo Box Wizard. This wizard walks you through the steps of creating a combo box that looks up values in another table. To create a combo box, switch to Design View and select the Combo Box command from the Design tab’s Controls group. Make sure the Use Control Wizards command is selected.

After you create the combo box, examine the Row Source Type, Row Source, Column Count, Column Heads, Column Widths, Bound Column, List Rows, and List Width properties. Once you become familiar with setting these properties, you can right-click a text box, select Change To ![]() Combo Box, and set the combo box’s properties manually.
Combo Box, and set the combo box’s properties manually.
Switching to Datasheet View
While in the form, you can display a Datasheet View of your data by using one of the following methods:
Click the Datasheet View command in the Home tab’s Views group.
Click the Datasheet View button in the View Shortcuts section at the bottom-right of the Access window.
Right-click on the form’s title bar—or any blank area of the form—and choose Datasheet View from the pop-up menu.
The datasheet is displayed with the cursor on the same field and record that it occupied in the form. If you move to another record and field and then redisplay the form, the form appears with the cursor on the field and with the record it last occupied in the datasheet.
To return to Form View—or any other view—select the desired view from the Views group, the View Shortcuts, or the pop-up menu.
Note that you can enter records in the Datasheet View by making the desired entries in cells, much as you would make entries in an Excel spreadsheet. You can use the techniques covered in Table 35-4 to add and edit field entries in the Datasheet View, as well as Form View.
Saving a record
Access saves each record when you move off it. Pressing Shift+Enter or selecting Save in the Home tab’s Records group saves a record without moving off it. Closing the form also saves a record.